
Seeding Succulents: Growing succulents from seeds is an incredibly rewarding process that takes patience but offers a magical experience.
Have you ever looked at your gorgeous succulent collection and wondered, “Could I grow these from tiny seeds?”
I had the same thought last spring, and let me tell you – it’s been quite the adventure!
While it takes more patience than propagating leaf cuttings, watching these desert jewels sprout from seeds is absolutely magical.
Seeding Succulents: Growing Succulents From Seeds
Why Start Succulents from Seeds?
Let’s be honest – most of us grab pre-grown succulents from the garden center.
But there is something special about starting from seeds.
You can:
- Access rare varieties not found in stores
- Grow dozens of plants for the cost of a single mature succulent
- Experience the entire journey from seed to spectacular
- Create your unique hybrid varieties
The Simple Truth About Succulent Seeds
Before we dive in, growing succulents from seeds isn’t a weekend project.
These desert darlings take their sweet time – we’re talking weeks for germination and months before you see those chubby leaves we all love.
But trust me, it’s worth the wait!
Time to Germination by Popular Variety:
| Succulent Type | Germination Time | Difficulty Level |
| Echeveria | 1-2 weeks | Easy |
| Sempervivum | 2-3 weeks | Moderate |
| Lithops | 3-4 weeks | Challenging |
| Crassula | 1-2 weeks | Easy |
| Sedum | 1-2 weeks | Easy |
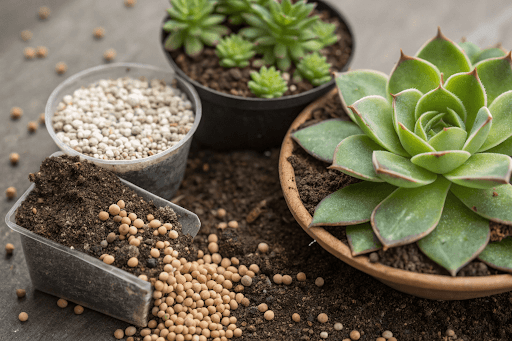
The Essential Supply List
According to succulent experts, here is what you will need for your succulent seeding adventure:
- Seeds: Choose fresh seeds from reputable suppliers
- Well-draining soil mix: I use 50% cactus mix and 50% perlite
- Small containers with drainage holes
- Clear plastic cover or plastic wrap
- Spray bottle
- Grow lights (optional but recommended)

Seeding Succulents: Growing Succulents From Seeds – The Step-by-Step Process
1. Seed Preparation
As recommended by Epic Gardening, some seeds benefit from a quick soak in warm water for 12-24 hours before planting.
This helps kick start germination and lets you identify viable seeds – they’ll sink to the bottom.
2. Soil Preparation
Fill your containers with pre-moistened soil mix, leaving about 1/2 inch at the top.
Press the soil down gently – we want it firm but not compacted.
Think of it as making a cozy bed for your seeds!
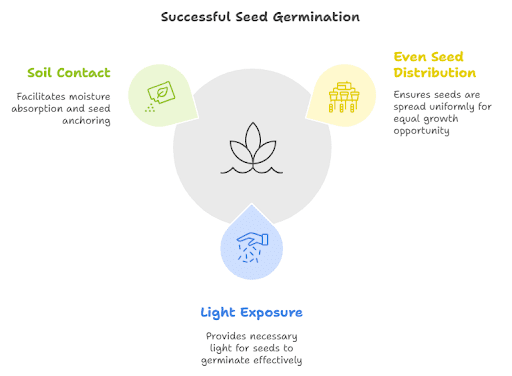
3. Planting the Seeds
Following proven methods, here’s where it gets fun (and a bit tricky – these seeds are tiny!):
- Sprinkle seeds evenly across the soil surface
- Don’t bury them – succulent seeds need light to germinate
- Press very gently to ensure good soil contact
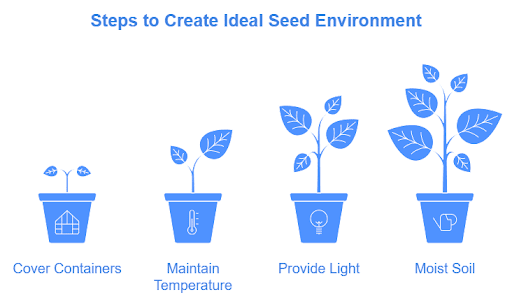
4. Creating the Perfect Environment
Your seeds need a warm, humid environment to sprout:
- Cover containers with clear plastic
- Maintain temperature between 70-80°F (21-27°C)
- Place under grow lights or in bright, indirect sunlight
- Keep soil consistently moist but not waterlogged
Common Questions Answered
How long until I see growth? Most succulent seeds germinate within 1-3 weeks, but some varieties might take longer.
My Lithops took nearly a month to show their tiny faces!
Do succulents reproduce on their own? Yes! In nature, succulents produce flowers that, when pollinated, develop seeds.
Some varieties also reproduce through offsets (pups) or fallen leaves.
Can you speed up succulent growth? While you can’t rush nature, you can optimize growth conditions:
- Provide proper lighting (12-14 hours daily)
- Maintain ideal temperature range
- Use appropriate fertilizer once seedlings establish
- Ensure good air circulation
How to Plant Succulent Seeds
Expert succulent growers emphasize that success starts with proper planting techniques.
Let me walk you through the comprehensive process I’ve refined through countless seed-starting adventures.
1. Container Preparation
Unlike mature succulents, seedlings need special consideration for their growing environment:
Choosing the Right Container
- Depth: 2-3 inches deep is ideal
Material Options:
- Plastic containers (maintain moisture better)
- Terra cotta (provides better airflow)
- Seed-starting trays with individual cells
Essential Features:
- Multiple drainage holes
- Clear dome cover option
- Wide enough for good air circulation
Sterilization Process
- Wash containers with mild soap and water
- Soak in 10% bleach solution for 10 minutes
- Rinse thoroughly with clean water
- Allow to air dry completely
- Handle with clean hands or gloves
Labeling System
Create detailed labels, including:
- Seed variety
- Planting date
- Source of seeds
- Expected germination time
- Special care notes
2. Soil Preparation Excellence
Perfect Soil Mix Recipe
Base Mix:
- 40% high-quality succulent/cactus soil
- 30% perlite
- 20% coarse sand
- 10% vermiculite
Alternative Mix for Higher Humidity Areas:
- 50% perlite
- 30% succulent soil
- 20% coarse sand
Soil Preparation Steps
Sterilization (Optional but Recommended):
- Spread soil mix on a baking sheet
- Heat in oven at 180°F for 30 minutes
- Allow to cool completely
Moisture Preparation:
- Gradually add water to the soil mix
- Aim for barely moist, not wet
- Test by squeezing – should barely hold together
Container Filling:
- Fill containers, leaving ½ inch at the top
- Tap the container gently to settle the soil
- Level surface with a straight edge
- Create micro-texture with fine mist
3. Advanced Seed Sowing Techniques
Pre-Sowing Treatment
Based on expert recommendations:
Seed Sorting:
- Use a fine mesh strainer to remove debris
- Examine seeds under magnification
- Remove any damaged seeds
Pre-Treatment Options:
- Cold stratification for desert species (1 week)
- Warm water soak (12-24 hours)
- Scarification for hard-coated seeds
Precision Sowing Methods
For Tiny Seeds:
- Mix with fine sand for even distribution
- Use the salt shaker method
- Create a DIY seed dispenser with paper crease
For Larger Seeds:
- Place individually with tweezers
- Space 1/4 inch apart
- Orient according to species requirements.
Surface Treatment
- Mist surface before sowing
- Don’t cover seeds with soil
- Press gently with a flat surface
- Apply a fine layer of sand (optional)
4. Initial Environment Setup
Light Management
Natural Light Option:
- East or north-facing window
- Filter direct sunlight
- Rotate containers daily
Artificial Light Setups
- LED grow lights 2-4 inches above the surface
- 14-16 hours daily
- Adjust height as seedlings grow
Temperature Control
Maintain optimal conditions:
- Day: 70-80°F (21-27°C)
- Night: No lower than 60°F (15°C)
- Use a heat mat if needed
- Monitor with a digital thermometer
Humidity Management
Create mini greenhouse effect:
Cover the container with:
- Clear plastic dome
- Plastic wrap with holes
- Clear plastic bag
Maintain humidity levels:
- 70-80% during germination
- Reduce gradually after sprouting
Monitor condensation:
- Wipe excess moisture
- Adjust ventilation as needed
5. Watering Protocol
Initial Watering
- Use the bottom watering method
- Alternatively, use a fine mist sprayer
- Maintain consistent moisture
- Never allow standing water
Ongoing Moisture Management
Create a schedule based on the environment:
Humid Climate:
- Mist once daily
- Allow slight drying between misting
Dry Climate:
- Mist twice daily
- Monitor moisture levels closely
Signs of Proper Moisture:
- The soil surface is slightly damp
- No algae growth
- Seeds remain in place
- There is slight condensation on the cover
Continuing Care for Succulent Seeds: A Month-by-Month Guide
Based on extensive research and personal experience, here’s a detailed care timeline:
First Month: The Critical Phase
Week 1-2: Germination Period
Daily Tasks:
- Check moisture levels twice daily
- Monitor temperature (maintain 70-80°F)
- Document germination progress
- Look for signs of mold/algae
Week 3-4: Early Growth
Environment Management:
- Maintain high humidity (70-80%)
- Provide 14-16 hours of light
- Ensure gentle air circulation
- Keep temperature stable
Common Challenges:
| Issue | Signs | Solution |
| Damping Off | Black stem base | Increase air flow |
| Low Germination | Few sprouts | Check seed viability |
| Algae Growth | Green surface | Reduce moisture |
| Leggy Growth | Stretched stems | Increase light |
Months 2-3: The Establishment Phase
Environmental Adjustments
Humidity Reduction:
- Week 5: Remove cover for 1 hour daily
- Week 6: Increase to 2 hours daily
- Week 7: Half day uncovered
- Week 8: Fully uncovered
Watering Changes:
- Switch to bottom watering
- Allow the top layer to dry slightly
- Water when soil lightens in color
- Maintain moisture at the root level
Fertilization Introduction:
- Start at quarter strength
- Use balanced fertilizer (10-10-10)
- Apply monthly
- Monitor for sensitivity
Growth Markers
Track seedling progress:
- First true leaves appearing
- Root system development
- Color intensification
- Leaf pair formation
Months 4-6: The Development Phase
Light Exposure
Gradual Sunlight Introduction:
- Morning sun: 1 hour
- Increase by 30 minutes weekly
- Monitor for stress signs
- Protect from the afternoon sun
Artificial Light Adjustment:
- Raise lights gradually
- Increase intensity if possible
- Maintain duration
- Watch for stretching
Watering Schedule Development
Create based on environment:
Humid Climate:
- Water every 5-7 days
- Monitor soil moisture
- Ensure good drainage
- Avoid overhead watering
Dry Climate:
- Water every 3-5 days
- Check moisture frequently
- Consider humidity trays
- Protect from drafts
When to Repot Succulent Seedlings
Identifying the Right Time
Physical Indicators
Leaf Development:
- 2-4 sets of true leaves
- Stable stem growth
- Healthy color
- Strong structure
Root System:
- Visible through drainage holes
- White, healthy appearance
- Filling current container
- Strong anchor in the soil
Timing Considerations
- Fast-Growing Species: 3-4 months
- Slow-Growing Species: 4-6 months
- Season Timing: Spring/Early Summer is ideal
- Growth Rate Indicators:
| Species | Repot Time | Signs |
| Echeveria | 3-4 months | Dense rosette |
| Sedum | 2-3 months | Trailing growth |
| Haworthia | 4-5 months | Pup formation |
| Lithops | 6-8 months | True leaf pairs |
The Repotting Process
Preparation
Materials Needed:
- Fresh succulent soil mix
- Clean containers
- Sterilized tools
- Plant markers
- Spray bottle
Container Selection:
- One size up from the current
- Proper drainage
- Appropriate material
- Adequate depth
Step-by-Step Process
Pre-Repotting Care:
- Water 2-3 days before
- Prepare new containers
- Mix fresh soil
- Gather tools
Removal Technique:
- Loosen soil edges
- Support plant base
- Lift gently
- Preserve roots
New Planting:
- Fill container 1/3
- Position seedling
- Add soil gradually
- Settle with gentle taps
Post-Repotting Care:
- Wait 5-7 days to water
- Keep in shade
- Monitor for Stress
- Resume normal care slowly
Seeding Succulents: Growing Succulents From Seeds (Types of Succulent Seeds)
Drawing from expert sources, let’s explore the diverse world of succulent seeds.
Beginner-Friendly Varieties
Echeveria Family
Growth Characteristics:
- Germination: 7-14 days
- First true leaves: 3-4 weeks
- Rosette formation: 2-3 months
Popular Species:
| Species | Special Features | Growth Rate | Light Needs |
| E. elegans | Powder blue color | Moderate | Bright indirect |
| E. pulidonis | Yellow flowers | Fast | Partial sun |
| E. peacockii | Blue-gray leaves | Moderate | Bright indirect |
Sedum Varieties
Growth Patterns:
- Germination: 5-10 days
- Spreading habit: 1-2 months
- Full development: 4-6 months
Recommended Species:
| Species | Characteristics | Success Rate | Special Notes |
| S. morganianum | Trailing habit | 80% | Great starter |
| S. rubrotinctum | Color changes | 85% | Stress tolerant |
| S. adolphii | Golden color | 75% | Heat resistant |
Intermediate Level Seeds
Haworthia Group
Growing Requirements:
- Germination temp: 68-75°F
- Light: Filtered bright
- Humidity: 60-70%
- Notable Species:
| Species | Germination Time | Difficulty | Key Features |
| H. fasciata | 14-21 days | Moderate | Striped patterns |
| H. retusa | 14-18 days | Moderate | Window leaves |
| H. cooperi | 16-20 days | Moderate | Transparent tips |
Growth Specifics:
- Germination: 2-4 weeks
- First true leaves: 1-2 months
- Mature size: 6-12 months
Advanced Level Seeds
Lithops (Living Stones)
Special Requirements:
- Precise moisture control
- Specific soil mix
- Careful light management
Growth Timeline:
- Month 1: Tiny seedlings
- Month 2-3: First true leaves
- Month 4-6: Color development
- Year 1: First splitting
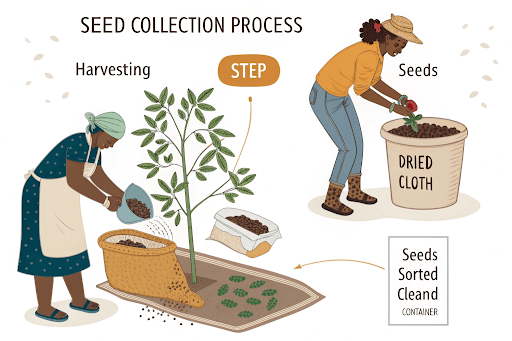
How to Collect Seeds from Seeding Succulents: Growing Succulents From Seeds
Following professional guidance, here’s a detailed approach to seed collection.
Flower Development Stages
Pre-Collection Phase
Flower Maturation Signs:
- Color changes to brown
- Petals becoming papery
- Seed pod swelling
- Natural splitting beginning
Timing Considerations:
- Season specific
- Weather conditions
- Plant health
- Pollination success
Collection Methods
Direct Collection:
- Materials Needed:
-
- Clean paper bags
- Small scissors
- Labels
- Collection containers
-
Process:
- Place bag around dying flower
- Secure loosely
- Check daily
- Collect fallen seeds
Pod Harvesting:
When to Harvest:
- Pod color change
- Slight splitting
- Dry texture
- Easy removal
Technique:
- Cut entire pod
- Place in a paper envelope
- Allow natural splitting
- Collect released seeds
Seed Processing and Storage
Cleaning Process
Initial Sorting:
- Remove plant debris
- Separate by size
- Check for viability
- Discard damaged seeds
Fine Cleaning:
- Use fine mesh sieves
- Gentle air movement
- Paper towel rolling
- Visual inspection
Storage Methods
Short-term Storage (Up to 6 months):
- Paper envelopes
- Room temperature
- Low humidity
- Dark location
Long-term Storage (6+ months):
Container Options:
- Glass vials
- Paper packets
- Seed storage envelopes
- Moisture-proof containers
Environment Control:
- Temperature: 40-50°F
- Humidity: 20-30%
- Light: None
- Air circulation: Minimal
Record Keeping System
Create detailed labels, including:
- Species name
- Collection date
- Parent plant details
- Storage conditions
- Expected viability period
Common Issues
| Problem | Likely Cause | Solution |
| No germination | Old/nonviable seeds | Use fresh seeds from reliable sources |
| Dampening off | Too much moisture | Improve air circulation, reduce watering |
| Leggy seedlings | Insufficient light | Move closer to light source |
| Slow growth | Poor nutrients | Begin gentle fertilization after 2-3 months |
The Journey Ahead
According to experienced growers, while it might take 6-12 months to get a plant that resembles what you would find in stores, the process is advantageous.
Each tiny sprout feels like a personal victory!
Care Timeline:
- Weeks 1-3: Keep covered and moist
- Weeks 4-8: Begin removing cover gradually
- Months 3-6: Start regular succulent care routine
- Months 6-12: Watch your babies grow!
Final Tips for Success on Seeding Succulents: Growing Succulents From Seeds
- Label everything! Trust me, you will forget what you planted where
- Take photos to track progress
- Be patient – good things come to those who wait
- Join online succulent communities for support and advice
Conclusion
Growing succulents from seeds is a rewarding journey that requires patience and attention to detail.
While it may take longer than propagating from cuttings, the sense of accomplishment is unparalleled.
By following the detailed steps outlined in this guide, you can successfully cultivate a diverse collection of succulents from tiny seeds.
Ready to start your succulent growing journey? Remember, every expert was once a beginner.
With some patience and care, you’ll soon have a collection of unique succulents that you grew from the very beginning!
Happy growing!
FAQs
Q: How long does it take for a succulent to grow from a seed?
Germination typically occurs within 1-3 weeks, depending on the variety. However, it takes 6-12 months for a plant to reach a size similar to what you’d find in stores.
Q: How do you reseed succulents?
To reseed succulents, collect seeds from dried flowers, prepare a well-draining soil mix, sprinkle seeds on the surface, maintain moisture with a transparent cover, and provide bright, indirect light until germination.
Q: What is the easiest succulent to grow from seed?
Echeveria, Sedum, and Crassula are among the easiest succulents to grow from seed, with relatively quick germination times of 1-2 weeks and straightforward care requirements.
Q: Should I soak succulent seeds before planting?
Yes, soaking succulent seeds in warm water for 12-24 hours before planting can help improve germination rates and help identify viable seeds (they sink to the bottom).
Q: Do succulents reproduce on their own?
Yes, succulents can reproduce naturally through seeds after flowering, and many species also reproduce through offsets (pups) or fallen leaves.
Q: How do you collect succulent seeds?
Wait for the flowers to completely dry on the plant, then carefully collect the dried flower heads in paper bags. Gently crush the dried flowers to release the seeds and store them in paper envelopes in a cool, dry place.
Q: Can you speed up succulent growth?
While you can’t drastically accelerate natural growth rates, you can optimize conditions through proper lighting, temperature control, appropriate fertilization, and good air circulation.
Q: How fast do succulents grow from seed?
Growth rates vary by species, but most succulent seeds germinate within 1-3 weeks. However, it typically takes 6-12 months for seedlings to develop into mature plants.