
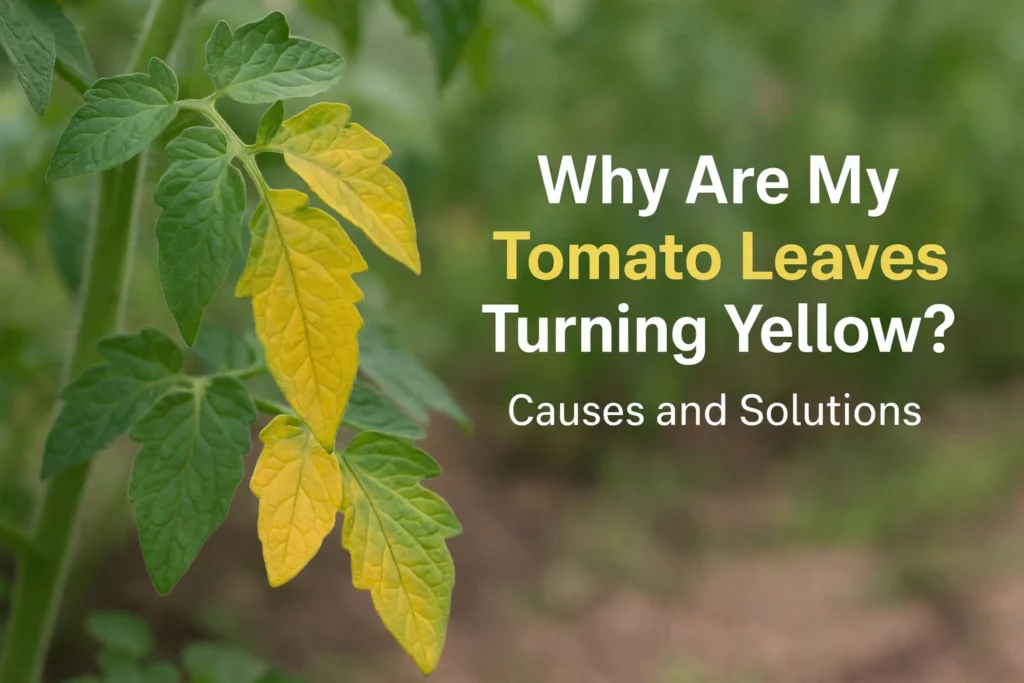
If you’ve been staring at your plant wondering, why are my tomato leaves turning yellow, you’re not alone.
It’s one of the most common issues gardeners face — and the good news is, it’s usually fixable.
Yellow leaves can signal overwatering, underwatering, nutrient deficiencies, poor drainage, or even normal aging of lower leaves.
Tomatoes are heavy feeders and a little dramatic when something’s off.
The key is identifying the pattern: Are the bottom leaves yellowing first?
Are they drooping or spotted? Once you pinpoint the cause, simple adjustments can get your plant back to healthy, green growth quickly.
Yellowing tomato leaves (chlorosis) is one of the most common problems faced by gardeners worldwide, from beginners to seasoned professionals.
It’s a symptom rather than a disease itself—a plant’s cry for help that can stem from numerous causes ranging from nutrient deficiencies and watering issues to pest infestations and environmental stressors.
Understanding why your tomato leaves are turning yellow is the first crucial step in nursing your plants back to health.
In this comprehensive guide, I’ll walk you through the various causes of yellowing tomato leaves, how to diagnose the specific issue affecting your plants, and most importantly, how to implement effective solutions to restore your tomato plants to their full glory.
Whether you’re growing tomatoes in a backyard garden, on a balcony, or in a commercial operation, this guide gives you everything you need to identify, treat, and prevent yellow leaves — and get back to harvesting great tomatoes.
Key Takeaways
- Multiple causes: Yellowing tomato leaves can result from nutrient deficiencies, watering issues, pests, diseases, or environmental stress—proper diagnosis is essential for effective treatment.
- Bottom-up vs. top-down yellowing: The pattern of yellowing provides important diagnostic clues—bottom-up typically indicates nutrient issues, while top-down often suggests disease problems.
- Soil health is fundamental: Many yellowing issues stem from poor soil conditions—regular soil testing and proper amendments can prevent numerous problems.
- Early intervention is crucial: The sooner you identify and address the cause of yellowing leaves, the better your chances of saving the plant and preserving your harvest.
- Prevention through proper care: Following best practices for tomato cultivation—appropriate watering, feeding, spacing, and monitoring—significantly reduces the risk of yellowing leaves.
Understanding Normal vs. Problematic Leaf Yellowing
Before diving into troubleshooting, it’s important to distinguish between normal leaf yellowing and problematic symptoms.
Not all yellowing indicates a serious issue.
Normal Aging Process
It’s perfectly natural for the oldest, lowest leaves on tomato plants to yellow and die as the plant matures.
This is part of the plant’s normal aging process and resource allocation strategy.
As tomato plants grow, they direct energy toward new growth and fruit production, sometimes at the expense of older foliage.
If you notice yellowing limited to a few bottom leaves while the rest of the plant looks healthy and vigorous, with strong stems and good fruit development, this is likely just normal senescence.
In such cases, you can simply remove these yellowed leaves to improve air circulation and plant appearance.
Signs of Problematic Yellowing
Problematic yellowing, on the other hand, exhibits distinct patterns that signal distress:
- Rapid progression: Yellowing that spreads quickly throughout the plant
- Unusual patterns: Yellowing between leaf veins, spotted yellowing, or yellowing with brown edges
- Widespread symptoms: Multiple plants showing similar symptoms simultaneously
- Accompanying issues: Yellowing accompanied by wilting, stunted growth, or poor fruit development
- Young leaf involvement: When newer leaves yellow before older ones (particularly concerning)
Warning Sign: If more than 10-15% of your plant’s leaves are turning yellow, or if the yellowing is accompanied by other symptoms like wilting, leaf drop, or stunted growth, your tomatoes are likely facing a specific problem that needs addressing.
Nutrient Deficiencies: The Most Common Culprits
Nutrient deficiencies are among the most frequent causes of yellowing tomato leaves.
Tomatoes are heavy feeders that require a balanced supply of macro and micronutrients to thrive.
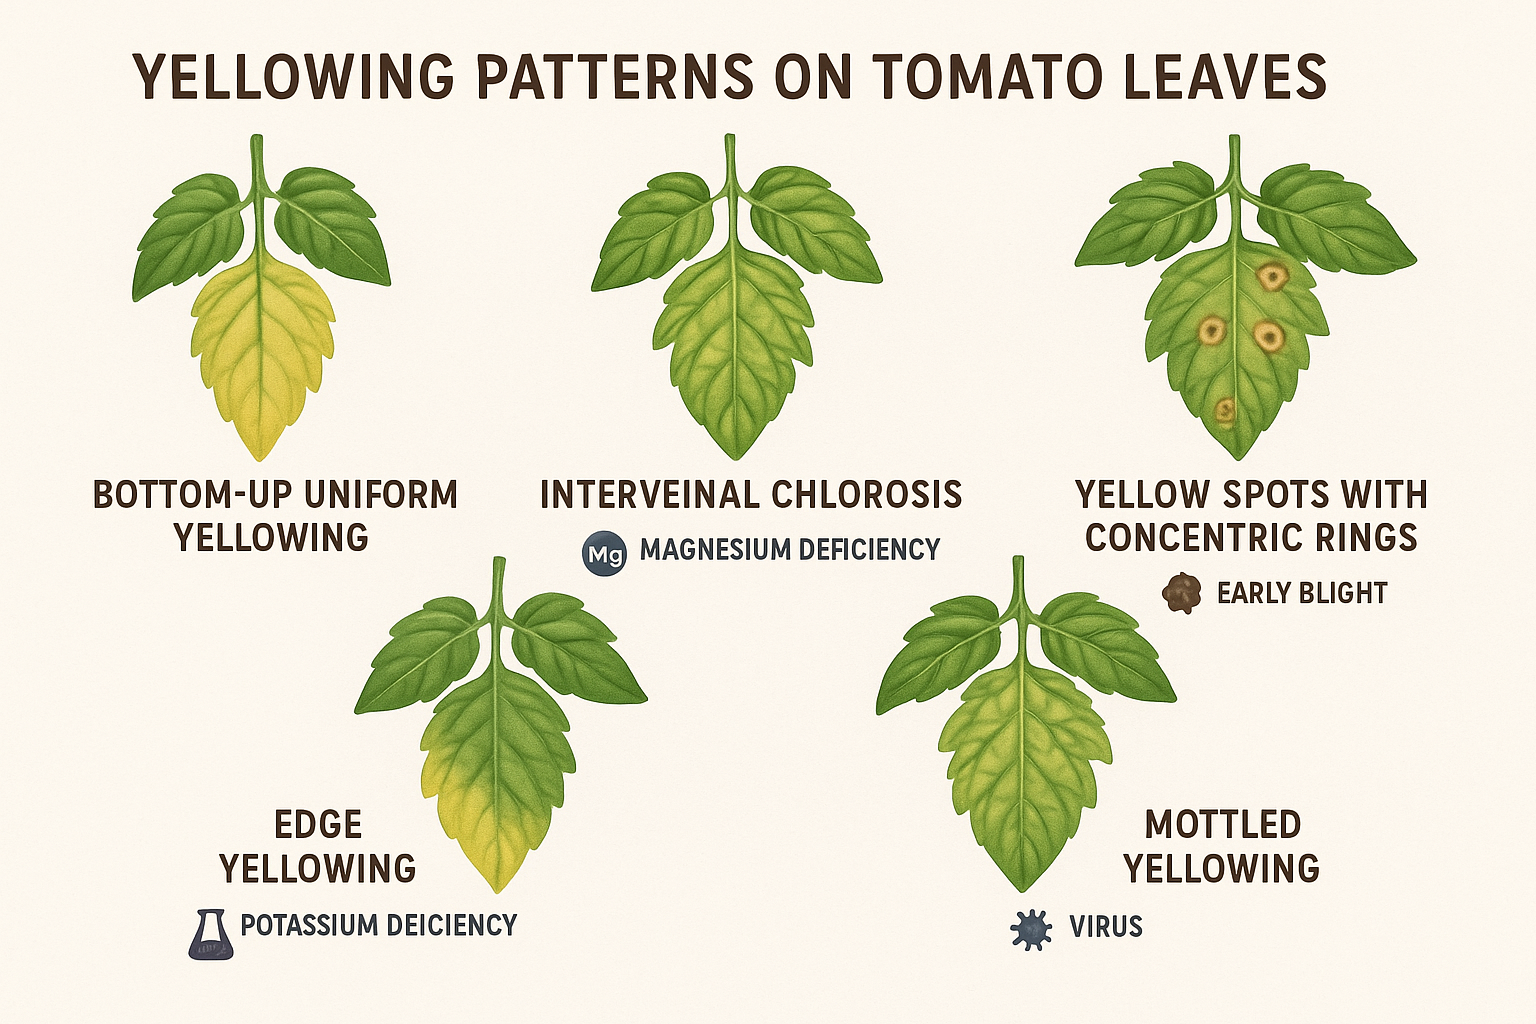
Each deficiency creates a distinctive yellowing pattern that can help with diagnosis.
Nitrogen Deficiency
Symptoms: Older, lower leaves turn pale green, then yellow, and eventually light brown.
The yellowing progresses up the plant as the deficiency worsens.
Cause: Nitrogen is highly mobile in plants. When supplies are insufficient, plants relocate nitrogen from older leaves to support new growth.
Solution:
- Apply a balanced organic fertilizer with higher nitrogen content
- Side-dress plants with compost or well-rotted manure
- Use fish emulsion or blood meal for a quick nitrogen boost
- Consider a foliar spray with fish emulsion for faster uptake
In my experience, nitrogen deficiency is particularly common in gardens where the soil hasn’t been amended with compost or in containers where nutrients get depleted quickly.
Last season, I noticed my container tomatoes developing yellow bottom leaves by mid-summer.
A weekly application of diluted fish emulsion resolved the issue within two weeks.
Magnesium Deficiency
Symptoms: Interveinal chlorosis (yellowing between leaf veins while veins remain green) on older leaves.
The yellowing often starts at leaf margins and progresses inward, sometimes with reddish-brown spots.
Cause: Magnesium is essential for chlorophyll production.
Deficiencies often occur in acidic, sandy soils or when plants receive excessive potassium.
Solution:
- Apply Epsom salts (magnesium sulfate) at 1-2 tablespoons per gallon of water as a soil drench
- Foliar spray with Epsom salt solution (1 tablespoon per gallon) for faster results
- Add dolomitic lime to raise pH if soil is acidic
- Use balanced fertilizers that include magnesium
Iron Deficiency
Symptoms: Younger leaves develop interveinal chlorosis, appearing yellow with a fine network of green veins.
In severe cases, leaves may become almost white and stunted.
Cause: Iron deficiency commonly occurs in alkaline soils (pH above 7.0) where iron becomes less available to plants, even if physically present in the soil.
Solution:
- Apply iron chelates or iron sulfate according to package directions
- Lower soil pH using elemental sulfur or acidic organic materials like pine needles
- Avoid overwatering, which can worsen iron deficiency
- Foliar spray with iron solution for temporary relief
Potassium Deficiency
Symptoms: Leaf edges turn yellow, then brown and appear scorched.
Older leaves show symptoms first, and fruits may ripen unevenly.
Cause: Potassium is crucial for fruit development and overall plant health. Deficiencies are common in light, sandy soils or during heavy fruiting.
Solution:
- Apply potassium-rich fertilizers like potassium sulfate
- Add wood ash (in moderation) to the soil
- Incorporate compost rich in banana peels
- Use a balanced tomato fertilizer with adequate potassium (the “K” in N-P-K)
Other Key Nutrient Deficiencies
| Nutrient | Symptoms | Solutions |
|---|---|---|
| Calcium | Blossom end rot, distorted leaf tips, stunted growth | Add lime or gypsum, ensure consistent watering, foliar spray with calcium solution |
| Phosphorus | Dark green leaves with purple tints, stunted growth | Bone meal application, balanced fertilizer with phosphorus, maintain soil pH 6.0-6.8 |
| Sulfur | General yellowing of newer leaves, similar to nitrogen deficiency but starting at the top | Apply gypsum, use fertilizers containing sulfur |
| Zinc | Interveinal chlorosis, abnormally small leaves, shortened internodes | Zinc sulfate application, balanced micronutrient spray |
| Manganese | Interveinal chlorosis with small brown spots, primarily on middle-aged leaves | Manganese sulfate application, adjust pH to 6.0-6.5 |
The Soil pH Factor
Soil pH dramatically influences nutrient availability to tomato plants.
Even when nutrients are physically present in the soil, they may be unavailable to plants if the pH is outside the optimal range.
Optimal pH Range for Tomatoes
Tomatoes prefer slightly acidic soil with a pH between 6.0 and 6.8. At this range, most essential nutrients are readily available for uptake by the plant roots.
How pH Affects Nutrient Availability
- Too alkaline (above 7.0): Iron, manganese, zinc, and phosphorus become less available, leading to deficiencies even in nutrient-rich soil
- Too acidic (below 5.5): Calcium and magnesium availability decreases, while aluminum and manganese can reach toxic levels
Testing and Adjusting Soil pH
I recommend testing your soil pH at least once every two years.
Inexpensive soil test kits are available at garden centers, or you can send samples to your local extension office for more comprehensive analysis.
To raise pH (make soil less acidic):
- Add garden lime (calcium carbonate)
- Use dolomitic lime (adds magnesium as well as calcium)
- Incorporate wood ash (use sparingly)
To lower pH (make soil less alkaline):
- Add elemental sulfur
- Incorporate pine needles, oak leaves, or peat moss
- Use acidifying fertilizers like ammonium sulfate
Tip: Always make pH adjustments gradually over time. Dramatic pH changes can stress plants and disrupt soil microbial life.
Apply amendments in fall for best results the following growing season.
Watering Issues: Too Much or Too Little
Improper watering is another major cause of yellowing tomato leaves.
Both overwatering and underwatering create stress that manifests as yellowing foliage, though the patterns differ slightly.
Overwatering Symptoms
- Yellowing throughout the plant, often starting with lower leaves
- Leaves may appear puffy or swollen before yellowing
- Soft, mushy stems near the soil line
- Slow growth despite adequate fertilization
- Soil remains constantly wet
- Potential development of fungal diseases
Overwatering is particularly problematic in heavy clay soils or containers with poor drainage.
The excess moisture displaces oxygen in the soil, essentially suffocating the roots and preventing nutrient uptake.
Underwatering Symptoms
- Yellowing and browning leaf edges
- Curling, crispy leaves
- Wilting during the day that may recover at night
- Blossom drop and poor fruit development
- Thin stems
- Dry soil that pulls away from the container edges
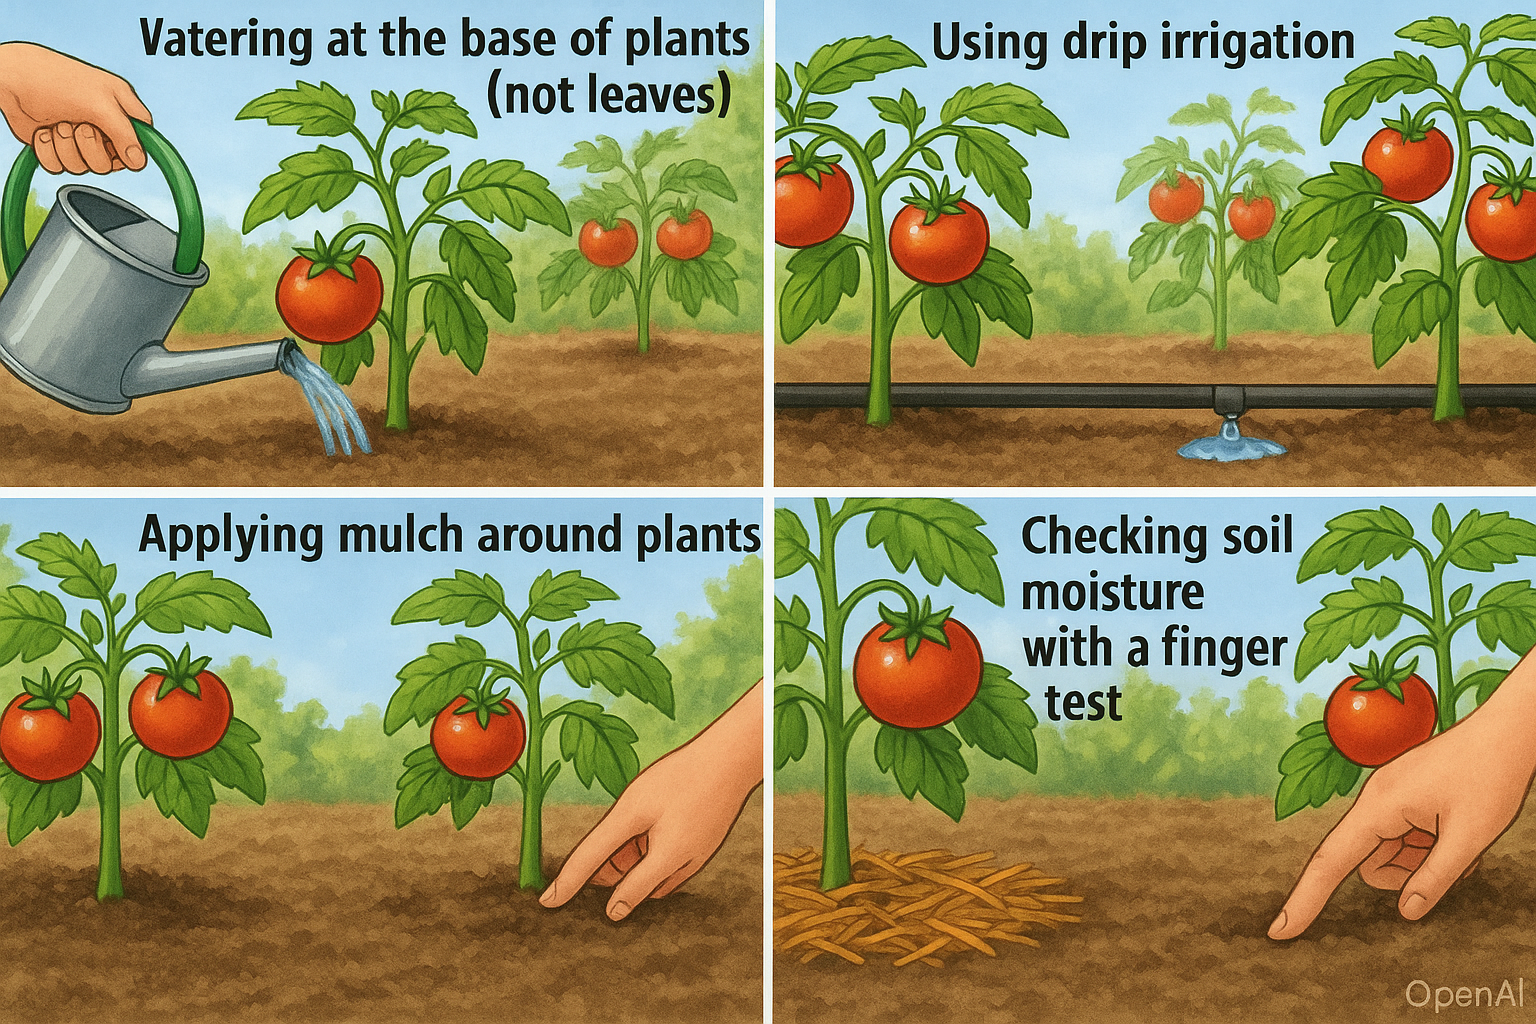
Proper Watering Techniques
The key to proper tomato watering is consistency and appropriate depth.
Here’s my approach after years of growing tomatoes:
- Water deeply and infrequently rather than shallowly and often. This encourages deeper root development.
- Aim for 1-2 inches of water per week (including rainfall), adjusting for temperature and humidity.
- Water at the base of plants to keep foliage dry and reduce disease risk.
- Use drip irrigation or soaker hoses for efficient, targeted watering.
- Water in the morning to allow any splashed foliage to dry during the day.
- Check soil moisture before watering by inserting your finger 2-3 inches into the soil—if it feels moist, wait to water.
- Apply mulch (2-3 inches of organic material) to conserve moisture and regulate soil temperature.
Container Tomatoes: Special Watering Considerations
Container-grown tomatoes have different watering needs than those planted in the ground:
- They dry out much faster, sometimes requiring daily watering during hot weather
- Ensure containers have adequate drainage holes
- Consider self-watering containers for more consistent moisture
- Use a moisture meter for accurate readings in deep containers
- Water until you see drainage from the bottom of the pot
Disease-Related Yellowing
Various tomato diseases can cause leaf yellowing, often with distinctive patterns that help with diagnosis.
Early identification is crucial for effective management.
Early Blight (Alternaria solani)
Symptoms:
- Dark brown concentric rings on lower leaves
- Yellowing around the spots
- Progression from bottom to top of plant
- Affected leaves eventually die and fall off
Management:
- Remove and destroy affected leaves
- Apply organic fungicides containing copper or Bacillus subtilis
- Maintain good air circulation by proper spacing and pruning
- Practice crop rotation (don’t plant tomatoes in the same spot for 3-4 years)
- Use mulch to prevent soil splash onto leaves
Late Blight (Phytophthora infestans)
Symptoms:
- Pale green water-soaked spots that quickly turn brown-black
- White fuzzy growth on leaf undersides in humid conditions
- Rapid spread throughout the plant
- Can destroy entire plants within days in favorable conditions
Management:
- Remove and destroy infected plants completely
- Apply copper-based fungicides preventatively
- Improve air circulation
- Avoid overhead watering
- Plant resistant varieties
Fusarium Wilt
Symptoms:
- Yellowing on one side of the plant or leaf
- Wilting despite adequate soil moisture
- Brown discoloration in stem vascular tissue when cut
- Progression from bottom to top
- Stunted growth
Management:
- No effective treatment once infected
- Remove and destroy affected plants
- Plant resistant varieties (look for “F” on seed packets)
- Sterilize garden tools
- Practice long crop rotations (7+ years for heavily infected soils)
Verticillium Wilt
Symptoms:
- V-shaped yellow areas on leaf edges
- Wilting during hot days with recovery at night
- Stunted growth
- Brown discoloration in lower stem vascular tissue
Management:
- Similar to Fusarium wilt management
- Plant resistant varieties (look for “V” on seed packets)
- Solarize soil in hot climates
- Maintain optimal growing conditions to reduce stress
Bacterial Spot and Speck
Symptoms:
- Small dark spots with yellow halos
- Spots may merge as infection progresses
- Affects leaves, stems, and fruits
- More prevalent in warm, wet conditions
Management:
- Remove infected leaves
- Copper-based sprays for prevention
- Avoid overhead watering
- Practice crop rotation
- Clean garden tools
Tomato Yellow Leaf Curl Virus (TYLCV)
Symptoms:
- Leaves curl upward and appear small and yellow
- Stunted growth
- Reduced fruit production
- Transmitted by whiteflies
Management:
- Control whitefly populations
- Remove and destroy infected plants
- Use reflective mulches to repel whiteflies
- Plant resistant varieties
- Use row covers during early growth
Pest Infestations Causing Yellowing
Several pests can cause tomato leaves to yellow through direct feeding damage or by transmitting diseases.
Aphids
Identification:
- Small (1/8 inch) soft-bodied insects
- Clustered on new growth and leaf undersides
- Various colors including green, black, or yellow
- Sticky honeydew residue on leaves
Damage:
- Yellowing, curling leaves
- Stunted growth
- Transmission of viral diseases
- Attraction of sooty mold on honeydew
Control:
- Spray plants with strong water stream to dislodge aphids
- Introduce beneficial insects like ladybugs and lacewings
- Apply insecticidal soap or neem oil
- Remove severely infested leaves
Spider Mites
Identification:
- Tiny (barely visible) spider-like creatures
- Fine webbing between leaves and stems
- Primarily on leaf undersides
- More common in hot, dry conditions
Damage:
- Stippling (tiny yellow/white spots)
- Bronzing of leaves
- General yellowing and leaf drop
- Webbing in severe infestations
Control:
- Increase humidity around plants
- Spray plants with water to dislodge mites
- Apply insecticidal soap or horticultural oil
- Introduce predatory mites
Whiteflies
Identification:
- Tiny white flying insects
- Fly up in clouds when plants are disturbed
- Congregate on leaf undersides
- Leave sticky honeydew
Damage:
- Yellowing leaves
- Reduced vigor
- Transmission of viruses including TYLCV
- Attraction of sooty mold
Control:
- Yellow sticky traps
- Insecticidal soap or neem oil applications
- Reflective mulch to repel whiteflies
- Remove heavily infested leaves
Tomato Hornworms
Identification:
- Large green caterpillars with diagonal white stripes
- Horn-like projection on rear end
- Can grow up to 4 inches long
- Often well-camouflaged
Damage:
- Extensive defoliation
- Feeding on stems and fruit
- Yellowing and wilting of remaining foliage
- Black frass (droppings) on leaves
Control:
- Handpick and remove caterpillars
- Apply Bacillus thuringiensis (Bt)
- Encourage natural predators like parasitic wasps
- Inspect plants regularly, especially at dusk
Root-Knot Nematodes
Identification:
- Microscopic soil-dwelling worms
- Cause distinctive root galls/knots
- Cannot be seen without microscope
- Diagnosed by examining roots
Damage:
- General yellowing and wilting
- Stunted growth
- Poor fruit production
- Reduced drought tolerance
Control:
- Plant resistant varieties (look for “N” on seed packets)
- Solarize soil before planting
- Add organic matter to soil to promote beneficial organisms
- Crop rotation with non-host plants like marigolds
Environmental Stressors
Environmental factors can trigger yellowing in tomato leaves even when pests, diseases, and nutrient levels are optimal.
Temperature Extremes
Tomatoes are warm-season crops with specific temperature preferences:
- Optimal daytime temperature: 70-85°F (21-29°C)
- Optimal nighttime temperature: 60-70°F (15-21°C)
Cold Stress (Below 50°F/10°C):
- Purplish discoloration on leaf undersides
- Yellowing and stunted growth
- Poor fruit set and development
- Increased susceptibility to diseases
Heat Stress (Above 90°F/32°C):
- Yellowing of leaves, especially on the sun-exposed side
- Wilting despite adequate moisture
- Flower drop
- Sunscald on fruits
Management:
- Use row covers or cloches for cold protection
- Provide afternoon shade during heat waves
- Plant heat-tolerant varieties in hot climates
- Mulch to moderate soil temperature
Sunlight Issues
Too Much Sun:
- Sunscald (white/yellow patches that turn papery)
- Leaf curling and yellowing on exposed sides
- Wilting during peak sun hours
Too Little Sun:
- Leggy, stretched growth
- Pale, yellowish leaves
- Poor fruit production
- Increased disease susceptibility due to poor air circulation
Management:
- Plant tomatoes in locations receiving 6-8 hours of sunlight daily
- Provide temporary shade during extreme heat
- Gradually acclimate seedlings to full sun (hardening off)
- Consider shade cloth (30%) during the hottest part of summer in extreme climates
Transplant Shock
When tomato seedlings are moved from protected environments to garden beds, they often experience transplant shock, which can cause temporary yellowing.
Symptoms:
- Wilting despite adequate moisture
- Yellowing of lower leaves
- Stunted growth for 1-2 weeks
- Slow establishment
Prevention and Management:
- Harden off seedlings gradually before transplanting
- Transplant on cloudy days or in the evening
- Water thoroughly after transplanting
- Provide temporary shade for a few days
- Apply a dilute seaweed solution to reduce stress
Chemical Damage
Herbicide drift, improper fertilizer application, or pesticide misuse can cause yellowing tomato leaves.
Herbicide Damage:
- Twisted, cupped leaves
- Yellow or white discoloration
- Stunted, abnormal growth patterns
- Often affects multiple plants in a pattern
Fertilizer Burn:
- Leaf edges turn yellow, then brown
- Root damage in severe cases
- Wilting that doesn’t recover with watering
- Salt crust visible on soil surface
Management:
- Avoid applying herbicides on windy days
- Use fertilizers according to package directions
- Flush soil with water if fertilizer burn is suspected
- Keep garden chemicals stored separately from seeds and tools
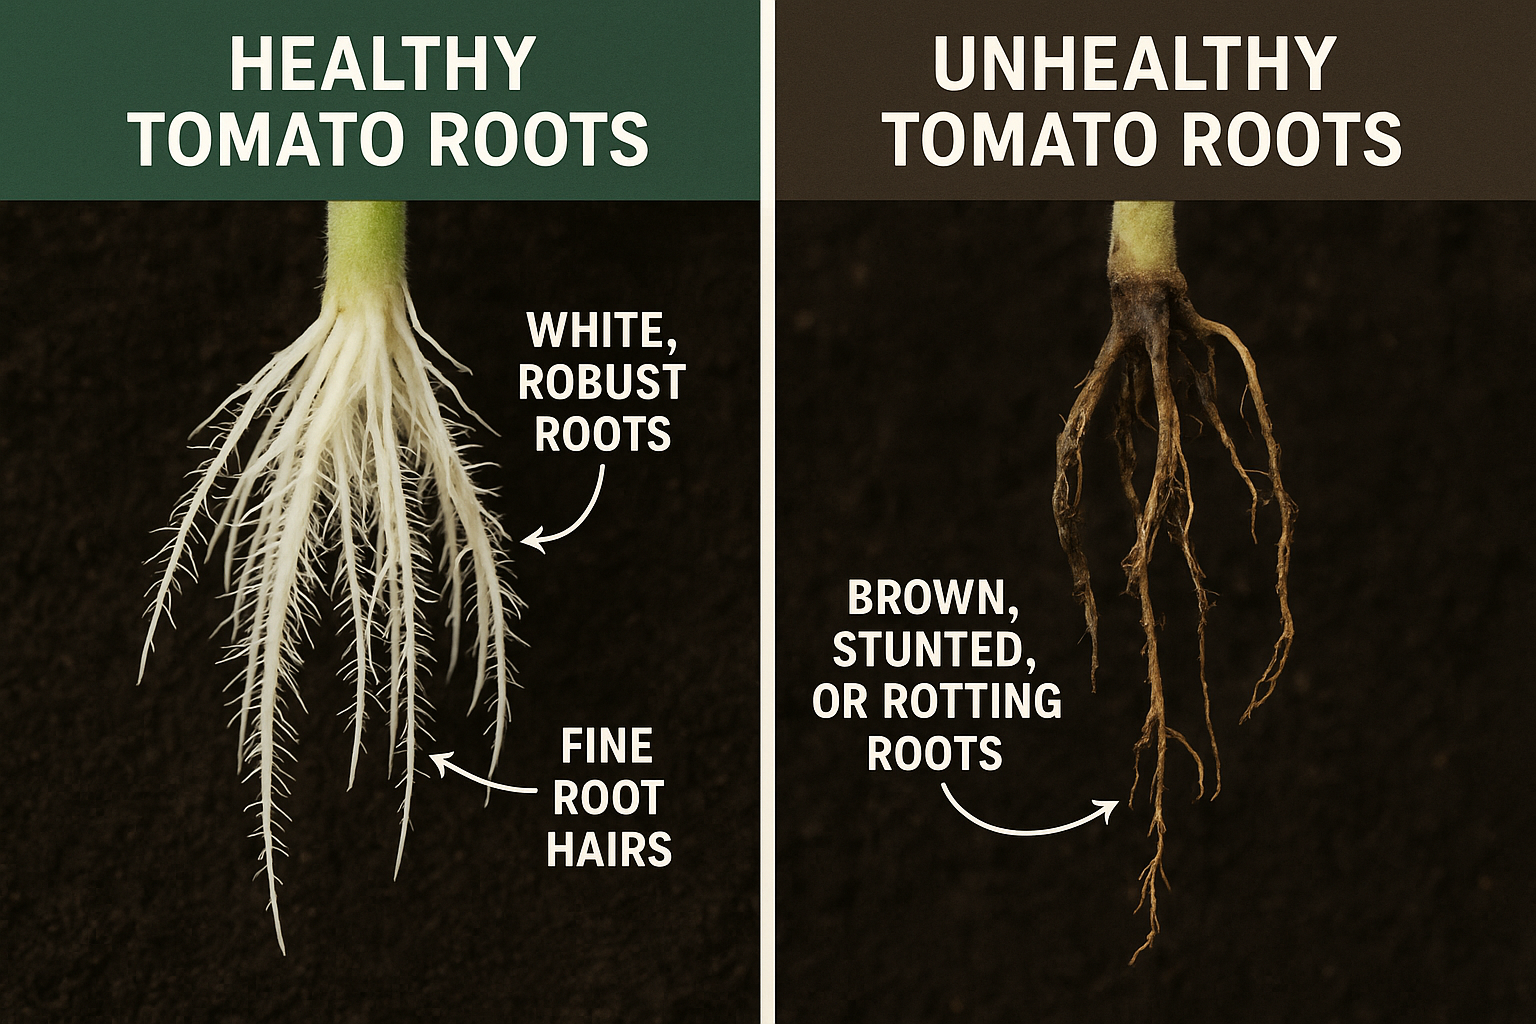
Soil and Root Problems
Healthy roots are essential for nutrient uptake.
Problems in the root zone often manifest as yellowing leaves above ground.
Compacted Soil
Symptoms:
- Stunted growth
- General yellowing
- Poor water penetration
- Standing water after rain
Solutions:
- Add organic matter annually
- Avoid working wet soil
- Use raised beds in areas with poor drainage
- Implement no-till or minimal-till practices
- Avoid walking on planting beds
Poor Drainage
Symptoms:
- Yellowing lower leaves
- Root rot
- Wilting despite wet soil
- Slow growth
Solutions:
- Create raised beds
- Add organic matter to improve soil structure
- Install drainage systems for severe problems
- Add perlite or coarse sand to heavy clay soils
- Consider planting in containers or grow bags
Container Issues
Container-grown tomatoes face unique challenges:
Container-Specific Problems:
- Rapid nutrient depletion
- Temperature fluctuations affecting roots
- Limited root space
- Salt buildup
Solutions:
- Use containers at least 5 gallons in size
- Fertilize more frequently but at half strength
- Ensure adequate drainage holes
- Consider self-watering containers
- Refresh potting mix annually
Diagnosis: A Systematic Approach
With so many potential causes for yellowing tomato leaves, a methodical approach to diagnosis is essential.
Step-by-Step Diagnostic Process
-
Observe the pattern:
- Bottom-up yellowing typically indicates nutrient deficiency or watering issues
- Top-down yellowing often suggests disease or pest problems
- Random yellowing might point to environmental stress
-
Examine the specific yellowing pattern:
- Interveinal yellowing (veins remain green) suggests magnesium, iron, or manganese deficiency
- Uniform yellowing of entire leaves often indicates nitrogen deficiency
- Yellow spots with distinct margins may indicate disease
-
Check for additional symptoms:
- Wilting along with yellowing
- Spots, lesions, or unusual growths
- Insect presence or evidence (honeydew, frass, webbing)
- Stem discoloration
-
Assess growing conditions:
- Recent weather patterns
- Watering practices
- Fertilization history
- Soil type and drainage
-
Examine the roots (carefully dig up a struggling plant):
- Healthy roots should be white or tan and firm
- Brown, mushy roots indicate root rot
- Knots or galls suggest nematodes
- Limited root development may indicate compacted soil
Using Plant and Soil Tests
For definitive answers, consider these testing options:
Soil Tests:
- Comprehensive soil tests from extension offices provide nutrient levels and pH
- Home test kits offer basic pH and NPK information
- Specialized tests can identify soil-borne pathogens
Plant Tissue Tests:
- Provide precise nutrient content of leaves
- Helpful for confirming suspected deficiencies
- Available through agricultural extension services
Disease Testing:
- Extension offices can often identify diseases from samples
- Some garden centers offer disease identification services
- Online plant clinics may provide preliminary diagnosis from photos
Prevention Strategies for Healthy Tomato Plants
The best way to avoid yellowing tomato leaves is to implement good preventative practices from the start.
Soil Preparation and Maintenance
-
Test and amend soil before planting:
- Add organic matter (compost, well-rotted manure)
- Adjust pH as needed
- Incorporate balanced fertilizers based on soil test results
-
Implement crop rotation:
- Avoid planting tomatoes or related crops (peppers, eggplants, potatoes) in the same location for 3-4 years
- Follow tomatoes with unrelated crops like beans or brassicas
-
Use cover crops in the off-season:
- Legumes add nitrogen
- Deep-rooted covers like daikon radish break up compaction
- Winter rye suppresses weeds and adds organic matter
-
Apply mulch:
- Maintain 2-3 inches of organic mulch
- Keep mulch 1-2 inches away from stems
- Replenish as needed throughout the season
Proper Planting Techniques
-
Choose appropriate varieties:
- Select disease-resistant varieties when possible
- Match varieties to your climate
- Consider determinate vs. indeterminate based on your space
-
Space properly:
- Allow 24-36 inches between plants
- Space rows 3-4 feet apart
- Provide adequate support (cages, stakes, trellises)
-
Plant at the right depth:
- Set transplants deeper than they were in pots
- Bury stems up to first set of true leaves to encourage root development
-
Time planting appropriately:
- Wait until soil temperatures reach 60°F (16°C)
- Avoid late planting in hot climates
Ongoing Maintenance
-
Implement proper pruning:
- Remove suckers for indeterminate varieties
- Maintain good air circulation
- Remove lower leaves that touch the soil
-
Monitor regularly:
- Inspect plants weekly for early signs of problems
- Check leaf undersides for pests
- Remove yellowed leaves promptly
-
Water consistently:
- Maintain even soil moisture
- Adjust watering based on weather conditions
- Use irrigation systems for consistency
-
Fertilize appropriately:
- Apply balanced fertilizer according to package directions
- Side-dress with compost when plants begin fruiting
- Avoid high-nitrogen fertilizers once fruit sets
Case Studies: Real-World Examples

Case Study 1: The Mystery of the Bottom-Up Yellowing
Situation: Maria noticed her tomato plants developing yellow leaves starting from the bottom and progressing upward.
The yellowing was uniform across the leaves with no spots or patterns.
Diagnosis Process:
- Observed the bottom-up progression
- Noted the uniform yellowing pattern
- Checked soil moisture (adequate)
- Examined for pests (none visible)
- Reviewed fertilization history (none since planting)
Solution: Nitrogen deficiency was diagnosed. Maria applied a balanced organic fertilizer and supplemented with diluted fish emulsion every two weeks.
The yellowing stopped progressing, and new growth emerged healthy and green.
Lesson: Regular feeding is essential for heavy feeders like tomatoes, especially in soils not amended with compost.
Case Study 2: The Container Tomato Challenge
Situation: James grew tomatoes in containers on his apartment balcony. By mid-summer, the leaves were showing interveinal yellowing despite regular fertilization.
Diagnosis Process:
- Noted the interveinal yellowing pattern
- Checked container drainage (adequate)
- Reviewed watering practices (consistent)
- Tested soil pH (7.8 – too alkaline)
Solution: The high pH was making magnesium unavailable to the plants. James applied Epsom salt solution as a foliar spray and soil drench, and gradually adjusted the pH with elemental sulfur.
The new growth emerged without yellowing.
Lesson: Container soils often become alkaline over time due to tap water minerals.
Regular pH testing is important for container gardens.
Case Study 3: The Spreading Yellow Spots
Situation: Elena noticed yellow spots with concentric rings on her tomato leaves, starting at the bottom of the plants.
The affected leaves eventually turned completely yellow and fell off.
Diagnosis Process:
- Observed the distinctive spot pattern
- Noted the bottom-up progression
- Saw that multiple plants were affected
- Researched the specific symptom pattern
Solution: Early blight was diagnosed. Elena removed the affected leaves, improved air circulation by pruning, applied a copper-based fungicide, and added mulch to prevent soil splash.
The disease progression slowed significantly.
Lesson: Prompt action at the first sign of disease can prevent serious crop damage.
Maintaining good air circulation is key to disease prevention.
Organic vs. Conventional Solutions
When treating yellowing tomato leaves, gardeners can choose between organic and conventional approaches.
Organic Treatment Options
Nutrient Deficiencies:
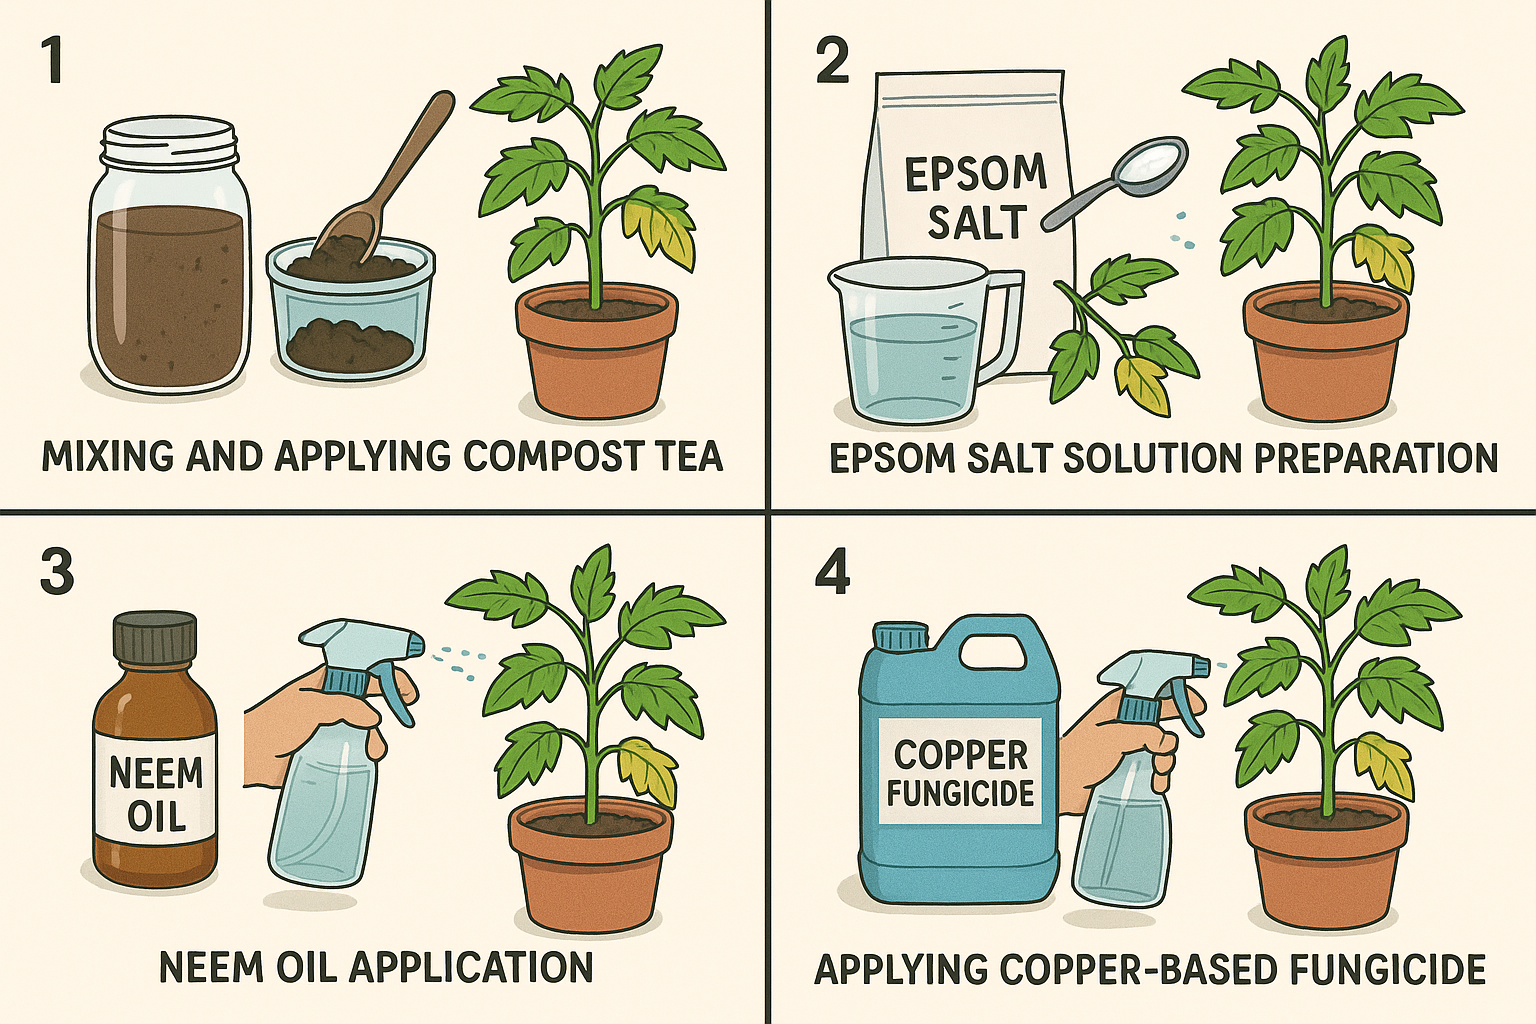
- Compost and compost tea
- Fish emulsion
- Seaweed extract
- Rock phosphate
- Greensand
- Bone meal
- Epsom salts
Pest Management:
- Insecticidal soap
- Neem oil
- Diatomaceous earth
- Bacillus thuringiensis (Bt)
- Beneficial insects (ladybugs, lacewings, predatory mites)
- Companion planting (marigolds, basil, nasturtiums)
Disease Control:
- Copper-based fungicides
- Sulfur sprays
- Bacillus subtilis products
- Compost tea
- Milk spray (1:9 milk to water ratio)
Advantages:
- Minimal environmental impact
- Safe for beneficial insects
- Builds long-term soil health
- No chemical residues on harvested fruit
Disadvantages:
- May work more slowly
- Can be less effective in severe infestations
- Often requires more frequent application
- Some products more expensive
Conventional Treatment Options
Nutrient Deficiencies:
- Synthetic fertilizers (Miracle-Gro, Peters, etc.)
- Chelated micronutrients
- Foliar sprays with immediate availability
Pest Management:
- Synthetic insecticides (pyrethroids, carbamates)
- Systemic insecticides
- Miticides for spider mite control
Disease Control:
- Chlorothalonil
- Mancozeb
- Propiconazole
- Other synthetic fungicides
Advantages:
- Often provides faster results
- May require fewer applications
- Generally less expensive
- More effective for severe infestations
Disadvantages:
- Potential environmental impacts
- May harm beneficial insects
- Can contribute to pest resistance
- May leave residues on produce
Integrated Approach
Many gardeners find success with an integrated approach:
- Focus on prevention through good cultural practices
- Start with the least toxic solutions when problems arise
- Progress to stronger treatments only if necessary
- Use conventional products selectively and according to label directions
- Combine approaches, such as organic soil management with targeted conventional treatments for acute problems
Seasonal Considerations
Yellowing tomato leaves can have different causes depending on the time of year.
Spring Issues (Early Season)
Common Causes:
- Transplant shock
- Cold soil temperatures
- Nutrient deficiencies in young plants
- Early fungal infections from spring rains
Prevention and Solutions:
- Harden off seedlings properly
- Use black plastic to warm soil before planting
- Apply starter fertilizer when transplanting
- Consider wall-o-water or other season extenders
- Plant when soil temperatures consistently reach 60°F (16°C)
Summer Issues (Mid-Season)
Common Causes:
- Heat stress
- Irregular watering
- Pest buildups
- Early and late blight
- Heavy fruit load depleting nutrients
Prevention and Solutions:
- Mulch to maintain even soil moisture
- Provide afternoon shade during heat waves
- Implement consistent watering schedule
- Monitor for pests weekly
- Side-dress with compost when fruits begin to develop
- Remove lower leaves to improve air circulation
Fall Issues (Late Season)
Common Causes:
- Natural senescence
- Cooler temperatures and increased humidity
- Cumulative disease pressure
- Depleted soil nutrients
Prevention and Solutions:
- Expect some natural yellowing as season ends
- Harvest fruits as they ripen
- Continue disease management until harvest complete
- Consider row covers for light frost protection
- Remove and compost plants after harvest (burn or discard if diseased)
Special Considerations for Different Growing Methods
Container Growing
Container tomatoes have unique challenges:
- Limited soil volume leads to faster nutrient depletion
- Temperature fluctuations affect roots more dramatically
- Watering needs are more frequent and critical
Best Practices:
- Use containers at least 5 gallons in size
- Choose potting mix specifically formulated for vegetables
- Fertilize more frequently but at half strength
- Monitor moisture levels daily during hot weather
- Consider self-watering containers for consistent moisture
- Provide afternoon shade for containers in hot locations
Greenhouse/Indoor Growing
Growing tomatoes under protection presents different challenges:
- Humidity management is critical for disease prevention
- Pollination may require manual assistance
- Light levels must be monitored and supplemented if needed
Best Practices:
- Maintain good air circulation with fans
- Avoid overhead watering
- Monitor for pests vigilantly (enclosed environments can allow rapid population growth)
- Hand-pollinate flowers by gently shaking plants or using a small brush
- Provide supplemental lighting during short winter days
Hydroponic Systems
Hydroponic tomatoes show nutrient deficiencies quickly and dramatically:
- Nutrient solution management is critical
- pH fluctuations affect nutrient availability immediately
- Oxygen levels in the root zone must be maintained
Best Practices:
- Monitor and adjust pH daily (aim for 5.8-6.2)
- Change nutrient solution regularly
- Use complete hydroponic nutrients formulated for fruiting plants
- Ensure adequate aeration in the root zone
- Clean systems thoroughly between crops
When to Remove vs. Save Plants
Sometimes, despite your best efforts, you’ll need to decide whether to continue treating affected plants or remove them.
When to Continue Treatment
- Yellowing is limited to a small percentage of leaves
- Plant is still producing new, healthy growth
- Problem has been identified and effective treatment is available
- Fruit development continues normally
- Problem is environmental and temporary
When to Remove Plants
- Disease is identified as viral (most viral diseases have no cure)
- Yellowing affects more than 50% of the plant
- Wilting occurs despite adequate soil moisture
- Stem shows internal discoloration when cut
- Multiple plants show rapid disease progression
- Fruits show signs of disease
Tip: When removing diseased plants, place them directly in a bag at the plant site to avoid spreading pathogens through your garden.
Do not compost diseased plant material; instead, dispose of it in the trash or burn it where permitted.
Future-Proofing Your Tomato Garden
To reduce yellowing leaf problems in future seasons, implement these long-term strategies:
Soil Building Program
- Annual soil testing to track nutrient levels and pH
- Cover cropping during off-seasons
- Compost application (1-2 inches) before each planting season
- Diverse crop rotation to break disease and pest cycles
- Minimal tillage to preserve soil structure and beneficial organisms
Record Keeping
Maintain a garden journal documenting:
- Varieties planted and their performance
- Disease and pest issues encountered
- Treatments applied and their effectiveness
- Weather patterns
- Harvest yields
This information becomes invaluable for identifying patterns and making improvements year after year.
Seed and Variety Selection
- Save seeds from your healthiest, most productive plants
- Select resistant varieties based on problems common in your area
- Diversify plantings with multiple varieties to hedge against variety-specific issues
- Exchange information with local gardeners about varieties that perform well in your specific climate
Conclusion
Yellowing tomato leaves are a common gardening challenge, but with the right knowledge, they don’t have to spell disaster for your tomato harvest.
By understanding the various causes—from nutrient deficiencies and watering issues to diseases and environmental stressors—you can quickly diagnose and address problems before they significantly impact your plants.
Remember that prevention is always the best strategy.
Building healthy soil, selecting appropriate varieties, providing consistent care, and monitoring regularly will go a long way toward preventing yellowing leaves in the first place.
When problems do arise, a systematic approach to diagnosis followed by targeted treatment will help you get your tomato plants back on track.
Throughout this article, we’ve explored the multifaceted nature of yellowing tomato leaves and provided practical solutions for each potential cause.
Whether you’re growing tomatoes in containers on a city balcony or managing rows of plants in a rural garden, these principles apply universally.
As you move forward with your tomato growing journey, I encourage you to:
- Keep learning about tomato cultivation and common problems
- Maintain detailed records of your garden’s performance
- Share knowledge with fellow gardeners in your community
- Experiment with different varieties and techniques
- Be patient with yourself and your plants
With each growing season, your expertise will expand, and yellowing leaves will become less of a mystery and more of a manageable challenge.
Happy gardening, and may your tomato harvests be bountiful!