
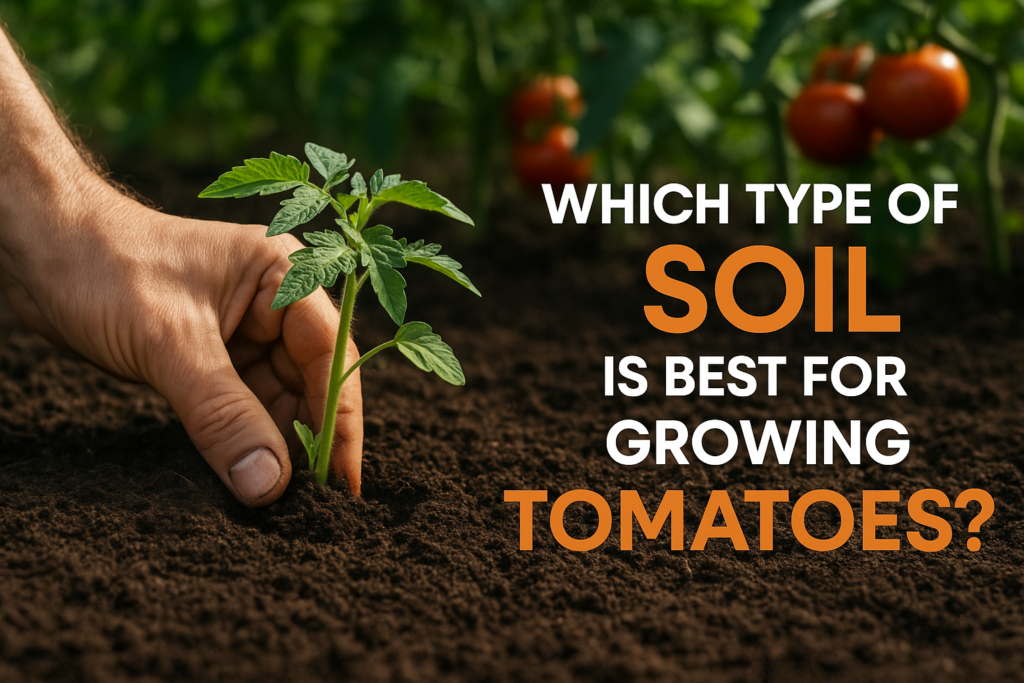
If you’re wondering which type of soil is best for growing tomatoes, the answer is loamy soil with plenty of organic matter.
Tomatoes are hungry plants that thrive in well-draining, nutrient-rich environments with a slightly acidic pH between 6.0 and 6.8.
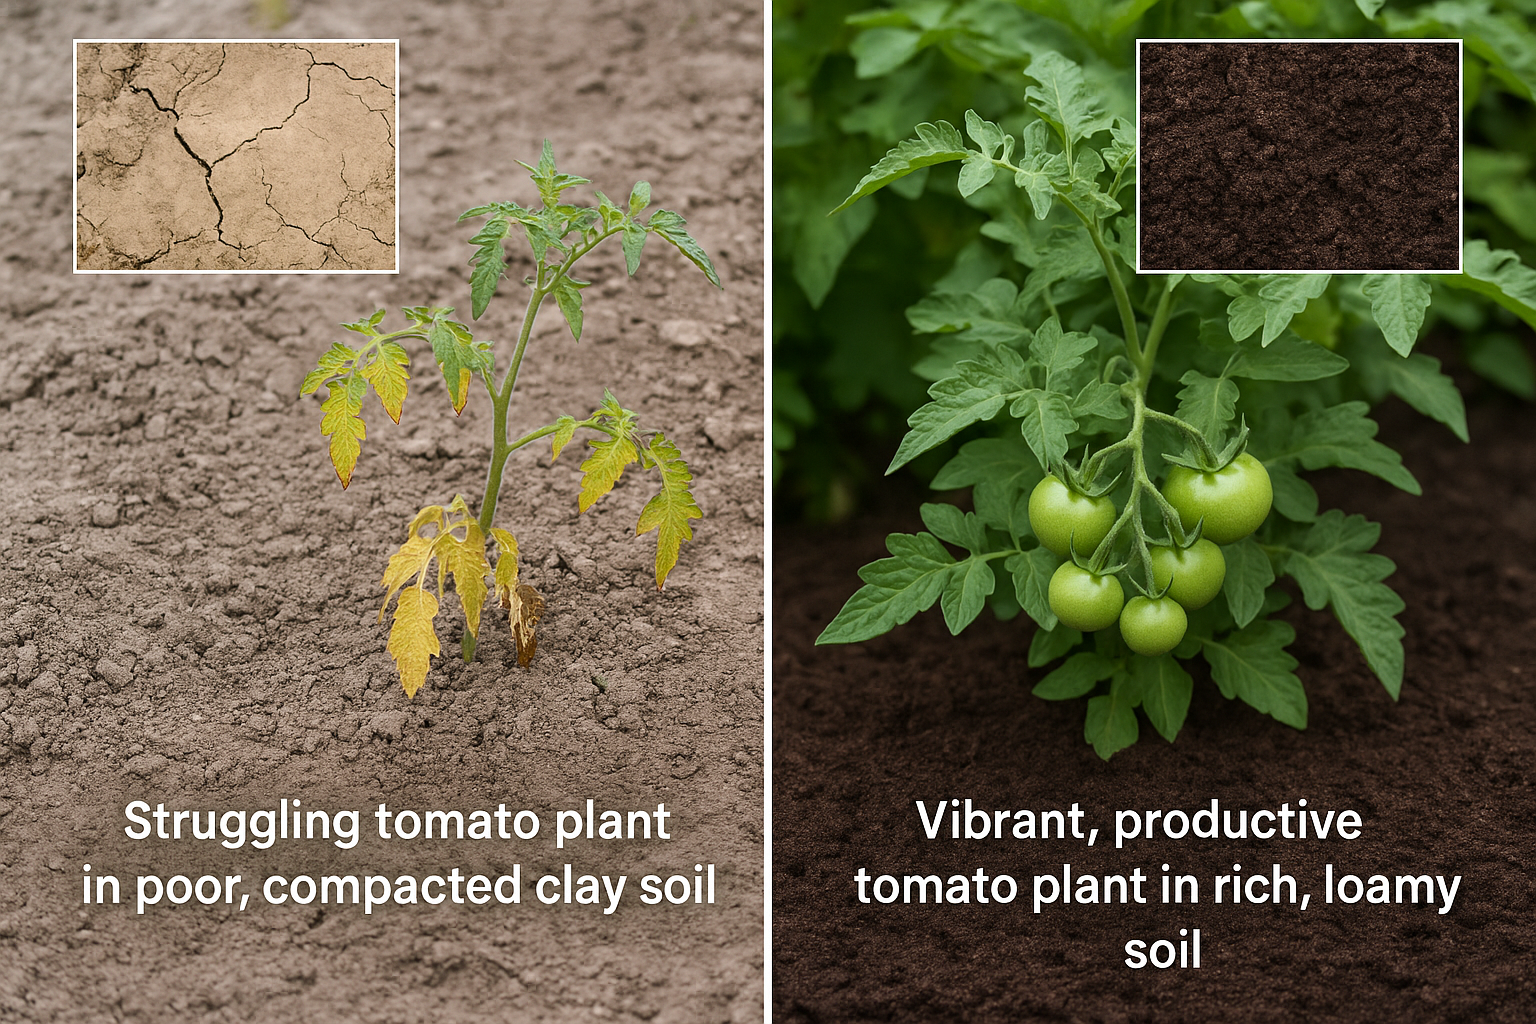
Think of loamy soil as the Goldilocks of garden beds—not too sandy, not too clay-heavy, just right.
It holds moisture without becoming waterlogged and allows roots to spread easily.
Mix in some compost or aged manure, and you’ve created tomato paradise.
Your plants will reward you with juicier fruits and healthier vines all season long.
Key Takeaways
- Loamy soil with a pH between 6.0 and 6.8 provides the optimal growing environment for tomatoes
- Soil should contain 30-35% organic matter to ensure proper nutrition and water retention
- Well-draining soil is critical to prevent root rot and fungal diseases in tomato plants
- Calcium content in soil directly impacts tomato quality and helps prevent blossom end rot
- Soil preparation techniques like double-digging and raised beds can significantly improve tomato yields
Understanding Soil Types and Their Impact on Tomato Growth
Tomatoes (Solanum lycopersicum) are among the most popular home garden crops worldwide, and for good reason.
These versatile fruits are nutritional powerhouses packed with vitamins, minerals, and antioxidants.
But achieving that perfect balance of flavor, texture, and yield starts with understanding the foundation of your garden: the soil.
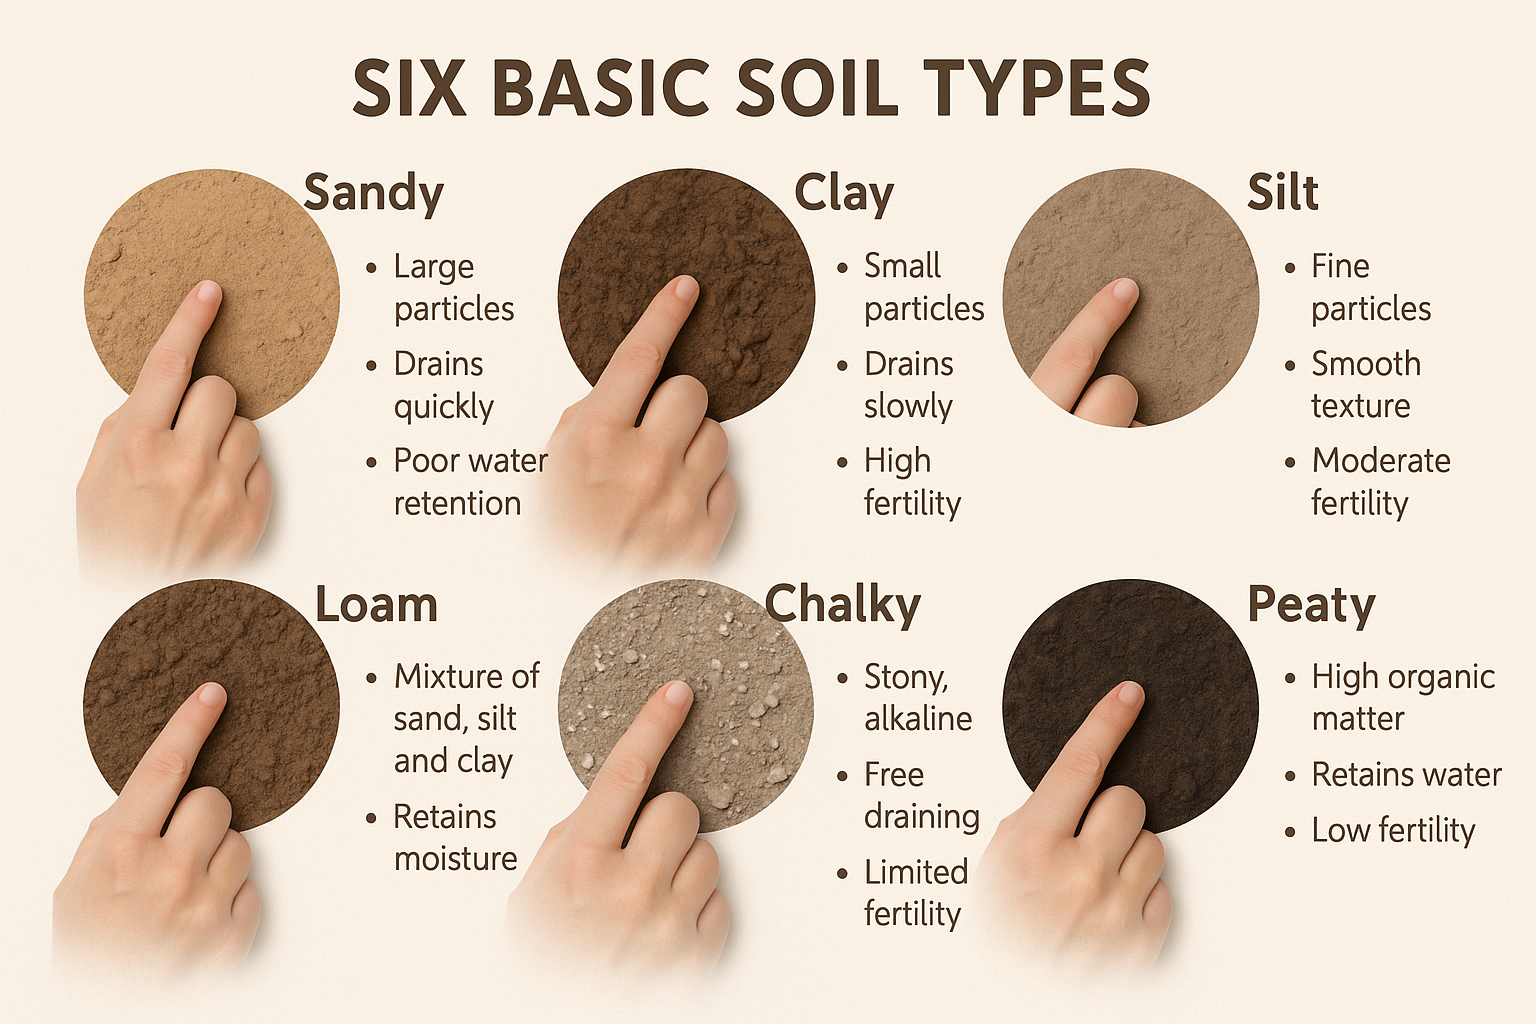
The Basic Soil Types
Before we dive into the ideal soil for tomatoes, let’s examine the primary soil types you might encounter in your garden:
| Soil Type | Characteristics | Drainage | Nutrient Retention |
|---|---|---|---|
| Sandy | Loose, gritty texture with large particles | Excellent | Poor |
| Clay | Dense, sticky when wet, hard when dry | Poor | Excellent |
| Silt | Smooth, slippery when wet, powdery when dry | Moderate | Good |
| Loam | Perfect balance of sand, silt, and clay | Good | Good |
| Chalky | Stony, light-colored, often alkaline | Excessive | Poor |
| Peaty | Dark, spongy, high in organic matter | Variable | Excellent |
Each soil type has distinct properties that affect how plants grow.
For tomatoes, the ideal soil provides a balance of water retention, drainage, nutrient availability, and root support.
Why Soil Matters Specifically for Tomatoes
Tomatoes are relatively heavy feeders with specific soil requirements that directly impact their growth, health, and productivity.
Here’s why soil matters so much for these popular garden fruits:
-
Root Development: Tomatoes develop extensive root systems that can extend several feet into the soil, requiring a medium that allows for easy penetration while providing adequate support.
-
Water Needs: Tomatoes need consistent moisture but are susceptible to root diseases if soil remains waterlogged.
-
Nutrient Requirements: As fruiting plants, tomatoes have high nutrient demands, particularly for phosphorus, potassium, and calcium.
-
Temperature Sensitivity: Soil type affects ground temperature, which impacts tomato growth rates and fruit development.
-
Disease Susceptibility: Many common tomato diseases, including early blight, late blight, and fusarium wilt, can be harbored in soil, making soil health and composition crucial.
“Give me a good soil, and I’ll give you a tomato that makes store-bought varieties taste like cardboard.” – Expert tomato grower and author Craig LeHoullier
The Ideal Soil for Growing Tomatoes
After years of experimentation and based on scientific research, the consensus among experts is clear:
loamy soil with high organic matter content provides the best growing environment for tomatoes.
Let’s break down the ideal characteristics:
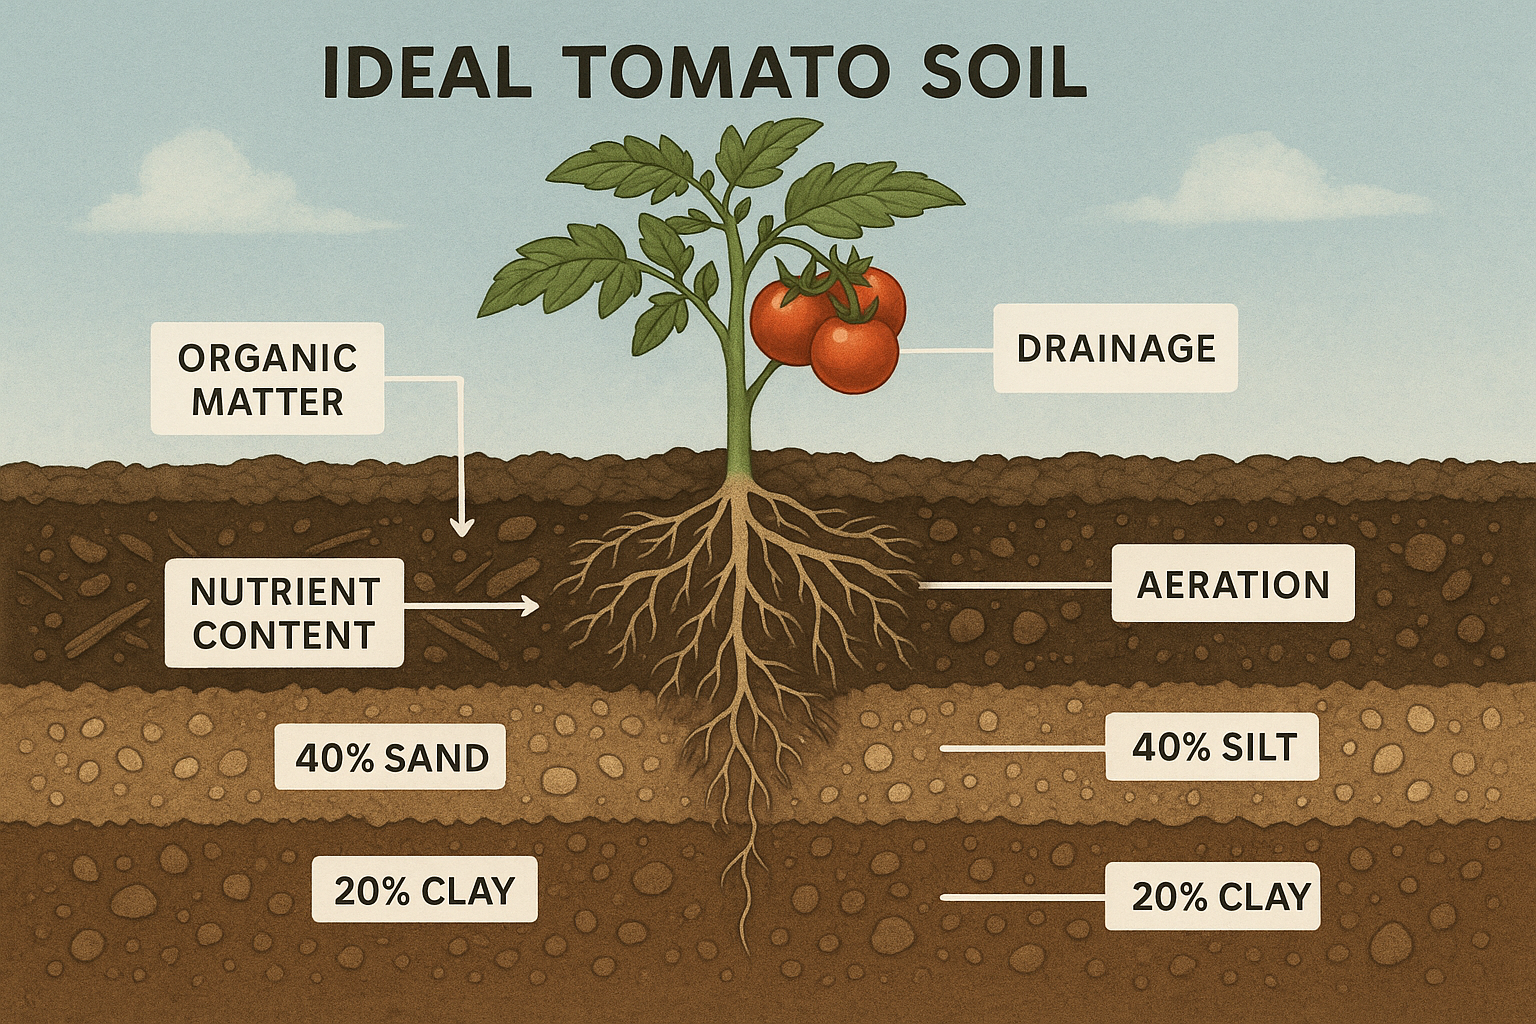
Loam: The Gold Standard
Loam soil represents the perfect balance of sand, silt, and clay particles.
This balanced composition creates an ideal environment for tomato roots by providing:
- Excellent drainage while retaining adequate moisture
- Good aeration for root respiration
- Balanced nutrient retention and availability
- Moderate compaction that supports plants without restricting root growth
The ideal loam for tomatoes consists of approximately:
- 40% sand
- 40% silt
- 20% clay
This composition creates soil that holds its shape when squeezed but crumbles easily when disturbed—a perfect texture for tomato root development.
Optimal pH Level for Tomatoes
Soil pH significantly impacts nutrient availability to plants.
For tomatoes, the sweet spot is a slightly acidic pH between 6.0 and 6.8.
At this pH range:
- Essential nutrients like phosphorus, potassium, and calcium become readily available
- Micronutrient uptake is optimized
- Beneficial soil microorganisms thrive
- Disease pressure is reduced
pH Impact on Tomato Growth:
- Below 5.5: Calcium deficiency becomes likely, leading to blossom end rot
- 6.0-6.8: Optimal range for nutrient availability
- Above 7.0: Iron, manganese, and phosphorus become less available
Organic Matter: The Secret Ingredient
Perhaps the most critical component of excellent tomato soil is organic matter.
The ideal tomato soil contains 30-35% organic material, which:
- Improves soil structure and tilth
- Enhances water retention in sandy soils
- Improves drainage in clay soils
- Provides slow-release nutrients
- Supports beneficial soil microorganisms
- Buffers pH changes
Best Sources of Organic Matter for Tomato Soil:
- Well-aged compost
- Worm castings
- Leaf mold
- Aged manure (never fresh)
- Cover crop residues
Drainage Requirements
Proper drainage is non-negotiable for tomato health.
Waterlogged soil quickly leads to root rot, fungal diseases, and poor fruit production.
The ideal tomato soil drains well enough that:
- Water doesn’t pool on the surface for more than a few minutes after heavy rain
- Soil doesn’t remain soggy for extended periods
- Roots have access to oxygen even after irrigation
To test your soil’s drainage, dig a hole 12 inches deep and fill it with water.
After it drains, fill it again and time how long it takes to empty:
- 1-3 hours: Ideal drainage for tomatoes
- Less than 1 hour: Drainage may be too rapid, requiring more organic matter
- More than 4 hours: Drainage is poor and needs improvement
Analyzing Your Existing Soil
Before amending your soil for tomatoes, it’s essential to understand what you’re working with.
Here are several methods to analyze your garden soil:
DIY Soil Tests
Several simple tests can help you determine your soil type and quality:
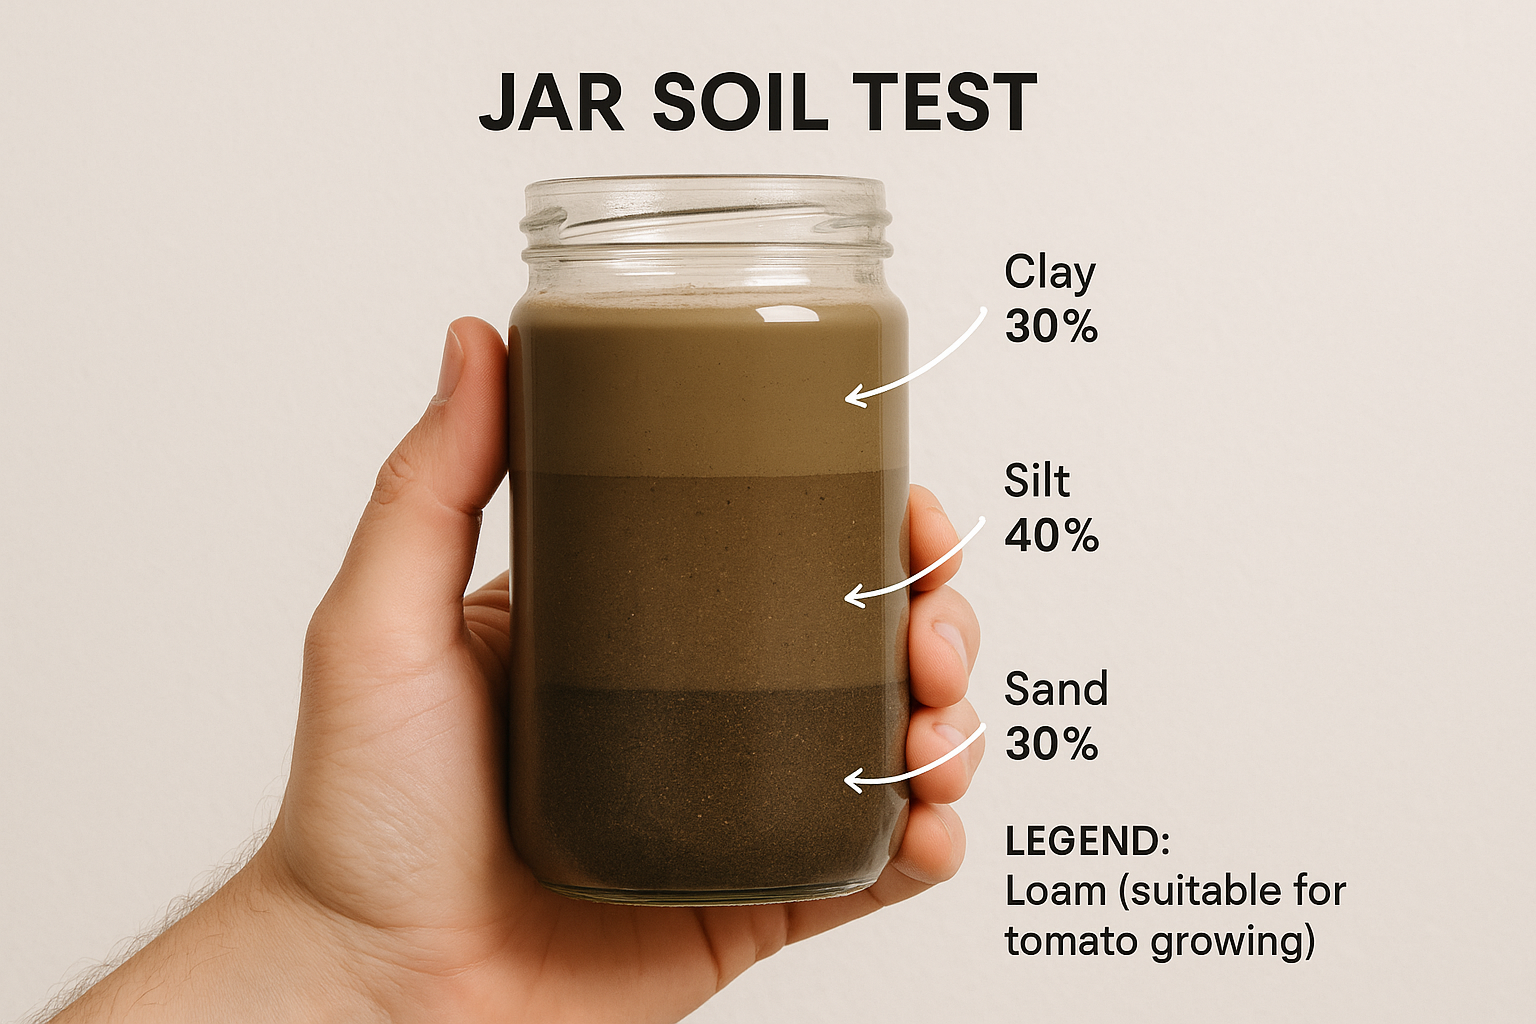
1. The Jar Test for Soil Composition
- Fill a clear jar 1/3 full with garden soil
- Add water until the jar is almost full
- Add a teaspoon of dishwashing liquid (acts as a dispersant)
- Shake vigorously and let settle for 24 hours
- Measure the layers:
- Bottom layer = sand
- Middle layer = silt
- Top layer = clay
- Calculate percentages to determine soil type
2. The Squeeze Test for Soil Structure
- Take a handful of slightly moist soil
- Squeeze it firmly
- Open your hand and observe:
- Falls apart immediately = sandy soil
- Forms a ball that crumbles when poked = loamy soil
- Forms a sticky ball that holds its shape = clay soil
3. The Worm Test for Soil Health
- Dig a hole 1 foot square and 1 foot deep
- Count the earthworms
- Interpretation:
- 10+ worms = excellent soil health
- 5-9 worms = good soil health
- Fewer than 5 = poor soil health
Professional Soil Testing
While DIY tests provide basic information, a professional soil test offers comprehensive data about:
- Exact pH level
- Nutrient levels (N-P-K)
- Micronutrient content
- Organic matter percentage
- Recommendations for amendments
Most county extension offices offer affordable soil testing services.
In 2026, many also provide digital soil analysis with smartphone apps that can give instant feedback on basic soil properties.
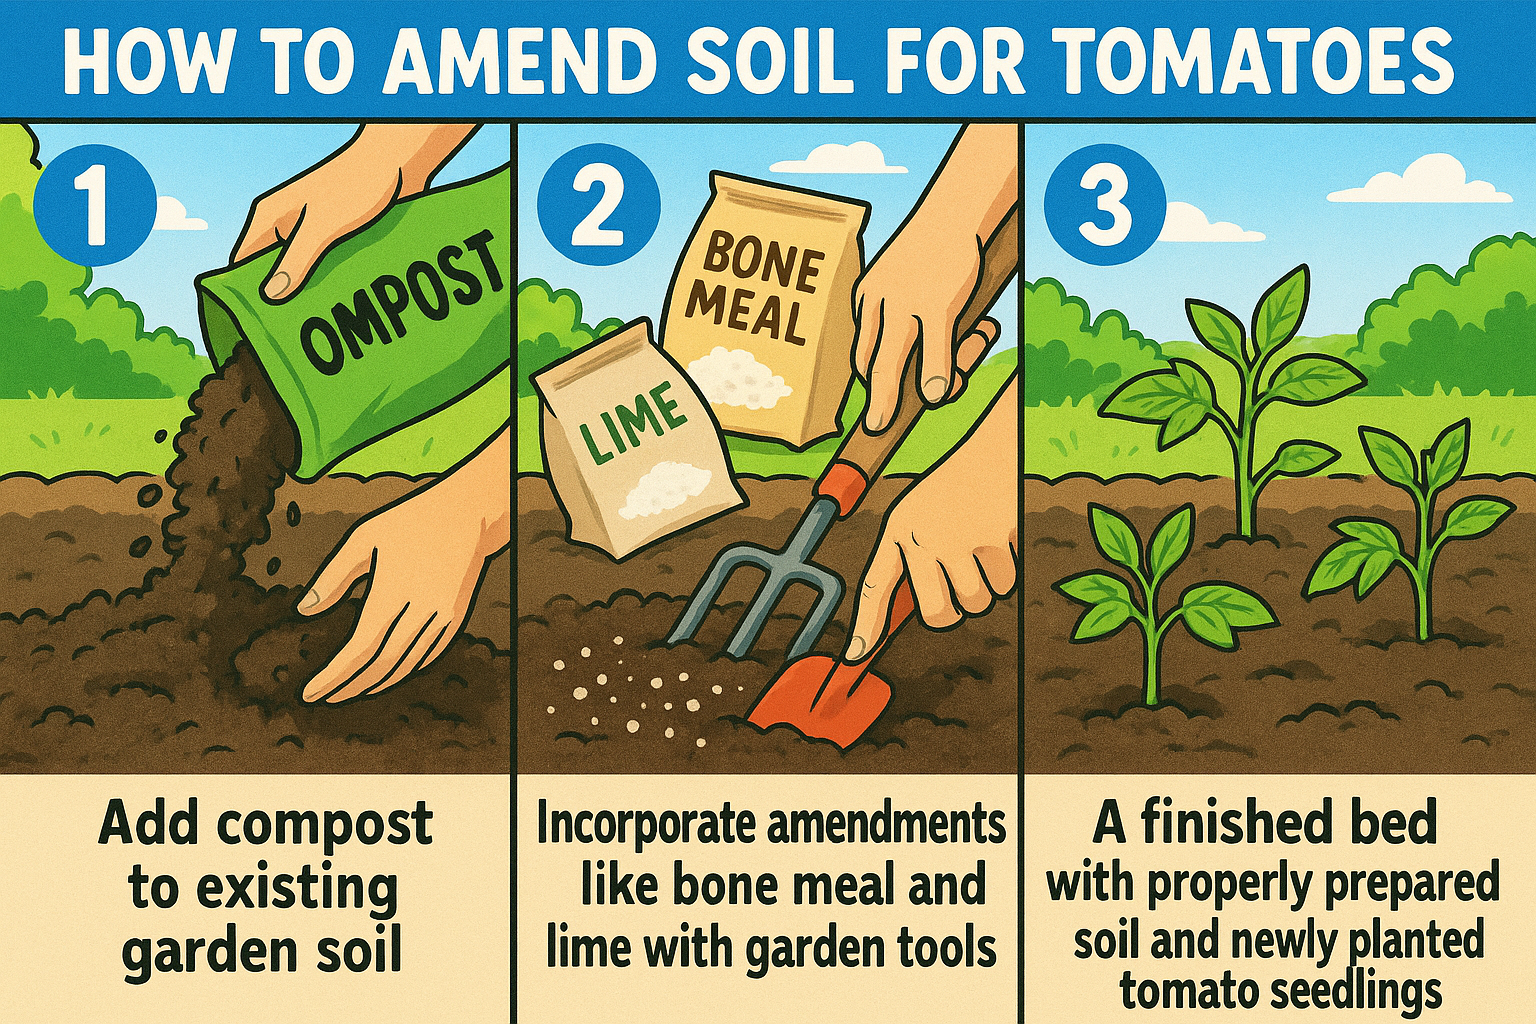
Transforming Your Soil for Tomato Growing Success
Now that you understand what makes ideal tomato soil and have assessed your existing soil, let’s explore how to transform your garden into a tomato-growing paradise.
Improving Sandy Soil for Tomatoes
Sandy soil drains too quickly and doesn’t retain nutrients well.
Here’s how to improve it:
- Add organic matter: Incorporate 4-6 inches of compost, aged manure, or leaf mold into the top 8-12 inches of soil
- Use cover crops: Plant cover crops like clover or vetch in the off-season and till them under
- Apply mulch: Use a 3-4 inch layer of organic mulch to reduce water evaporation
- Consider biochar: Modern research shows biochar can significantly improve sandy soil’s water and nutrient retention
- Use water-retaining amendments: Products containing coco coir or sustainable alternatives to peat moss can help retain moisture
Pro Tip: In sandy soil, watering more frequently but in smaller amounts helps maintain consistent moisture levels for tomatoes.
Improving Clay Soil for Tomatoes
Clay soil retains too much water and can become compacted.
Here’s how to improve it:
- Double-digging: Loosen soil to a depth of 24 inches, incorporating organic matter as you go
- Add coarse materials: Mix in coarse sand, fine gravel, or perlite to improve drainage
- Use gypsum: Apply agricultural gypsum to help break up clay particles
- Avoid working wet clay: Only work with clay soil when it’s slightly moist, never wet
- Build raised beds: Consider raised beds to provide better drainage and soil control
Pro Tip: Clay soil benefits from fall preparation, allowing winter freezes and thaws to break up clumps naturally.
Creating the Perfect Loam Blend
If you’re starting from scratch or want to create an optimal growing medium, here’s a recipe for the perfect tomato soil:
Homemade Premium Tomato Soil Mix:
- 40% topsoil
- 30% finished compost
- 10% perlite or coarse sand
- 10% vermiculite
- 5% worm castings
- 5% aged manure
This blend provides excellent structure, drainage, water retention, and nutrition for tomato plants.
Soil Amendments Specifically Beneficial for Tomatoes
Certain amendments are particularly valuable for tomato production:
- Calcium sources: Eggshells, lime, or gypsum help prevent blossom end rot
- Epsom salts: Provide magnesium and sulfur for robust growth (1 tablespoon per planting hole)
- Bone meal: Offers slow-release phosphorus for root development and fruiting
- Azomite: Contains trace minerals that enhance tomato flavor
- Mycorrhizal fungi: Improves nutrient uptake and disease resistance
- Worm castings: Provides balanced nutrition and beneficial microorganisms
- Compost tea: Delivers soluble nutrients and beneficial microbes
Advanced Soil Preparation Techniques
For those serious about maximizing tomato production, these advanced techniques can transform your results:
Double-Digging Method
Double-digging creates a deep, loose growing bed that allows tomato roots to penetrate deeply:
- Remove the top 12 inches of soil from a section of your garden
- Loosen the next 12 inches of subsoil with a fork
- Mix compost into the loosened subsoil
- Return the topsoil, mixing in additional amendments
- Repeat for adjacent sections
This method, while labor-intensive, creates exceptional growing conditions for deep-rooted plants like tomatoes.
Lasagna Gardening for Tomatoes
This no-dig method builds soil from the top down:
- Cover your growing area with overlapping layers of cardboard or newspaper
- Add alternating layers of “browns” (carbon-rich materials like leaves or straw) and “greens” (nitrogen-rich materials like grass clippings or kitchen scraps)
- Finish with a layer of compost
- Allow to decompose for 4-6 months before planting
By 2025, lasagna gardening has become increasingly popular due to its soil-building benefits and reduced labor requirements.
Biochar Integration
Biochar—charcoal produced specifically for soil amendment—has gained significant attention in recent years:
- Purchase or make biochar (never use regular charcoal)
- “Charge” it by soaking in compost tea or liquid fertilizer
- Mix into soil at 5-10% by volume
- Benefits include:
- Carbon sequestration
- Improved water retention
- Enhanced microbial activity
- Long-term soil structure improvement
Hugelkultur for Tomatoes
This German technique involves building raised beds over rotting wood:
- Dig a trench or create a mound
- Fill with logs, branches, and woody debris
- Cover with nitrogen-rich materials like grass clippings
- Top with soil and compost
- Plant tomatoes on top
As the wood decomposes, it:
- Releases nutrients slowly
- Creates air pockets for roots
- Retains moisture like a sponge
- Generates slight warmth that can extend the growing season
Soil Management Throughout the Growing Season
Creating perfect tomato soil isn’t a one-time event but an ongoing process.
Here’s how to maintain soil quality throughout the growing season:
Mulching Strategies for Tomatoes
Proper mulching is crucial for tomato health:
- Wait until soil warms: Apply mulch after soil temperature reaches 65°F (18°C)
- Maintain proper thickness: Apply 2-4 inches of organic mulch
- Keep mulch away from stems: Leave a few inches of space around plant stems to prevent rot
- Choose the right material: Options include:
- Straw (excellent all-purpose mulch)
- Grass clippings (nitrogen-rich but apply thinly)
- Shredded leaves (improve soil as they decompose)
- Wood chips (best for pathways, not directly around plants)
- Plastic mulch (warms soil but doesn’t improve it)
Irrigation and Soil Moisture Management
Proper watering maintains soil health and tomato quality:
- Deep, infrequent watering: Water deeply once or twice weekly rather than shallowly every day
- Drip irrigation: Delivers water directly to soil, reducing foliar diseases
- Moisture monitoring: Use a moisture meter or the finger test (soil should feel moist but not wet 2 inches down)
- Consistent moisture: Fluctuations in soil moisture can cause cracking and blossom end rot
- Morning watering: Allows foliage to dry before evening, reducing disease risk
Mid-Season Soil Boosters
As heavy feeders, tomatoes benefit from mid-season soil amendments:
- Side-dressing: Apply additional compost or organic fertilizer around plants monthly
- Compost tea applications: Water with compost tea every 2-3 weeks
- Foliar feeding: Spray diluted seaweed extract or fish emulsion on leaves for quick nutrient uptake
- Calcium supplementation: Apply crushed eggshells or calcium spray if blossom end rot appears
Common Soil-Related Problems and Solutions
Even with careful preparation, tomato growers may encounter soil-related issues.
Here’s how to identify and address them:
Nutrient Deficiencies and Their Symptoms
| Deficiency | Symptoms | Solution |
|---|---|---|
| Nitrogen | Yellowing of older leaves, stunted growth | Side-dress with compost or apply diluted fish emulsion |
| Phosphorus | Purple tinge to leaves, poor flowering | Add bone meal or rock phosphate |
| Potassium | Yellow leaf margins, poor fruit development | Apply wood ash or greensand |
| Calcium | Blossom end rot (black bottoms on fruit) | Add crushed eggshells, lime, or gypsum |
| Magnesium | Interveinal chlorosis (yellowing between leaf veins) | Apply Epsom salts (1 Tbsp/gallon water) |
| Iron | Yellowing of youngest leaves | Lower pH or apply chelated iron |
Soil-Borne Diseases and Prevention
Many tomato diseases originate in the soil. Prevention is key:
- Crop rotation: Don’t plant tomatoes in the same location more than once every 3-4 years
- Resistant varieties: Choose tomato varieties with disease resistance (look for letters like ‘F’, ‘V’, ‘N’ on seed packets)
- Soil solarization: Cover moist soil with clear plastic for 4-6 weeks during hot weather to kill pathogens
- Beneficial additions: Add mycorrhizal fungi and beneficial bacteria to suppress pathogens
- Proper spacing: Ensure adequate air circulation between plants
- Clean practices: Remove and destroy (don’t compost) diseased plant material
pH Adjustment Techniques
If your soil pH is outside the ideal range for tomatoes (6.0-6.8), here’s how to adjust it:
To Lower pH (Make Soil More Acidic):
- Add elemental sulfur (follow package directions for application rates)
- Incorporate pine needles or oak leaf mulch
- Use acidic fertilizers like ammonium sulfate
- Apply coffee grounds to the soil surface
To Raise pH (Make Soil More Alkaline):
- Add agricultural lime (calcium carbonate)
- Use wood ash (sparingly, as it’s potent)
- Apply crushed eggshells or oyster shell lime
- Incorporate dolomitic lime (if magnesium is also needed)
Allow 2-3 months for these amendments to affect soil pH before planting.
Container and Raised Bed Soil for Tomatoes
Not everyone has access to in-ground gardening space.
Fortunately, tomatoes excel in containers and raised beds when provided with the right soil mix.
Container Soil Mixes
Container-grown tomatoes need a lighter soil mix than garden beds:
Basic Container Mix for Tomatoes:
- 50% high-quality potting soil
- 25% compost
- 15% perlite or pumice
- 10% vermiculite
- Plus 2 tablespoons slow-release organic fertilizer per gallon of mix
Premium Container Mix for Tomatoes:
- 40% coconut coir
- 30% compost
- 10% worm castings
- 10% perlite
- 5% vermiculite
- 5% biochar
- Plus 1 cup each of bone meal and kelp meal per cubic foot of mix
Container considerations:
- Use containers at least 5 gallons in size (larger is better)
- Ensure adequate drainage holes
- Consider self-watering containers for consistent moisture
- Use light-colored containers to keep soil temperatures moderate
Raised Bed Soil Formulations
Raised beds offer the perfect opportunity to create ideal tomato soil from scratch:
Standard Raised Bed Mix:
- 60% topsoil
- 30% compost (use a variety of sources)
- 10% aeration material (perlite, rice hulls, or coarse sand)
Intensive Production Raised Bed Mix:
- 40% topsoil
- 40% compost
- 10% coconut coir or peat moss
- 5% vermiculite
- 5% perlite
- Plus 1 cup each of bone meal, blood meal, and greensand per 4 cubic feet
Raised bed depth matters for tomatoes:
- Minimum depth: 12 inches
- Ideal depth: 18-24 inches
- Deeper beds allow for better root development and drought resistance
Regional Considerations for Tomato Soil
Soil requirements for tomatoes vary somewhat by climate and region.
Here are adaptations for different growing environments:
Hot, Dry Climates
In arid regions, focus on water retention and heat management:
- Increase organic matter to 40% of soil volume
- Use water-retaining amendments like coconut coir
- Apply thicker mulch (4-6 inches)
- Consider adding 5% clay minerals like bentonite to improve water retention
- Use light-colored mulch to reflect heat
- Incorporate biochar to improve water-holding capacity
Cold Climate Adaptations
In northern regions with short growing seasons:
- Add more compost to encourage microbial activity
- Incorporate stone or gravel for thermal mass
- Use dark-colored mulch to absorb heat
- Consider adding a small amount of sand to improve drainage in cold, wet conditions
- Plant in raised beds that warm more quickly in spring
- Add extra phosphorus and potassium to encourage fruiting in shorter seasons
Coastal and High-Humidity Areas
In humid regions where fungal diseases are common:
- Focus on excellent drainage
- Use slightly more coarse material in soil mixes
- Space plants farther apart for air circulation
- Consider slightly raised planting areas even within garden beds
- Use disease-resistant varieties
- Apply mulch more sparingly to allow soil to dry between watering
Urban and Compromised Soils
Urban gardeners often face unique challenges:
- Test soil for contaminants before growing edibles
- Consider raised beds with imported soil if contamination is present
- Add extra compost to counteract compaction from urban development
- Incorporate biochar to help adsorb potential pollutants
- Use deep-rooted cover crops during off-seasons to break up compacted subsoil
- Consider no-dig methods to preserve soil structure
Sustainable Soil Practices for Long-Term Tomato Growing
For those looking to grow tomatoes year after year, sustainable soil management is essential.
These practices build soil health over time:
Cover Cropping for Tomato Beds
Cover crops planted in rotation with tomatoes offer numerous benefits:
Winter Cover Crops:
- Cereal rye: Produces abundant biomass and suppresses weeds
- Hairy vetch: Fixes nitrogen and provides ground cover
- Winter peas: Add nitrogen and organic matter
- Crimson clover: Fixes nitrogen and attracts beneficial insects
Summer Cover Crops:
- Buckwheat: Grows quickly, suppresses weeds, attracts pollinators
- Cowpeas: Add nitrogen in hot weather
- Sunn hemp: Builds organic matter and fixes nitrogen
- Sorghum-sudangrass: Creates massive root systems that break up compacted soil
Terminate cover crops 2-3 weeks before planting tomatoes by:
- Cutting at soil level and leaving as mulch
- Mowing and incorporating into soil
- Using tarps to kill the crop without disturbing soil
Companion Planting for Soil Health
Certain plants grown alongside tomatoes can improve soil conditions:
- Legumes (beans, peas): Fix nitrogen in the soil
- Deep-rooted plants (comfrey, daikon radish): Break up compacted subsoil
- Aromatic herbs (basil, borage): Repel pests and attract beneficial insects
- Alliums (garlic, onions): Deter soil pests with antifungal properties
- Marigolds: Release compounds that suppress harmful nematodes
No-Till and Minimal Tillage Approaches
Modern research increasingly supports reduced tillage for better soil health:
Benefits of No-Till for Tomato Growers:
- Preserves soil structure and fungal networks
- Reduces erosion and nutrient leaching
- Increases carbon sequestration
- Improves water infiltration and retention
- Protects beneficial soil organisms
No-Till Tomato Growing Methods:
- Cut holes in landscape fabric or cardboard for planting
- Use permanent raised beds with added compost on top yearly
- Practice “chop and drop” mulching with cover crops
- Use broadforks to aerate soil without inverting it
- Apply compost as top-dressing rather than tilling it in
Innovative and Emerging Soil Technologies for Tomatoes
The field of soil science continues to evolve, with new approaches showing promise for tomato growers:
Biochar and Carbon-Negative Gardening
Biochar represents one of the most exciting developments in sustainable soil management:
- Created through pyrolysis of organic materials in low-oxygen environments
- Stable carbon structure can remain in soil for centuries
- Creates habitat for beneficial microorganisms
- Improves water and nutrient retention
- Can be made at home or purchased commercially
For tomatoes, incorporate biochar at 5-10% of soil volume for best results.
Microbial Inoculants and Soil Food Web Management
The soil microbiome plays a crucial role in plant health:
Key Microbial Groups for Tomatoes:
- Mycorrhizal fungi: Extend root systems and improve nutrient uptake
- Nitrogen-fixing bacteria: Convert atmospheric nitrogen into plant-available forms
- Phosphorus-solubilizing bacteria: Make bound phosphorus available to plants
- Beneficial nematodes: Control soil pests
- Protozoa: Release nutrients locked in bacterial bodies
Commercial inoculants or homemade compost tea can introduce these beneficial organisms to your soil.
Precision Soil Monitoring
New technology makes it easier than ever to understand your soil:
- Continuous pH and moisture monitoring systems
- Smartphone-connected soil sensors
- DIY soil microbiome testing kits
- Handheld nutrient analyzers
- Subscription soil testing services that track changes over time
These tools allow for precision soil management based on real-time data.
Expert Insights: What Professional Tomato Growers Do Differently
Commercial tomato growers and expert gardeners often employ techniques that home gardeners can adapt:
Soil Testing and Custom Amendment Programs
Professional growers:
- Test soil multiple times throughout the season
- Create custom amendment blends based on test results
- Track soil changes over multiple years
- Use tissue testing of plants to identify deficiencies before symptoms appear
- Apply amendments in smaller, more frequent doses
Pre-Plant Soil Preparation Timing
Timing matters for soil preparation:
- Begin heavy amendments 4-6 months before planting
- Allow lime or sulfur applications 3 months to adjust pH
- Incorporate organic matter in fall for spring planting
- Apply biological inoculants just before planting for maximum efficacy
- Time cover crop termination based on nitrogen release patterns
Rotation and Resting Strategies
Expert growers use strategic rotation:
- Follow tomatoes with less demanding crops
- Plant soil-building crops in years between tomatoes
- Use diverse cover crop mixes rather than single species
- Include deep-rooted crops to break up compaction
- Allow some areas to rest under mulch periodically
Conclusion: Building Your Perfect Tomato Soil
The journey to perfect tomato soil is ongoing, but the rewards are substantial.
By understanding the specific needs of tomatoes and working with nature to meet those needs, you can create growing conditions that produce abundant, flavorful fruits year after year.
Remember these key principles:
- Loamy soil with high organic matter provides the ideal balance of drainage and water retention
- Soil pH between 6.0 and 6.8 optimizes nutrient availability
- Regular additions of compost and organic matter build long-term soil health
- Mulching conserves moisture and feeds soil life
- Cover cropping and minimal tillage preserve soil structure
- Attention to calcium and consistent moisture prevents common tomato problems
Whether you’re growing in containers on an urban balcony or managing extensive garden beds, these principles can be adapted to your situation.
The time and effort invested in building healthy soil will pay dividends not just in tomato production but in the overall health and productivity of your garden ecosystem.
As we face increasing climate uncertainty, resilient soil systems become even more valuable.
By focusing on soil health first, you create a buffer against environmental stresses and a foundation for gardening success.
Start where you are, use what you have, and improve your soil incrementally.
Even small changes in soil management can lead to noticeable improvements in tomato quality and yield.
Your perfect tomato—juicy, flavorful, and nutritious—begins with the soil beneath your feet.