
Want to know how to grow perfect tomatoes that actually taste like summer? You are in the right place.
Growing tomatoes isn’t rocket science, but a few key strategies make all the difference between sad, mealy supermarket imposters and those juicy, burst-in-your-mouth beauties you dream about.
The secret starts with choosing the right variety for your climate, giving them plenty of sunlight (at least 6-8 hours daily), and consistent watering—tomatoes hate both drought and soggy feet.
Add some quality soil, support stakes for your plants, and regular feeding, and you’re golden.
Whether you are starting from seed indoors or grabbing seedlings from the nursery, this guide will walk you through every step to ensure your tomato harvest is nothing short of spectacular.
Determinate vs. Indeterminate: Growth Habits That Matter
Tomatoes fall into two main categories based on their growth pattern:
Determinate (Bush) Varieties:
- Grow to a predetermined height (usually 3-4 feet)
- Produce all their fruit within a 4-6 week period
- Ideal for containers, small spaces, and shorter growing seasons
- Great for canning as fruits ripen simultaneously
- Examples: Roma, Celebrity, Bush Early Girl
Indeterminate (Vining) Varieties:
- Continue growing and producing fruit until killed by frost
- Can reach heights of 6-10 feet or more
- Provide a steady harvest throughout the season
- Require sturdy staking or caging
- Examples: Brandywine, Cherokee Purple, Sun Gold, Better Boy
Heirloom vs. Hybrid: Flavor and Resilience Considerations
The next important distinction is between heirloom and hybrid varieties:
Heirloom Tomatoes:
- Open-pollinated varieties passed down for generations (typically 50+ years)
- Exceptional, complex flavors and unique appearances
- Seeds can be saved and will grow “true” to the parent plant
- Often less disease-resistant than hybrids
- Examples: Brandywine, Cherokee Purple, Black Krim, Green Zebra
Hybrid Tomatoes:
- Crosses between two different parent varieties
- Bred for disease resistance, uniformity, and productivity
- Often more vigorous and reliable in challenging conditions
- Seeds won’t produce plants identical to parents
- Examples: Big Beef, Early Girl, Sun Gold, Celebrity
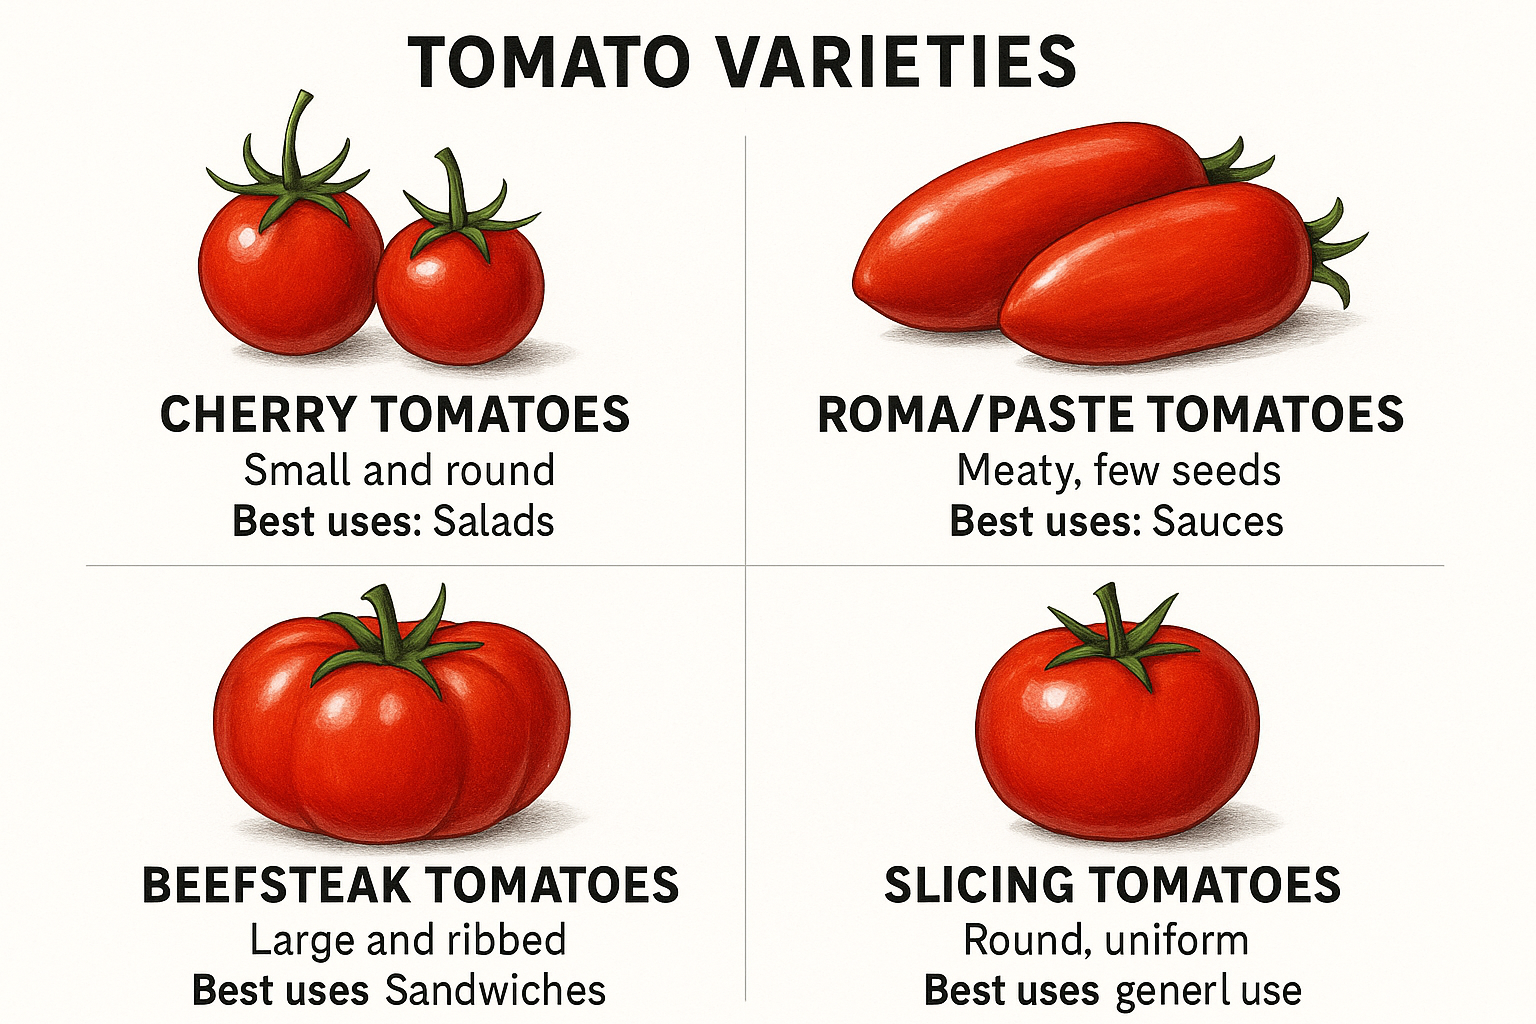
Popular Tomato Types by Use
| Type | Characteristics | Best Uses | Popular Varieties |
|---|---|---|---|
| Cherry/Grape | Small (1-2″), sweet, prolific | Snacking, salads | Sun Gold, Sweet 100, Black Cherry |
| Roma/Paste | Oblong, meaty, fewer seeds | Sauces, canning | Roma, San Marzano, Amish Paste |
| Beefsteak | Large (8-16 oz), juicy | Sandwiches, slicing | Brandywine, Big Beef, Mortgage Lifter |
| Slicing | Medium (4-8 oz), well-balanced | All-purpose | Better Boy, Celebrity, Early Girl |
| Specialty | Unique colors/patterns | Visual appeal, flavor | Green Zebra, Pineapple, Black Krim |
Selecting for Your Climate and Growing Space
The most beautiful tomato variety in the catalog won’t thrive if it’s not suited to your growing conditions:
- Short-season regions: Choose varieties with “early” in the name or those that mature in 60-70 days
- Hot climates: Look for heat-tolerant varieties like Solar Fire, Heatmaster, or Arkansas Traveler
- Container gardens: Select determinate or dwarf varieties specifically bred for pots
- Disease-prone areas: Choose varieties with resistance codes (V, F, N, T, etc.)
Tip: When reading seed packets or plant labels, look for letters indicating disease resistance: V (Verticillium wilt), F (Fusarium wilt), N (Nematodes), T (Tobacco mosaic virus), and A (Alternaria).
Starting Tomatoes from Seed: Timing and Technique
Growing tomatoes from seed gives you access to hundreds more varieties than buying transplants.
It’s also more economical and deeply satisfying to nurture plants from their very beginning.
Timing Your Seed Starting
The key to successful tomato growing is starting seeds at the optimal time:
- Calculate backward: Start seeds indoors 6-8 weeks before your region’s last average frost date
- In 2025’s changing climate: Consider your microclimate, not just regional averages
- For succession planting: Start a second batch 2-3 weeks after the first for extended harvests
| Growing Zone | Typical Seed Starting Window |
|---|---|
| Zones 3-4 | Early to mid-April |
| Zones 5-6 | Mid-March to early April |
| Zones 7-8 | Late February to mid-March |
| Zones 9-10 | January to February |
Essential Seed Starting Supplies
Gather these materials before beginning:
- Seeds: Fresh from reputable suppliers (seeds remain viable for 3-4 years if stored properly)
- Containers: Cell trays, peat pots, or recycled containers with drainage holes
- Growing medium: Sterile seed-starting mix (not garden soil)
- Light source: Sunny south-facing window or grow lights
- Heat source: Seed heating mat (optional but beneficial)
- Labels: Waterproof markers and tags to identify varieties
- Plastic dome or plastic wrap: To maintain humidity during germination
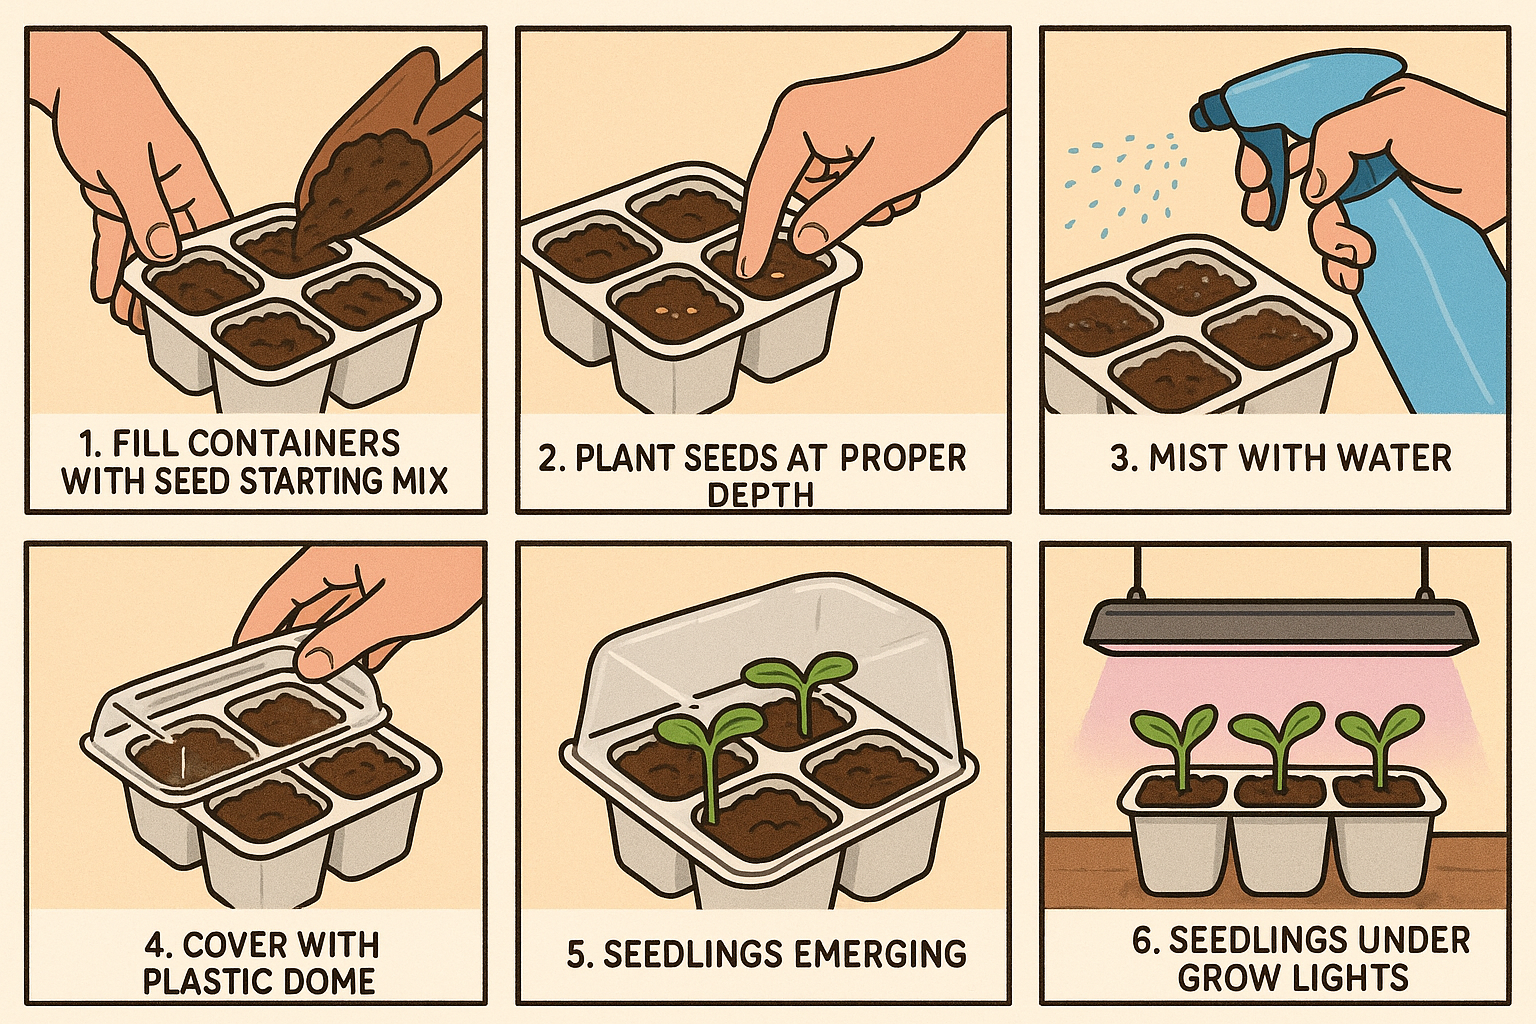
Step-by-Step Seed Starting Process
- Prepare containers: Fill with moistened seed-starting mix to ¼ inch below the rim
- Plant seeds: Place 2-3 seeds per cell, approximately ¼ inch deep
- Cover lightly: Sprinkle a thin layer of mix over seeds
- Moisten: Use a spray bottle to water gently without displacing seeds
- Create humidity: Cover with plastic dome or wrap
- Provide warmth: Place on a heat mat or in a warm location (70-80°F is ideal)
- Monitor daily: Remove cover once germination occurs (5-10 days)
- Provide light: Position seedlings under grow lights or in a sunny window
- Thin seedlings: Once true leaves appear, snip off all but the strongest seedling in each cell
Common Seed Starting Problems and Solutions
| Problem | Cause | Solution |
|---|---|---|
| Leggy, stretched seedlings | Insufficient light | Move closer to light source or increase light duration |
| Damping off (seedlings collapse) | Fungal disease, excessive moisture | Improve air circulation, avoid overwatering |
| Yellow leaves | Nutrient deficiency | Begin feeding with half-strength fertilizer after true leaves appear |
| Slow germination | Too cold | Increase temperature with heat mat |
| Mold on soil surface | Too wet, poor air circulation | Remove cover, improve airflow, reduce watering |
Transplanting Seedlings: Hardening Off and Planting Out
The transition from protected indoor growing to the garden environment is critical for tomato success.
This process requires patience and careful timing.
Hardening Off: Preparing Plants for Outdoor Life
Hardening off is the gradual acclimatization of seedlings to outdoor conditions:
- Begin 7-14 days before transplanting: When seedlings are 6-8 inches tall with several sets of true leaves
- Day 1-2: Place seedlings in a sheltered, shaded outdoor location for 2-3 hours
- Day 3-4: Increase outdoor time to 4-5 hours with some filtered sunlight
- Day 5-6: Extend to 6-8 hours with more direct morning sun
- Day 7-9: Leave plants out all day, bringing in at night
- Day 10-14: Leave plants out day and night unless frost threatens
Warning: Skipping the hardening off process can result in sunscald, wind damage, and transplant shock that may set plants back weeks or even kill them.
Preparing the Planting Site
While seedlings are hardening off, prepare their permanent home:
- Timing: Wait until soil temperatures reach at least 60°F and all danger of frost has passed
- Location: Select a spot with 6-8 hours of direct sunlight daily
- Soil preparation: Dig holes twice as wide and deep as the root ball
- Amendments: Mix in 2-3 inches of compost and a handful of balanced organic fertilizer
- Spacing: Allow 18-24 inches between determinate plants and 24-36 inches for indeterminate varieties
- Support structures: Install cages, stakes, or trellises before planting to avoid root damage later
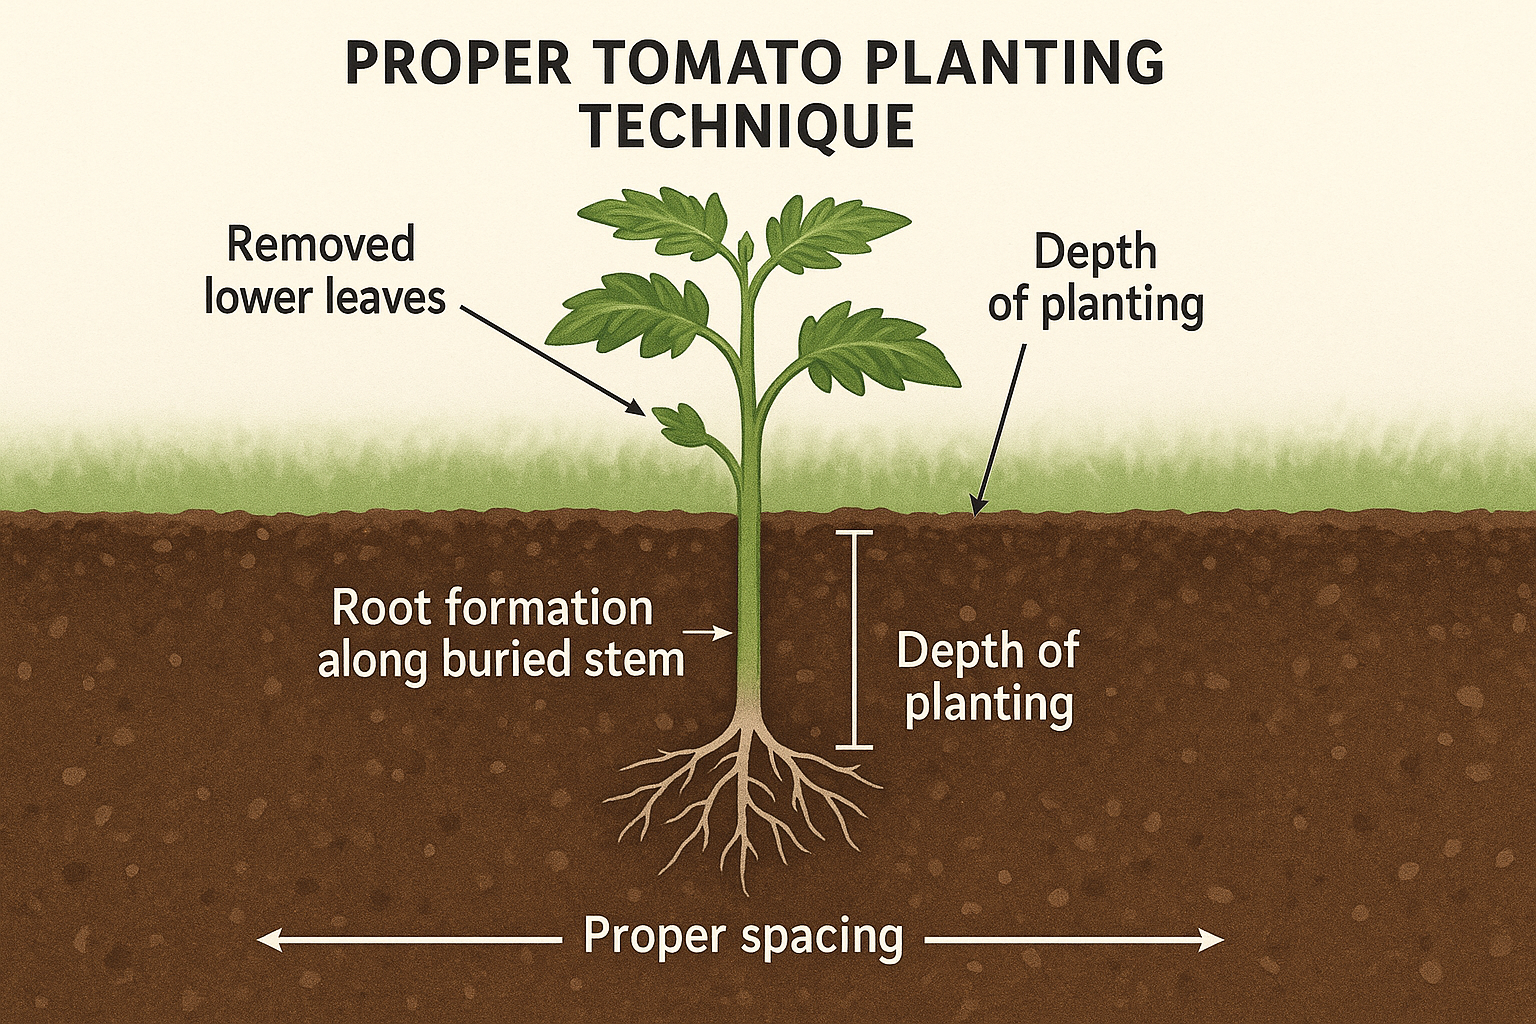
Proper Transplanting Technique
- Water seedlings: Thoroughly moisten plants several hours before transplanting
- Choose the right time: Transplant on a cloudy day or in late afternoon to reduce transplant shock
- Dig holes: Create holes large enough to accommodate the entire root ball plus 2-3 inches
- Remove lower leaves: Strip off leaves from the bottom 2/3 of the stem
- Plant deeply: Bury plants up to their top set of leaves (roots will form along the buried stem)
- Backfill carefully: Gently firm soil around plant without compacting
- Water immediately: Create a shallow basin around each plant and water deeply
- Mulch: Apply 2-3 inches of organic mulch, keeping it 2 inches away from the stem
Post-Transplant Care
The first two weeks after transplanting are critical:
- Watering: Keep soil consistently moist but not soggy
- Protection: Use row covers or cloches if temperatures drop unexpectedly
- Feeding: Hold off on additional fertilizer until plants show new growth
- Observation: Monitor for signs of stress or pest issues daily
Soil Preparation and Nutrition: Feeding Your Tomatoes
Tomatoes are heavy feeders with specific soil preferences. Creating the right growing environment will pay dividends in health and productivity.
Ideal Soil Conditions for Tomatoes
Tomatoes thrive in soil with these characteristics:
- pH level: Slightly acidic to neutral (6.0-6.8)
- Texture: Loamy, well-draining but moisture-retentive
- Organic matter: High in humus and compost (5-10%)
- Temperature: Warm (above 60°F) for proper root development
- Depth: At least 12 inches of good soil for extensive root systems
Essential Nutrients and Their Roles
Understanding the key nutrients tomatoes need helps you provide balanced nutrition:
| Nutrient | Role in Tomato Growth | Deficiency Symptoms |
|---|---|---|
| Nitrogen (N) | Leaf and stem growth | Yellowing lower leaves, stunted growth |
| Phosphorus (P) | Root, flower, and fruit development | Purple-tinged leaves, poor flowering |
| Potassium (K) | Disease resistance, fruit quality | Yellow leaf edges, uneven ripening |
| Calcium (Ca) | Cell wall strength, prevents blossom end rot | Black spots on fruit bottoms |
| Magnesium (Mg) | Chlorophyll production | Interveinal yellowing of older leaves |
Organic vs. Synthetic Fertilizers
Both approaches have merits, but understanding the differences helps you choose:
Organic Fertilizers:
- Release nutrients slowly as they break down
- Improve soil structure and microbial activity
- Lower risk of nutrient burn or leaching
- Examples: compost, worm castings, fish emulsion, bone meal
Synthetic Fertilizers:
- Provide immediately available nutrients
- Precise nutrient ratios for specific needs
- May not improve soil structure long-term
- Examples: water-soluble tomato formulas, time-release granules
Fertilizing Schedule and Techniques
Follow this timeline for optimal nutrition:
- Before planting: Incorporate balanced organic fertilizer and compost into planting holes
- At transplanting: Add a handful of bone meal to support root development
- Early growth stage: Focus on moderate nitrogen for foliage development
- First flowers: Transition to phosphorus and potassium-rich fertilizers
- Throughout fruiting: Apply liquid fertilizer every 2-3 weeks at half strength
- Late season: Reduce nitrogen to avoid excessive foliage at expense of fruit
Tip: In 2025, many gardeners are using biochar-enriched fertilizers, which help retain nutrients in the soil while sequestering carbon. These sustainable options have shown promising results for tomato production.
Watering Techniques: Consistency is Key
Perhaps nothing affects tomato quality more than proper watering. Too little causes stress and blossom drop; too much can lead to disease and diluted flavor.
How Much and How Often
Tomatoes require consistent moisture, but needs vary by growth stage:
- After transplanting: Water deeply every 2-3 days to establish roots
- Vegetative growth: 1-2 inches of water weekly (including rainfall)
- Flowering and fruiting: Increase to 2-3 inches weekly during fruit development
- Ripening stage: Slightly reduce water to concentrate flavors
Watering Methods Compared
| Method | Pros | Cons | Best For |
|---|---|---|---|
| Drip irrigation | Water-efficient, keeps foliage dry, consistent | Initial setup cost, maintenance | All tomato plantings |
| Soaker hoses | Affordable, easy to install, targets root zone | Less precise than drip, shorter lifespan | Row plantings |
| Hand watering | No equipment needed, can observe plants closely | Time-consuming, inconsistent | Container plants, small gardens |
| Sprinklers | Covers large areas quickly | Wets foliage (disease risk), water waste | Emergency watering only |
Mulching for Moisture Management
A 2-3 inch layer of mulch provides multiple benefits:
- Moisture retention: Reduces evaporation by up to 70%
- Temperature regulation: Keeps soil cooler in summer heat
- Weed suppression: Minimizes competition for water and nutrients
- Splash prevention: Reduces soil-borne disease transmission
Effective mulching materials include:
- Straw (disease-free)
- Shredded leaves
- Compost
- Pine needles
- Chemical-free grass clippings
- Black plastic (for warming soil in cool climates)
Signs of Watering Problems
Monitor your plants for these indicators:
Underwatering:
- Wilting, especially in afternoon
- Curling leaves
- Yellow leaves that drop
- Blossom drop
- Small, tough fruits
Overwatering:
- Yellowing lower leaves
- Cracked fruits
- Swollen stems
- Root rot (plants pull easily from soil)
- Fungal diseases
Supporting and Training Tomato Plants
Left to their own devices, tomato plants become sprawling, disease-prone messes.
Proper support systems improve air circulation, light exposure, and harvest accessibility.
Support System Options
Choose the right support based on your tomato varieties and garden style:
Tomato Cages:
- Best for: Determinate varieties, container growing
- Pros: Easy to set up, minimal training required
- Cons: Standard sizes often too small for vigorous plants
- Tip: Invest in heavy-duty, large cages or make your own from concrete reinforcing wire
Stakes:
- Best for: Indeterminate varieties grown with pruning
- Pros: Inexpensive, space-efficient
- Cons: Requires regular tying and pruning
- Tip: Use 6-8 foot stakes at least 1 inch in diameter, driven 12 inches into the ground
Trellises and String Systems:
- Best for: Large plantings of indeterminate varieties
- Pros: Maximizes space, excellent air circulation
- Cons: More complex setup, requires consistent pruning
- Tip: The “Florida weave” method uses posts and twine to support multiple plants in a row
A-Frames and Tepees:
- Best for: Decorative kitchen gardens, smaller spaces
- Pros: Attractive, good use of vertical space
- Cons: Limited support for very vigorous varieties
- Tip: Use bamboo poles lashed together at the top for an eco-friendly option
Pruning Techniques for Healthier Plants
Pruning improves plant health and fruit quality:
- Removing suckers: Pinch out the shoots that form in the crotch between the main stem and branches
- For indeterminate varieties: Remove most or all suckers
- For determinate varieties: Minimal pruning or remove only lower suckers
- Lower leaf removal: Strip leaves from the bottom 12 inches of the plant to:
- Improve air circulation
- Prevent soil-borne disease splash
- Redirect energy to fruit production
- Topping: When plants reach the top of their support (or 4-6 weeks before first frost):
- Pinch out the growing tip to stop vertical growth
- Encourage existing fruit to ripen
Warning: Always prune with clean tools to prevent disease transmission.
Early morning pruning allows cuts to dry quickly, reducing infection risk.
Training Methods Step-by-Step
For staked tomatoes, follow this routine:
- Install stakes at planting time
- When plants reach 12-18 inches, secure main stem to stake with soft garden twine or tomato clips
- Add new ties every 8-12 inches as plant grows
- Remove suckers weekly when they’re 2-4 inches long
- For single-stem training, remove all suckers
- For double or triple-stem training, allow 1-2 strong suckers to develop as additional main stems
Pest and Disease Management: Prevention and Solutions
In 2025, sustainable and organic approaches to pest and disease management have become mainstream. A proactive strategy focuses on prevention first, followed by targeted interventions when necessary.
Common Tomato Pests and Organic Controls
| Pest | Identification | Organic Controls |
|---|---|---|
| Tomato hornworms | Large green caterpillars with white stripes | Handpicking, Bt spray, parasitic wasps |
| Aphids | Tiny green, black, or white insects clustered on new growth | Insecticidal soap, neem oil, ladybugs |
| Whiteflies | Tiny white insects that fly up when disturbed | Yellow sticky traps, insecticidal soap, reflective mulch |
| Spider mites | Tiny specks that cause stippling on leaves; webbing | Strong water spray, predatory mites, insecticidal soap |
| Flea beetles | Small black beetles that create small holes in leaves | Row covers, diatomaceous earth, sticky traps |
| Stink bugs | Shield-shaped bugs that cause yellow spots on fruit | Row covers, trap crops, kaolin clay sprays |
Major Tomato Diseases and Prevention
| Disease | Symptoms | Prevention Strategies |
|---|---|---|
| Early blight | Dark spots with concentric rings on lower leaves | Crop rotation, mulching, resistant varieties |
| Late blight | Water-soaked spots, white fuzzy growth | Proper spacing, avoid overhead watering, copper fungicide |
| Fusarium wilt | Yellowing and wilting of lower leaves on one side | Resistant varieties, crop rotation, soil solarization |
| Verticillium wilt | V-shaped yellowing on leaf edges, stunting | Resistant varieties, crop rotation, healthy soil |
| Bacterial spot | Small dark spots with yellow halos on leaves and fruit | Copper sprays, avoid working with wet plants |
| Blossom end rot | Black sunken areas on fruit bottoms | Consistent watering, calcium supplementation |
Integrated Pest Management (IPM) Approach
Modern gardeners follow these IPM principles:
- Prevention first: Choose resistant varieties, maintain plant health, practice crop rotation
- Monitor regularly: Inspect plants weekly for early signs of problems
- Identify accurately: Proper identification ensures appropriate treatment
- Establish thresholds: Determine acceptable levels of damage before intervention
- Use least-toxic methods first: Start with cultural and mechanical controls
- Apply targeted treatments: Use specific remedies for identified problems
- Evaluate results: Track effectiveness and adjust strategies accordingly
Homemade Organic Sprays and Treatments
These DIY solutions can address many common problems:
Basic Insecticidal Soap:
- 1 tablespoon mild liquid soap (not detergent)
- 1 quart water
- Optional: 1 tablespoon neem oil
- Effective against: soft-bodied insects like aphids, whiteflies, and mites
Garlic-Pepper Spray:
- 4 cloves minced garlic
- 1 tablespoon hot pepper flakes
- 2 cups water
- Steep overnight, strain, add 1 teaspoon soap
- Effective against: many insects and some fungal issues
Baking Soda Fungicide:
- 1 tablespoon baking soda
- 1 teaspoon mild liquid soap
- 1 gallon water
- Effective against: powdery mildew and some leaf spots
Tip: Apply homemade sprays in early morning or evening to prevent leaf burn. Always test on a small area first and avoid application during hot, sunny conditions.
Pollination and Fruit Set: Maximizing Your Harvest
Tomatoes are self-pollinating, but understanding the pollination process helps you maximize fruit production, especially in challenging conditions.
How Tomato Pollination Works
Tomato flowers contain both male and female parts:
- Pollen from the anthers (male) must reach the stigma (female) of the same flower
- This typically occurs when the flower is vibrated by wind or visiting insects
- Once pollinated, the flower begins developing into fruit
- Unpollinated flowers drop from the plant
Factors Affecting Pollination
Several environmental conditions can interfere with successful pollination:
- Temperature extremes: Below 55°F or above 90°F can prevent pollen formation or viability
- Humidity levels: Very high or very low humidity affects pollen stickiness
- Lack of pollinators: Fewer bees and other insects in some environments
- Too much nitrogen: Excessive nitrogen fertilizer promotes foliage at the expense of flowers
- Irregular watering: Stress from drought or flooding can cause blossom drop
Hand Pollination Techniques
When natural pollination is insufficient, these methods can help:
- Gentle shaking: Lightly shake flowering stems during mid-morning when pollen is most viable
- Electric toothbrush method: Touch the back of flowers with a vibrating toothbrush to release pollen
- Q-tip transfer: Collect pollen with a cotton swab and touch it to the stigma of each flower
- Blossom spray: Mist flowers with a solution of 1 tablespoon Epsom salts per gallon of water to improve receptivity
Encouraging Pollinators in Your Garden
Create a pollinator-friendly environment with these strategies:
- Plant flowers: Include nectar-rich companions like marigolds, borage, and basil
- Provide water: Shallow dishes with stones for landing spots
- Avoid pesticides: Particularly during flowering periods
- Create habitat: Leave some areas with native plants and bare soil for ground-nesting bees
- Install bee houses: Simple structures for solitary bees can increase local populations
Container Growing: Tomatoes for Small Spaces
Limited space doesn’t mean limited harvest. Container growing allows anyone to enjoy homegrown tomatoes, even on balconies, patios, or small yards.
Choosing the Right Containers
The container you select significantly impacts success:
- Size matters: Minimum 5 gallons (larger is better)
- Material options:
- Terracotta: Breathable but dries quickly
- Plastic: Lightweight, retains moisture
- Fabric: Excellent drainage, prevents root circling
- Wood: Insulates roots from temperature extremes
- Drainage: Multiple holes are essential
- Color considerations: Dark containers absorb heat (good in cool climates, problematic in hot areas)
Best Tomato Varieties for Containers
Not all tomatoes perform well in containers. Look for these characteristics:
- Determinate or dwarf indeterminate growth habit
- Compact or bush varieties
- “Patio,” “container,” or “dwarf” in the name
Top-performing container varieties include:
- Patio Princess (determinate, 2-3 ft)
- Tiny Tim (determinate, 12-18 inches)
- Tumbling Tom (determinate, trailing)
- Bush Early Girl (determinate, 3 ft)
- Terenzo (determinate, 16-20 inches)
- Micro Tom (determinate, 6-8 inches)
Specialized Container Growing Mix
Standard garden soil is too heavy for containers. Create the ideal mix:
Basic Container Mix Recipe:
- 60% high-quality potting soil
- 20% compost
- 10% perlite or pumice
- 10% coconut coir or peat moss
- Optional: 1 cup worm castings per container
Container-Specific Care Techniques
Container tomatoes have unique requirements:
- Watering: Check daily; containers dry out faster than garden soil
- Water when top inch of soil feels dry
- Apply until water runs from drainage holes
- Consider self-watering containers for consistent moisture
- Feeding: Nutrients leach more quickly from containers
- Apply liquid fertilizer every 7-10 days at half strength
- Supplement with slow-release organic fertilizer monthly
- Watch for signs of nutrient deficiencies
- Temperature management:
- Move containers to shade during extreme heat
- Use wheeled platforms for heavy containers
- Insulate pots in cool weather with bubble wrap or fabric wraps
- Support systems:
- Secure cages to containers to prevent tipping
- Consider attaching containers to railings or walls for stability
- Use compact support systems designed for containers
Tip: Vertical hydroponic systems have become more affordable and user-friendly for urban gardeners.
These space-saving options can produce impressive yields of cherry and small slicing tomatoes in very limited space.
Harvesting and Storage
After months of care, harvesting at the right moment ensures the best flavor and longest storage life for your homegrown tomatoes.
When to Harvest: Timing for Perfect Ripeness
Tomatoes develop full flavor only when allowed to ripen properly:
- Color development: Harvest when fruits show 50-75% color change for best flavor development
- Feel test: Ripe tomatoes yield slightly to gentle pressure
- Seasonal considerations:
- Early season: Allow to ripen more fully on vine
- Late season: Harvest earlier to avoid frost damage
Harvesting Techniques to Prevent Damage
Proper harvesting prevents damage and disease:
- Harvest in the morning when fruits are cool but dry
- Use scissors or pruners rather than pulling to avoid stem damage
- Leave a small piece of stem attached to the fruit
- Handle gently to prevent bruising
- Use shallow containers to avoid crushing
- Separate damaged fruits for immediate use
Ripening Green Tomatoes Indoors
At season’s end, save unripe tomatoes:
- Harvest mature green tomatoes (full-sized with whitish-green color)
- Sort by ripeness stage
- Place in single layers in cardboard boxes
- Store at 65-70°F in indirect light
- Check every few days, removing ripened or rotting fruits
- Add a ripe banana to speed ripening (ethylene gas)
Storage Methods for Different Timeframes
| Storage Method | Temperature | Humidity | Duration | Best For |
|---|---|---|---|---|
| Counter | Room temp (65-70°F) | Ambient | 3-5 days | Completing ripening, best flavor |
| Refrigerator | 45-50°F | High | 1-2 weeks | Fully ripe tomatoes, short-term |
| Paper bag | Room temp | Moderate | 5-10 days | Accelerating ripening |
| Freezing | 0°F | N/A | 6-12 months | Cooking uses only |
| Canning | Room temp (after processing) | N/A | 1-2 years | Sauces, whole tomatoes |
| Dehydrating | Room temp | Very low | 6-12 months | Sun-dried tomatoes, powder |
Preserving Your Tomato Harvest
When blessed with abundance, preserve tomatoes for year-round enjoyment:
Quick Freezing Method:
- Wash and dry tomatoes
- Remove core
- Place whole on baking sheet until frozen
- Transfer to freezer bags
- Best for cooking uses (sauces, soups, stews)
Simple Refrigerator Tomato Sauce:
- Chop 5 pounds tomatoes
- Simmer with 2 tablespoons olive oil, 1 teaspoon salt
- Cook down for 1-2 hours
- Cool and refrigerate up to 1 week, or freeze for 6 months
Oven-Dried Tomatoes:
- Slice Roma tomatoes in half
- Place cut-side up on baking sheet
- Sprinkle with salt and herbs
- Dry in 200°F oven for 4-6 hours
- Store in refrigerator covered with olive oil
Troubleshooting Common Tomato Problems
Even experienced gardeners encounter challenges. Recognizing and addressing problems quickly can save your crop.
Leaf Problems and Solutions
| Symptom | Likely Cause | Solution |
|---|---|---|
| Yellowing lower leaves | Nitrogen deficiency or normal aging | Remove affected leaves, light nitrogen feeding |
| Purple-tinged leaves | Phosphorus deficiency or cold stress | Bone meal application, protect from cold |
| Curling leaves | Heat stress, overwatering, herbicide damage | Shade during peak heat, adjust watering, check for drift |
| Spotted leaves | Early blight, Septoria leaf spot | Remove affected leaves, apply organic fungicide |
| White powdery coating | Powdery mildew | Improve air circulation, baking soda spray |
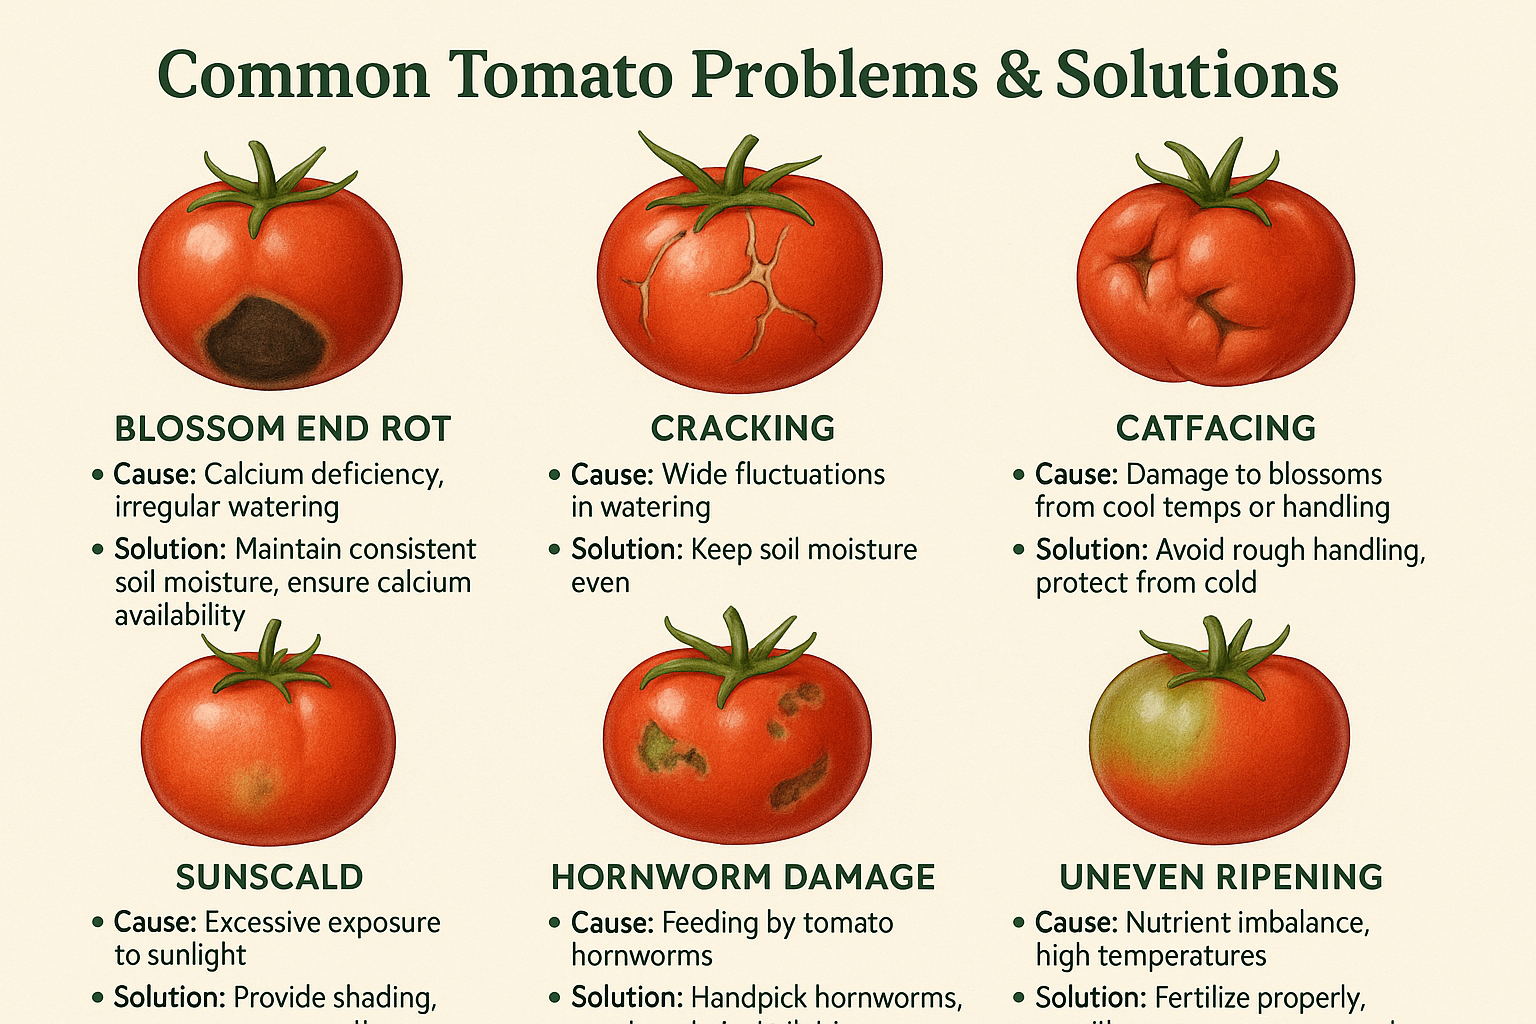
Fruit Issues Diagnosed
| Symptom | Likely Cause | Solution |
|---|---|---|
| Blossom end rot | Calcium deficiency, irregular watering | Consistent watering, calcium spray |
| Catfacing (deformed fruit) | Temperature fluctuations during flowering | Row covers for temperature stability |
| Cracking | Sudden uptake of water after dry period | Consistent watering, mulch |
| Sunscald | Sudden exposure to intense sun | Gradual hardening off, partial shade |
| Green shoulders | High temperatures, variety characteristic | Shade cloth in hot weather |
| Failure to ripen | Too much nitrogen, insufficient potassium | Adjust fertilizer, Epsom salt application |
Growth and Development Concerns
| Symptom | Likely Cause | Solution |
|---|---|---|
| Leggy plants | Insufficient light, overcrowding | More light, proper spacing |
| Blossom drop | Temperature extremes, inconsistent watering | Shade cloth, blossom set spray |
| Few flowers | Excessive nitrogen, insufficient phosphorus | Switch to bloom-promoting fertilizer |
| Stunted growth | Root damage, soil-borne disease, nematodes | Investigate roots, soil solarization |
| Wilting despite moist soil | Bacterial or fungal wilt | Remove affected plants, rotate crops |
Season Extension Techniques
Extend your tomato season with these approaches:
Early Season Strategies:
- Start seeds indoors 6-8 weeks before last frost
- Use wall-o-water or other water-filled protectors
- Apply black plastic mulch to warm soil
- Install row covers or cold frames
- Select early-maturing varieties
Late Season Strategies:
- Cover plants during early fall frosts
- Harvest green tomatoes before killing frost
- Prune late-forming flowers to focus energy on existing fruit
- Reduce watering to accelerate ripening
- Use reflective mulch to bounce light and heat onto plants
Companion Planting and Crop Rotation
Strategic planting partnerships and proper rotation schedules improve tomato health and productivity.
Beneficial Companion Plants for Tomatoes
Certain plants support tomato growth when planted nearby:
Pest-Repelling Companions:
- Marigolds: Repel nematodes and many insects
- Nasturtiums: Trap aphids and deter whiteflies
- Basil: Repels tomato hornworms and flies
- Garlic and onions: Deter many pests with strong odor
Growth-Enhancing Companions:
- Borage: Attracts pollinators, deters hornworms
- Carrots: Share space well, different root depth
- Asparagus: Long-term beneficial relationship
- Parsley: Attracts beneficial insects
Nutrient-Providing Companions:
- Comfrey: Dynamic accumulator of nutrients
- Beans and peas: Fix nitrogen in soil
- Chamomile: Accumulates calcium, potassium, sulfur
Plants to Avoid Near Tomatoes
Some plants compete with or inhibit tomato growth:
- Brassicas (cabbage, broccoli, kale): Compete for nutrients
- Corn: Heavy feeder that shades tomatoes
- Dill: Inhibits tomato growth when mature
- Fennel: Secretes growth-inhibiting substances
- Potatoes: Can transmit similar diseases
- Walnuts: Produce juglone, toxic to tomatoes
Four-Year Crop Rotation Plan
Rotating crops prevents disease buildup and balances soil nutrients:
Year 1: Tomatoes and other nightshades (peppers, eggplants)
- Heavy feeders that benefit from fresh compost
Year 2: Legumes (beans, peas)
- Nitrogen fixers that replenish soil
Year 3: Brassicas (cabbage, broccoli, kale)
- Medium feeders with different nutrient needs
Year 4: Root crops and greens (carrots, beets, lettuce)
- Light feeders that clean up remaining nutrients
???? Pro Tip: In small gardens, practice “spot rotation” by changing the specific location of tomatoes within each bed, rather than rotating entire beds.
Polyculture Approaches for Small Spaces
Modern gardening embraces mixed plantings:
- Three Sisters variation: Dwarf tomatoes, bush beans, and low-growing herbs
- Vertical integration: Tomatoes above, shade-tolerant crops below
- Guild planting: Central tomato surrounded by beneficial companions in concentric circles
- Salad garden: Cherry tomatoes with lettuce, radishes, and herbs
Advanced Techniques for Tomato Enthusiasts
For gardeners looking to take their tomato growing to the next level, these specialized approaches can produce exceptional results.
Grafting Tomatoes for Disease Resistance
Grafting combines the vigor of disease-resistant rootstock with the flavor of heirloom varieties:
- Select components:
- Rootstock: Vigorous, disease-resistant variety
- Scion: Desired fruiting variety (often heirloom)
- Timing: Start both varieties so stems reach pencil thickness at the same time
- Basic tube grafting method:
- Cut rootstock and scion at 45° angles
- Join with silicone grafting clip
- Maintain high humidity (90%+) for 7 days
- Gradually acclimate to normal conditions
- Benefits:
- Grow heirlooms in disease-prone soil
- Increased vigor and yield
- Extended harvest season
- Better tolerance to environmental stress
Hydroponic and Aquaponic Systems
Soil-free growing offers precise control and water efficiency:
Simple Bucket Hydroponic System:
- 5-gallon bucket with lid
- Net pot inserted in lid
- Air stone and pump
- Nutrient solution
- Growing medium (rockwool, clay pellets)
Basic Nutrient Film Technique (NFT):
- Sloped channel with thin film of nutrient solution
- Circulating pump and reservoir
- Plants in net pots along channel
- Timer for intermittent flow
Home Aquaponics Integration:
- Fish tank provides nutrient-rich water
- Tomatoes filter water for fish
- Requires pH balancing (6.8-7.0)
- Best for cherry and smaller tomato varieties
Breeding Your Own Tomato Varieties
Developing custom varieties tailored to your conditions:
- Select parent plants with desirable characteristics
- Cross-pollinate by transferring pollen between varieties
- Mark and harvest cross-pollinated fruits
- Save and dry seeds properly
- Grow out F1 generation the following season
- Select best performers for desired traits
- Continue selection for 6-8 generations until stable
Record-Keeping for Continuous Improvement
Systematic documentation leads to better results each year:
Essential Information to Track:
- Variety names and sources
- Planting and transplanting dates
- First flower and harvest dates
- Yield quantities and timing
- Flavor and performance notes
- Disease and pest issues
- Weather conditions
- Successful companion plantings
- Fertilization schedule and results
???? Pro Tip: In 2025, many gardeners use specialized apps with AI-powered recommendations based on their specific growing conditions and previous results. These tools can significantly accelerate the learning curve for tomato growing.
Seasonal Care Calendar: Month-by-Month Guide
This timeline provides a framework for tomato care throughout the year. Adjust timing based on your specific climate zone.
Early Spring (February-March)
- Order seeds and supplies
- Start seeds indoors (6-8 weeks before last frost)
- Prepare garden beds (soil testing, amendments)
- Set up grow lights and heat mats
- Begin hardening off seedlings as weather permits
Late Spring (April-May)
- Transplant seedlings after danger of frost
- Install support systems
- Apply initial mulch layer
- Monitor for late frosts and protect plants
- Begin regular feeding schedule
- Watch for early pests and diseases
Early Summer (June-July)
- Maintain consistent watering schedule
- Prune suckers weekly
- Add additional mulch as needed
- Monitor and treat for pests and diseases
- Begin harvesting early varieties
- Continue side-dressing with compost
Late Summer (August-September)
- Harvest main crop
- Reduce nitrogen fertilization
- Remove lower leaves for better air circulation
- Protect from extreme heat if necessary
- Begin preserving excess harvest
- Plant fall crop in warm regions
Fall (October-November)
- Harvest remaining fruits before frost
- Ripen green tomatoes indoors
- Remove and compost plants after harvest
- Clean and store supports and cages
- Add organic matter to beds
- Record notes on variety performance
Winter (December-January)
- Review garden records
- Plan next season’s varieties and layout
- Order seeds for early start
- Clean and organize tools and supplies
- Research new varieties and techniques
- Attend gardening workshops or webinars
Conclusion: Growing Your Tomato Expertise
Growing perfect tomatoes is both a science and an art. The journey from tiny seed to juicy, flavorful fruit requires attention to detail, consistent care, and a willingness to learn from both successes and challenges. By following the comprehensive guidance in this article, you’re well-equipped to grow the most delicious tomatoes possible in your unique growing environment.
Remember that each growing season brings new lessons and opportunities for improvement. The tomato varieties that thrive in your microclimate, your specific soil conditions, and your gardening style may differ from those that work for others. Embrace the experimental nature of gardening and keep detailed records to refine your approach year after year.
In 2025, with increasing focus on food security, sustainability, and the unmatched quality of homegrown produce, your tomato growing skills represent more than just a hobby—they’re a valuable contribution to your household’s well-being and a connection to the timeless practice of growing food.
Whether you’re harvesting your first cherry tomato from a container on your balcony or managing rows of heirloom varieties in a dedicated garden, the satisfaction of biting into a sun-warmed, perfectly ripe tomato you’ve grown yourself is one of gardening’s greatest rewards. So get your hands dirty, tend your plants with care, and prepare to enjoy the incomparable flavor of homegrown tomatoes.
Next Steps for Tomato Success
- Start small but dream big: Begin with a few plants to build confidence before expanding
- Join a community: Connect with local gardening groups or online forums to share knowledge
- Save seeds: Preserve genetics from your best performers for next season
- Try new varieties yearly: Experiment with at least one new variety each season
- Share the abundance: Gift extra produce to neighbors and friends to spread the joy of homegrown tomatoes.