With growing concerns about food security and quality, more gardeners than ever are discovering the rewards of starting tomatoes from seed.
Whether you’re a seasoned gardener or just beginning your growing journey, understanding the nuances of tomato seeds for planting can dramatically improve your harvest.
From heirloom varieties bursting with complex flavors to modern hybrids bred for disease resistance, the world of tomato seeds offers endless possibilities for your garden.
Highlights
- Seed selection matters: Choose between heirloom, hybrid, or open-pollinated varieties based on your growing goals, climate, and taste preferences.
- Proper seed starting techniques significantly increase germination rates and produce stronger seedlings.
- Understanding tomato seed terminology (determinate vs. indeterminate, days to maturity, disease resistance codes) helps match varieties to your specific growing conditions.
- Seed saving from your best tomato plants creates a sustainable garden and allows you to develop varieties adapted to your local environment.
- Timing is crucial: Start seeds 6-8 weeks before your region’s last frost date for optimal results.
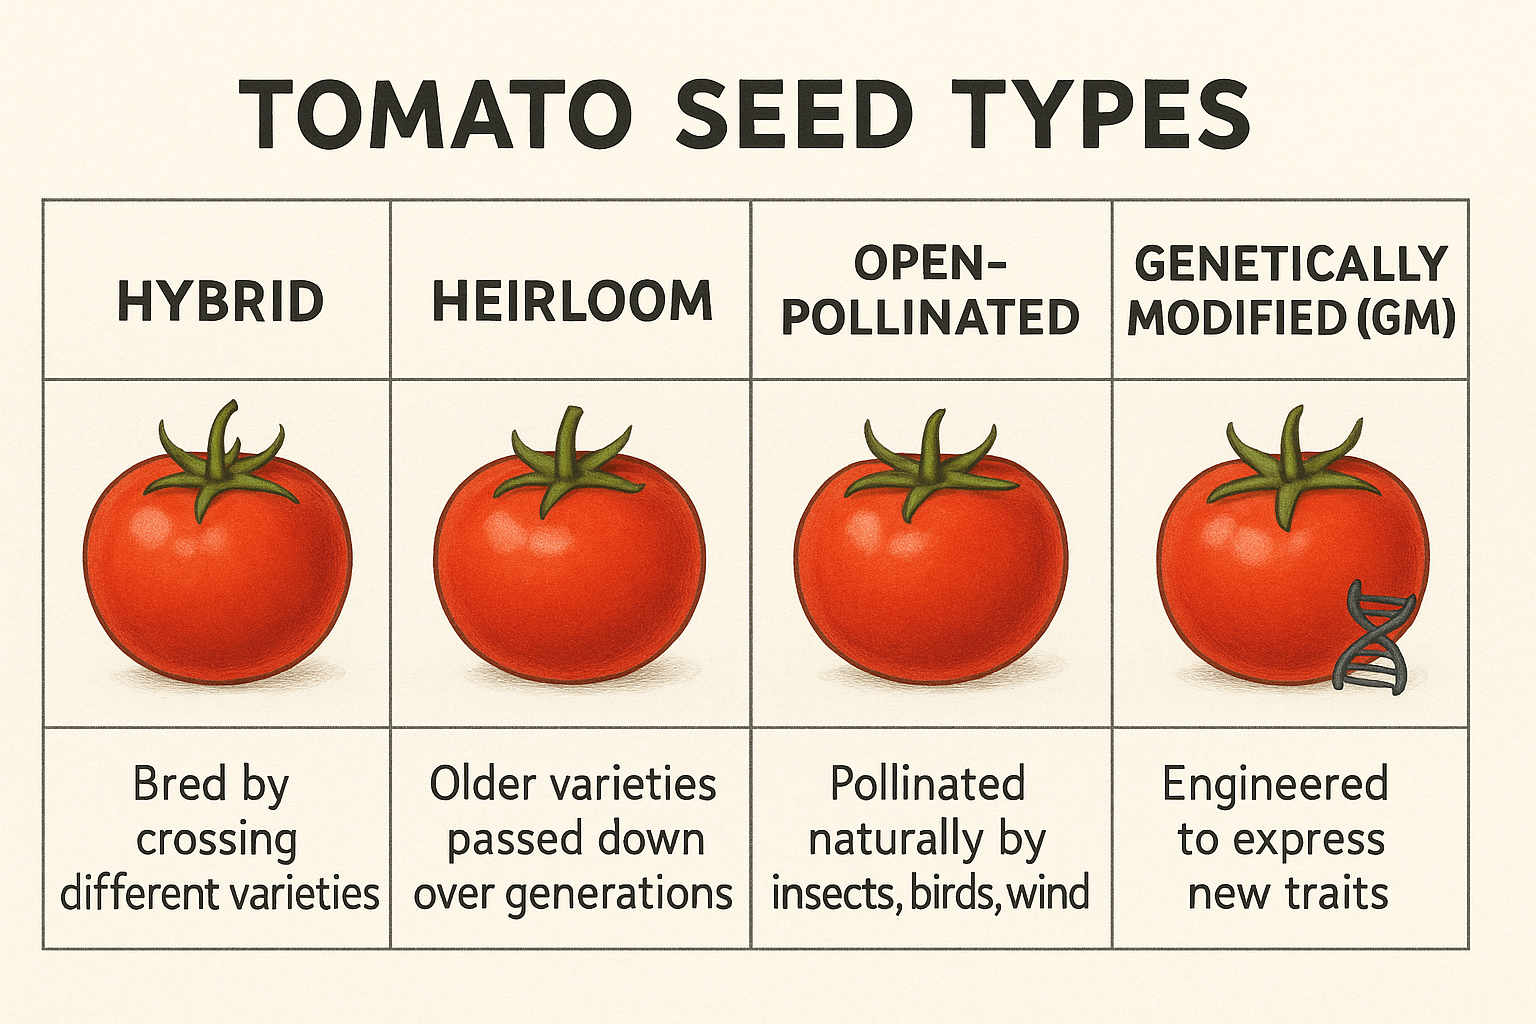
Understanding Tomato Seed Types
When I first started growing tomatoes, I was overwhelmed by the terminology on seed packets.
Let’s demystify the main categories of tomato seeds available for planting.
Heirloom Tomato Seeds
Heirloom tomatoes are varieties that have been passed down through generations, typically for 50 years or more.
These seeds tell stories—of immigrant families bringing their prized tomato varieties to new countries, of gardeners selecting for specific traits over decades, of flavors that commercial growers have long abandoned in favor of shipping durability.
Benefits of heirloom tomato seeds:
- Exceptional, complex flavors often missing from store-bought varieties
- Incredible diversity in colors, shapes, and sizes
- Ability to save seeds that grow “true to type” year after year
- Connection to agricultural heritage and food history
Popular heirloom varieties for 2025:
- Brandywine (pink, red, yellow, and black variations)
- Cherokee Purple
- Green Zebra
- Mortgage Lifter
- Black Krim
- San Marzano
I’ll never forget biting into my first home-grown Brandywine tomato.
The complex sweetness with balanced acidity was nothing like the bland supermarket tomatoes I’d grown accustomed to.
That moment converted me into a lifelong tomato seed enthusiast.
Hybrid Tomato Seeds
Hybrid seeds result from deliberately cross-pollinating two different tomato varieties to create offspring with desirable traits from both parents.
Think of hybrids as the best of both worlds—combining disease resistance, productivity, and sometimes flavor in ways that nature might not have produced on its own.
Benefits of hybrid tomato seeds:
- Enhanced disease resistance
- Improved yield and uniformity
- Earlier maturity in many cases
- Vigor (sometimes called “hybrid vigor”)
Popular hybrid varieties for 2025:
- Better Boy
- Early Girl
- Sungold (a cherry tomato that’s consistently rated among the sweetest)
- Big Beef
- Celebrity
The trade-off? Seeds saved from hybrid tomatoes won’t grow “true to type”—meaning the resulting plants won’t have the same characteristics as the parent plant.
For this reason, you’ll need to purchase new hybrid seeds each season.
Open-Pollinated Tomato Seeds
Open-pollinated varieties occupy a middle ground between heirlooms and hybrids.
These are stable varieties that will produce offspring similar to the parent plants when saved and replanted, but they haven’t necessarily been passed down for generations.
Benefits of open-pollinated tomato seeds:
- Seeds can be saved for future planting
- Often more genetically diverse than hybrids
- Many newer open-pollinated varieties combine heirloom flavor with modern improvements
Popular open-pollinated varieties for 2025:
- Rutgers
- Stupice
- Amish Paste
- Matt’s Wild Cherry
- Crimson Sprinter
Organic vs. Conventional Tomato Seeds
Beyond the genetic categories above, you’ll also need to decide between organic and conventionally produced seeds.
Organic tomato seeds are harvested from plants grown without synthetic fertilizers or pesticides, and the seeds themselves aren’t treated with synthetic chemicals.
These seeds support sustainable agricultural practices and may be better adapted to organic growing methods.
Conventional tomato seeds may come from plants grown with synthetic inputs and might be treated with fungicides to prevent disease during germination.
These treatments can improve germination rates but aren’t compatible with certified organic growing.
In my experience, organic seeds tend to produce plants that are more resilient in low-input gardens, while conventional seeds sometimes offer more variety options.
The choice ultimately depends on your gardening philosophy and goals.
Determinant vs. Indeterminant: Growth Habits Explained
One of the most important distinctions when selecting tomato seeds for planting is understanding growth habits.
This characteristic will determine how your plants grow, how much space they need, and how they should be supported.
Determinate Tomatoes: The Compact Option
Determinate tomatoes grow to a predetermined height (usually 3-4 feet) and then stop. They produce most of their fruit within a concentrated 4-6 week period and then taper off.
Think of them as bushy plants with a defined life cycle.
Ideal for:
- Container gardening
- Small spaces
- Gardeners who want a concentrated harvest for canning or preserving
- Regions with shorter growing seasons
Popular determinate varieties:
- Roma
- Bush Early Girl
- Patio Princess
- Tumbler
- Tiny Tim
I’ve found determinate varieties particularly useful for my patio containers, where their manageable size fits perfectly in limited space.
Last year, my Roma plants provided a perfect two-week window of intense production that aligned perfectly with my annual sauce-making weekend.
Indeterminate Tomatoes: The Continuous Producers
Indeterminate tomatoes are the vining types that continue growing, flowering, and producing fruit until killed by frost or disease.
These plants can reach impressive heights—I’ve grown some that stretched to over 8 feet tall by the end of the season!
Ideal for:
- Gardeners who want a continuous harvest throughout the season
- Trellising or staking systems
- Longer growing seasons
- Those who prefer to harvest fresh tomatoes regularly rather than all at once
Popular indeterminate varieties:
- Most cherry tomatoes (like Sweet 100 and Sun Gold)
- Most heirloom varieties (like Brandywine and Cherokee Purple)
- Better Boy
- Early Girl
- Beefsteak
Semi-Determinate: The Middle Ground
Some tomato varieties fall between determinate and indeterminate classifications.
These semi-determinate types grow larger than determinate varieties but don’t vine indefinitely like indeterminates.
Ideal for:
- Gardeners seeking a balance between plant size and extended harvest
- Those with medium-sized growing spaces
Popular semi-determinate varieties:
- Celebrity
- Mountain Merit
- Defiant
Understanding these growth habits is crucial when planning your garden space and selecting support systems.
I’ve made the mistake of planting indeterminate varieties in cages meant for determinate plants—by August, the vines had escaped their confines and were sprawling across my garden paths!
Decoding Tomato Seed Packets: What the Information Means
Tomato seed packets contain valuable information that can help you make informed choices and achieve successful harvests.
Let’s break down what all those numbers and abbreviations actually mean.
Days to Maturity: Timing Your Harvest
This number tells you approximately how many days from transplanting outdoors until the plant begins producing ripe fruit.
For example, a variety listed as “75 days” should start ripening tomatoes about 75 days after being transplanted into the garden.
Important note: This timing assumes ideal growing conditions.
Factors like temperature, sunlight, and soil quality can extend or reduce this timeframe.
| Maturity Category | Days to Maturity | Examples |
|---|---|---|
| Early Season | 50-65 days | Early Girl, Fourth of July, Glacier |
| Mid-Season | 65-80 days | Celebrity, Roma, Better Boy |
| Late Season | 80+ days | Brandywine, Cherokee Purple, Beefsteak |
I’ve found that planting a mix of early, mid, and late-season varieties provides the longest possible harvest window.
My early varieties start producing by mid-June, while my late-season heirlooms continue the harvest well into October in my Zone 6 garden.
Disease Resistance Codes
Those letters after a tomato variety name aren’t just random—they indicate which diseases the variety has been bred to resist.
Here’s a quick reference guide to common resistance codes:
- V – Verticillium Wilt
- F or FF or FFF – Fusarium Wilt (races 1, 2, or 3)
- N – Nematodes
- T – Tobacco Mosaic Virus
- A – Alternaria (Early Blight)
- St – Stemphylium (Gray Leaf Spot)
- TSWV – Tomato Spotted Wilt Virus
- LB – Late Blight
So a tomato described as “Celebrity VFFNT” has resistance to Verticillium Wilt, three races of Fusarium Wilt, Nematodes, and Tobacco Mosaic Virus.
Disease resistance is particularly important if you’ve experienced specific problems in your garden before.
After losing an entire crop to late blight in 2023, I now make sure to include at least a few LB-resistant varieties in my garden each year as insurance.
Fruit Size and Type
Seed packets typically describe the size and sometimes the shape of the tomato fruits.
Common categories include:
- Cherry/Grape – Small fruits under 2 inches, perfect for snacking
- Saladette/Plum – Medium-small oval or cylindrical fruits, ideal for salads and cooking
- Slicing – Medium to large round fruits perfect for sandwiches
- Beefsteak – Large, sometimes irregularly shaped fruits with lots of flesh
- Paste/Roma – Meaty tomatoes with less juice, ideal for sauces and canning
Seed Count and Germination Rates
Most packets indicate how many seeds are included.
Commercial seeds typically have germination rates of 80-95%, meaning you can expect that percentage of seeds to successfully sprout under proper conditions.
Pro tip: Even if a packet contains 25 seeds, you don’t need to plant them all at once!
Properly stored tomato seeds remain viable for 3-5 years, so you can save some for future seasons.
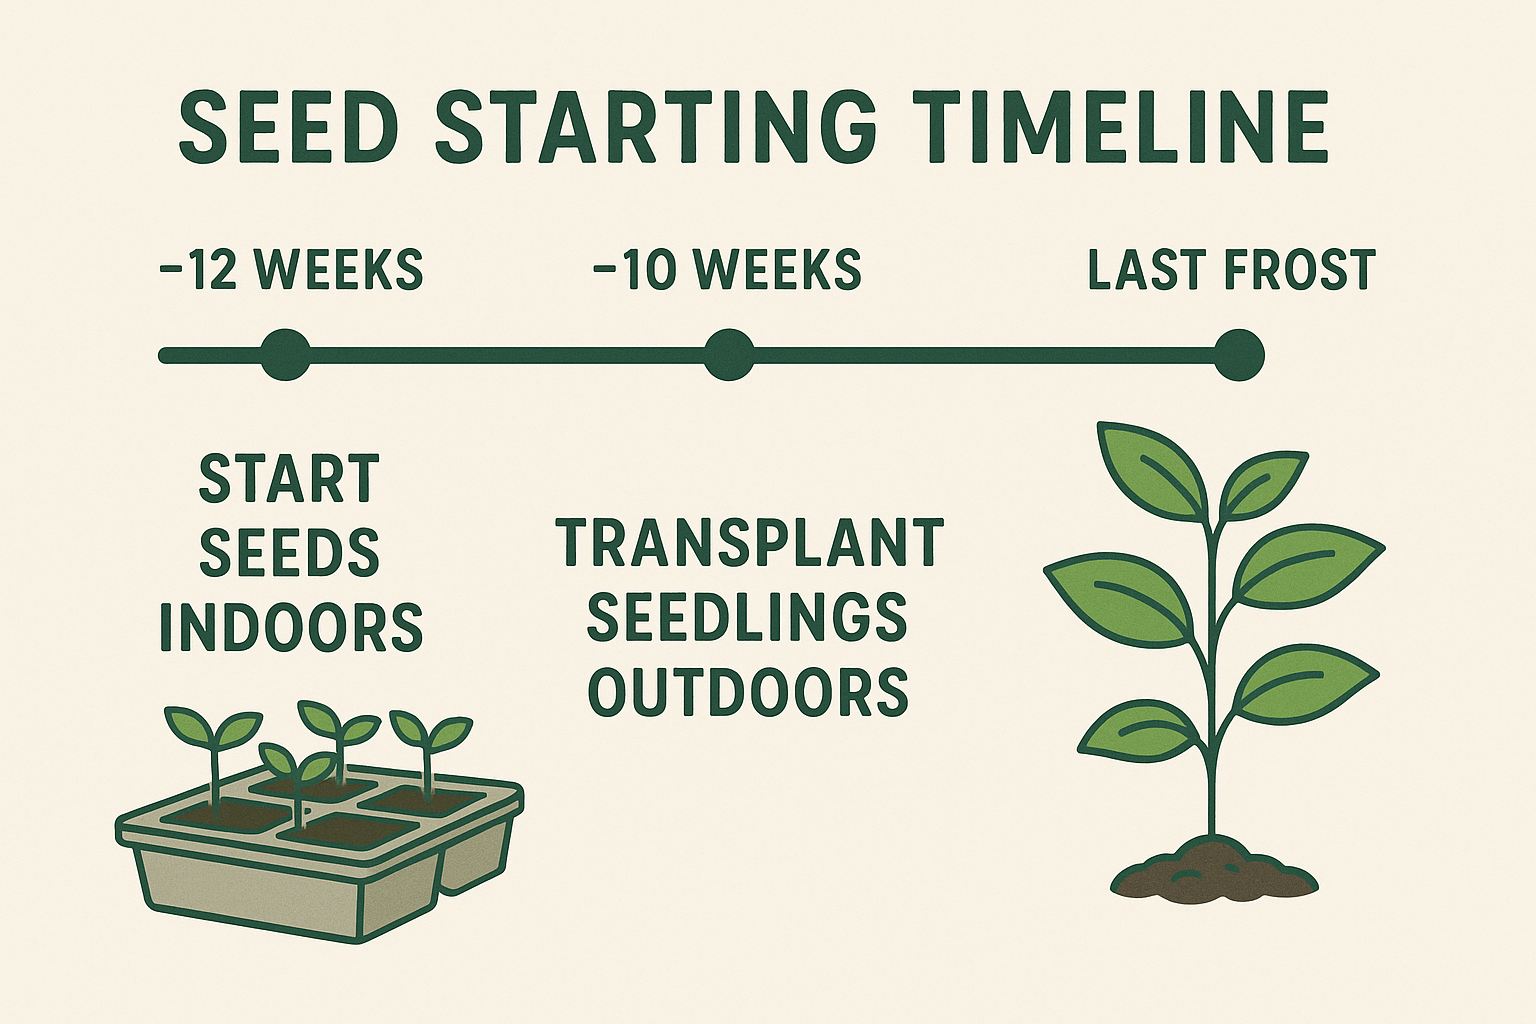
When to Start Tomato Seeds for Optimal Growth
Timing is everything when it comes to starting tomato seeds.
The goal is to have seedlings that are the right age for transplanting when your weather is suitable for outdoor growing.
Calculating Your Seed Starting Date
The general rule is to start tomato seeds indoors 6-8 weeks before your region’s average last frost date.
This gives seedlings time to develop into sturdy young plants ready for transplanting.
To find your optimal seed starting date:
- Determine your region’s average last frost date (available from local extension offices or online resources)
- Count backward 6-8 weeks from that date
- Mark your calendar!
For example, if your last frost date is May 15th, you should start your seeds between March 20th and April 3rd.
Regional Timing Considerations
| Climate Zone | Typical Seed Starting Window | Notes |
|---|---|---|
| Zones 3-4 | Early to mid-March | Consider starting a week earlier for longer-season varieties |
| Zones 5-6 | Late February to mid-March | Standard 6-8 week window usually works well |
| Zones 7-8 | Early to late February | Can often transplant earlier |
| Zones 9-10 | January or September/October | Many warm regions have two growing seasons, avoiding the hottest summer months |
Living in Zone 6, I’ve found that starting seeds in early March gives me perfectly sized transplants by mid-May when our soil has warmed and frost danger has passed.
One year I started too early in February, and my leggy, overgrown seedlings struggled after transplanting.
Succession Planting for Extended Harvests
Instead of starting all your tomato seeds at once, consider staggering your planting to extend your harvest season.
Succession planting strategy:
- Start your main crop at the standard 6-8 weeks before last frost
- Start a second smaller batch 2-3 weeks later
- For fall harvests in longer-season areas, start another batch in early summer
This approach provides fresh tomatoes over a longer period and serves as insurance if one batch encounters problems.
Essential Supplies for Starting Tomato Seeds
Before you begin, gather the right supplies to give your tomato seeds the best possible start.
Quality materials make a significant difference in germination rates and seedling health.
Seed Starting Containers
You have several options for containers to start your tomato seeds:
Seed starting trays with cell inserts:
- Pros: Organized, space-efficient, easy to label
- Cons: Seedlings may outgrow cells before transplant time
Biodegradable pots (peat, coir, or paper):
- Pros: Can be planted directly into the garden, reducing transplant shock
- Cons: May dry out more quickly, can develop mold in very humid conditions
Recycled containers (yogurt cups, egg cartons, etc.):
- Pros: Inexpensive, reuses materials
- Cons: May lack drainage, inconsistent sizes
Soil blocks:
- Pros: No containers needed, excellent root development
- Cons: Requires special equipment, more skill to master
I prefer starting in 72-cell trays for germination, then potting up to 4-inch biodegradable pots once true leaves develop.
This two-step approach gives me the best of both worlds—efficient use of space during germination and adequate root development before transplanting.
Seed Starting Mix
Never use garden soil for starting seeds! It’s too heavy and may contain pathogens. Instead, use:
Commercial seed starting mix:
- Lightweight, sterile, and formulated specifically for seed starting
- Usually contains peat moss or coco coir, vermiculite, and/or perlite
- Some include a small amount of nutrients to support early growth
DIY seed starting mix recipe:
- 1 part coco coir or peat moss
- 1 part vermiculite or perlite
- ¼ part worm castings or compost (screened fine)
Whichever option you choose, the mix should be:
- Light and fluffy for easy root penetration
- Able to hold moisture without becoming waterlogged
- Free from weed seeds and disease organisms
Lighting Systems
Adequate light is crucial for growing strong tomato seedlings. Without it, seedlings become leggy and weak.
South-facing window:
- Pros: Free, no equipment needed
- Cons: Often insufficient light intensity, especially during cloudy periods
- Results: Often leads to leggy, stretched seedlings
Fluorescent shop lights:
- Pros: Affordable, effective, low heat output
- Cons: Bulky, less energy-efficient than newer options
- Results: Good seedling development when placed 2-3 inches above plants
LED grow lights:
- Pros: Energy-efficient, customizable spectrum, long-lasting
- Cons: Higher initial investment
- Results: Excellent seedling development, compact growth
After years of struggling with leggy seedlings in my windows, I invested in LED grow lights and saw a dramatic improvement in seedling quality.
My transplants were stockier, greener, and more vigorous—well worth the initial expense.
Heat Mats and Temperature Control
Tomato seeds germinate best at soil temperatures between 70-80°F (21-27°C).
Since most homes are cooler than this, especially in early spring, heat mats can significantly improve germination.
Benefits of heat mats:
- Faster germination (often within 5-7 days versus 10-14 days without)
- More consistent germination rates
- Reduced risk of damping off disease due to quicker emergence
Once seedlings emerge, maintain ambient temperatures around 65-75°F (18-24°C) during the day and slightly cooler at night.
Watering Tools
Proper watering is essential but challenging with tiny seedlings.
These tools help:
Spray bottles:
- Gentle misting prevents seed displacement
- Ideal for keeping soil surface moist during germination
Bottom watering trays:
- Allows water to be absorbed from below
- Prevents disturbing seeds and seedlings
- Encourages deeper root growth
Watering cans with fine roses:
- Delivers gentle shower once seedlings are established
- More efficient than spray bottles for larger quantities
I’ve found that a combination approach works best: mist the surface until germination, then switch to bottom watering as seedlings develop.
Step-by-Step Guide to Starting Tomato Seeds
Now that you understand the basics and have your supplies ready, let’s walk through the process of starting tomato seeds from beginning to transplanting.
Preparation: Setting Up Your Seed Starting Area
-
Choose your location – Find a warm spot with access to electricity for lights and heat mats. A spare table, shelving unit, or dedicated growing rack works well.
-
Assemble your lighting – Hang lights so they can be adjusted as plants grow. They should start just a few inches above the seed trays.
-
Prepare your containers – If reusing containers, wash them with a 10% bleach solution to kill any pathogens. For biodegradable pots, moisten them before filling.
-
Moisten your seed starting mix – Before filling containers, moisten the mix to the consistency of a wrung-out sponge. This is crucial—dry mix is difficult to wet evenly later, and overly wet mix can cause seeds to rot.
-
Fill containers – Fill to about ¼ inch from the top, tapping gently to settle the mix without compacting it.
-
Label everything – Use waterproof markers on plastic labels or directly on containers. Include variety name and date planted.
Sowing the Seeds
-
Make seed depressions – Create small indentations about ¼ inch deep. I use the eraser end of a pencil for this.
-
Place seeds – Put 1-2 seeds in each cell or pot. Using two seeds provides insurance, but you’ll need to thin to the strongest seedling later.
-
Cover lightly – Sprinkle a thin layer of seed starting mix over the seeds. Tomato seeds need darkness to germinate effectively.
-
Moisten the surface – Use a spray bottle to gently wet the surface without displacing seeds.
-
Cover for humidity – Place a humidity dome or plastic wrap over the containers to maintain moisture during germination.
-
Apply bottom heat – Place containers on a heat mat set to 75-80°F (24-27°C).
Caring for Seedlings After Germination
-
Remove covers – As soon as you see the first sprouts emerging, remove humidity domes or plastic covers to prevent damping off disease.
-
Provide light – Position lights 2-3 inches above seedlings for 14-16 hours daily. Raise lights as plants grow to maintain this distance.
-
Adjust temperature – Turn off heat mats once most seeds have germinated. Maintain room temperature around 65-75°F (18-24°C).
-
Water properly – Allow the surface to dry slightly between waterings. Bottom watering is ideal at this stage to encourage root development.
-
Improve air circulation – Use a small fan on low setting to create gentle air movement. This strengthens stems and reduces disease risk.
Thinning and Potting Up
-
Thin seedlings – If you planted multiple seeds per cell, snip off the weaker seedlings at soil level once they have their first true leaves. Never pull them out, as this can damage the roots of the seedling you want to keep.
-
Evaluate timing for potting up – When seedlings have developed their second set of true leaves and are 2-3 inches tall, they’re ready for larger containers.
-
Prepare larger containers – Fill 3-4 inch pots with potting mix (not seed starting mix). Make a hole in the center large enough for the seedling’s root ball.
-
Handle seedlings carefully – Lift seedlings by their leaves, never by the stems. The stems are fragile, while the leaves can be replaced if damaged.
-
Plant deeply – Unlike most plants, tomatoes can develop roots along their stems. Plant seedlings deeper than they were growing, burying up to 2/3 of the stem. Remove the lowest leaves if necessary.
-
Water thoroughly – After potting up, water seedlings to eliminate air pockets around roots.
My first year starting tomatoes, I skipped the potting-up step and tried to keep my seedlings in their original cells until transplant time.
The result was stunted, nutrient-deficient plants that took weeks to recover after planting out.
I’ve never skipped this crucial step since!
Hardening Off: Preparing for Outdoor Life
Hardening off is the process of gradually acclimating indoor-grown seedlings to outdoor conditions.
This crucial step prevents transplant shock.
7-10 day hardening off schedule:
- Day 1-2: Place seedlings in a sheltered outdoor location for 1-2 hours in filtered sunlight
- Day 3-4: Increase outdoor time to 3-4 hours, introducing a bit more direct sunlight
- Day 5-6: Leave plants out for 5-6 hours, including some exposure to gentle breezes
- Day 7-8: Extend time to a full day, but bring in at night if temperatures will drop below 50°F (10°C)
- Day 9-10: Leave plants out day and night unless frost is predicted
During the hardening off process, be especially vigilant about watering, as containers can dry out more quickly outdoors.
Also, watch for signs of stress like wilting or leaf scorch, which indicate you need to slow down the process.
Common Problems When Starting Tomato Seeds
Even experienced gardeners encounter issues when starting tomato seeds.
Here’s how to identify and solve the most common problems.
Damping Off Disease
This fungal disease causes seedlings to collapse and die, often with a constricted stem at soil level.
Prevention:
- Use sterile seed starting mix and clean containers
- Provide good air circulation
- Avoid overwatering
- Remove humidity domes promptly after germination
- Apply a light dusting of cinnamon (a natural fungicide) to soil surface
Treatment: Unfortunately, once damping off appears, affected seedlings cannot be saved.
Remove them immediately to prevent spread, improve air circulation, and reduce watering.
Leggy Seedlings
Leggy seedlings have long, thin stems with wide spacing between leaves—a sign of insufficient light.
Prevention:
- Provide strong, direct light 14-16 hours daily
- Keep lights positioned just 2-3 inches above seedlings
- Maintain proper temperatures (excessive heat can contribute to legginess)
Treatment:
- Increase light intensity and duration
- When potting up, bury the leggy stems deeper in the soil
- Gently brush your hand across seedling tops daily to strengthen stems
Nutrient Deficiencies
Yellow leaves, purple undersides, or stunted growth can indicate nutrient issues.
Prevention:
- Pot up to nutrient-rich potting mix when seedlings develop true leaves
- Begin very light fertilization after the first true leaves appear
Treatment:
- Apply quarter-strength liquid organic fertilizer once weekly
- For yellowing between leaf veins (magnesium deficiency), spray with diluted Epsom salt solution (1 tsp per quart of water)
Germination Failure
If your seeds aren’t sprouting, consider these factors:
Common causes and solutions:
- Old seeds: Tomato seeds remain viable for 3-5 years when properly stored. Beyond that, germination rates decline. Increase quantity planted or obtain fresh seeds.
- Improper temperature: Ensure soil temperature is 70-80°F (21-27°C) using a heat mat.
- Inconsistent moisture: Keep soil consistently moist but not waterlogged during germination.
- Planted too deeply: Tomato seeds should be covered with only ¼ inch of soil.
Transplant Shock
Seedlings may wilt or stall growth after potting up or transplanting outdoors.
Prevention:
- Always handle seedlings by their leaves, not stems
- Ensure proper hardening off before outdoor transplanting
- Transplant on cloudy days or in the evening
- Water thoroughly after transplanting
Treatment:
- Provide temporary shade for a few days after transplanting
- Maintain consistent soil moisture
- Apply a dilute seaweed solution to reduce stress
Saving Tomato Seeds: Creating a Sustainable Garden
One of the most rewarding aspects of growing tomatoes from seed is the ability to save seeds from your best plants, creating a sustainable cycle in your garden.
This practice not only saves money but also helps develop varieties adapted to your specific growing conditions.
Which Tomato Seeds Can Be Saved?
Not all tomato varieties are suitable for seed saving:
Good candidates for seed saving:
- Heirloom varieties
- Open-pollinated varieties
- Any variety labeled “heritage” or “traditional”
Not suitable for seed saving:
- Hybrid varieties (seeds won’t grow “true to type”)
- Patented varieties (saving seeds may violate intellectual property rights)
Always check seed packets or catalog descriptions if you’re unsure whether a variety is open-pollinated or hybrid.
The Fermentation Method for Seed Saving
The most effective way to save tomato seeds involves fermentation, which removes the gel sac surrounding each seed and helps prevent seed-borne diseases.
Step-by-step fermentation process:
-
Select perfect specimens – Choose fully ripe, disease-free tomatoes from your healthiest, most productive plants.
-
Extract seeds and pulp – Cut tomatoes in half across the equator and squeeze seeds and gel into a clean container. Add a small amount of water.
-
Label clearly – Mark containers with variety names and dates.
-
Ferment the mixture – Cover loosely (a paper towel secured with a rubber band works well) and place in a warm location (70-80°F/21-27°C) out of direct sunlight.
-
Wait for fermentation – Within 2-5 days, a white mold will form on the surface. This is normal and desirable! The fermentation process breaks down the gel coating.
-
Test for completion – Fermentation is complete when seeds have sunk to the bottom of the container.
-
Rinse thoroughly – Pour the mixture into a fine sieve and rinse under running water, rubbing gently to remove any remaining pulp.
-
Dry completely – Spread clean seeds in a single layer on coffee filters, paper plates, or window screens. Place in a warm, dry location with good air circulation for 1-2 weeks.
-
Test for dryness – Seeds should snap, not bend, when fully dry.
-
Store properly – Place dried seeds in paper envelopes or small glass jars. Label with variety name and date. Store in a cool, dry place.
Isolation Distances for Pure Seed Saving
If you’re growing multiple tomato varieties and want to save seeds that will grow true to type, you need to consider isolation distances to prevent cross-pollination.
While tomatoes are primarily self-pollinating, cross-pollination can occur through insect activity. For the purest seed saving:
- Standard isolation: Keep different varieties 10-50 feet apart
- Physical barriers: Use row covers during flowering to prevent insect access
- Blossom bagging: Place small fabric or paper bags over individual flower clusters before they open
For the home gardener not concerned with absolute purity, the standard isolation distance is usually sufficient.
I’ve successfully saved seeds from multiple varieties grown in the same garden with minimal crossing by simply selecting fruits from the center of each plant rather than the edges.
Long-Term Seed Storage
Properly stored tomato seeds can remain viable for 3-5 years or even longer.
Optimal storage conditions:
- Cool temperatures (ideally 32-41°F/0-5°C)
- Low humidity (less than 40%)
- Protection from light
- Consistent temperature (avoid fluctuations)
Storage containers:
- Paper envelopes inside airtight jars with desiccant packets
- Vacuum-sealed bags
- Mylar bags with oxygen absorbers
I store my seeds in paper envelopes inside mason jars with a small silica gel packet, kept in the refrigerator.
This method has maintained germination rates above 80% even for seeds over four years old.
Planting Tomato Seedlings in the Garden
After all your careful work starting seeds indoors, proper transplanting technique ensures your tomato plants will thrive in the garden.
Timing Your Outdoor Planting
Tomatoes are warm-season crops that can be damaged by cold soil and air temperatures.
Patience is key to successful transplanting.
Optimal conditions for transplanting:
- Soil temperature consistently above 60°F (16°C) at a 4-inch depth
- Nighttime air temperatures reliably above 50°F (10°C)
- All danger of frost passed (typically 2 weeks after your region’s last frost date)
- Seedlings hardened off properly
In most regions, this means late May to early June is ideal for transplanting tomatoes.
In my Zone 6 garden, I aim for the week after Memorial Day, when our soil has reliably warmed.
Preparing the Planting Site
Tomatoes thrive in properly prepared soil with adequate nutrition and good drainage.
Site preparation steps:
-
Choose a sunny location – Tomatoes need at least 6-8 hours of direct sunlight daily.
-
Test and amend soil – Ideal pH is 6.0-6.8. Add lime to raise pH or sulfur to lower it based on soil test results.
-
Add organic matter – Work 2-3 inches of compost into the top 8-12 inches of soil.
-
Pre-plant fertilization – Incorporate balanced organic fertilizer according to package directions. Avoid high-nitrogen fertilizers, which promote leafy growth at the expense of fruit production.
-
Prepare for support – Install stakes, cages, or trellises before planting to avoid damaging roots later.
Proper Planting Technique
The way you place your seedlings in the ground significantly impacts their future growth and productivity.
Step-by-step planting process:
-
Dig proper holes – Make holes twice as wide as the root ball and deep enough to bury a portion of the stem.
-
Add amendments to holes – Consider adding:
- ¼ cup bone meal (for phosphorus to support root development)
- 2 tablespoons Epsom salts (for magnesium)
- A handful of worm castings or compost
-
Remove lower leaves – Strip off leaves from the bottom portion of the stem that will be buried.
-
Plant deeply – Set plants deeper than they grew in containers, burying the stem up to the first set of healthy leaves. This encourages additional root development along the buried stem.
-
Space properly – Allow adequate distance between plants:
- Determinate varieties: 18-24 inches apart
- Indeterminate varieties: 24-36 inches apart
- Rows: 4-5 feet apart
-
Water thoroughly – Apply water directly to the soil around each plant, creating a slight depression to hold water.
-
Mulch – Once soil has warmed, apply 2-3 inches of organic mulch (straw, shredded leaves, or compost) keeping it 2 inches away from stems.
Support Systems for Tomato Plants
Proper support keeps plants healthy, increases yield, and makes harvesting easier.
Common support options:
Tomato cages:
- Pros: Easy to use, provides all-around support
- Cons: Standard sizes often too small for indeterminate varieties
- Best for: Determinate varieties, container growing
Stakes:
- Pros: Inexpensive, keeps plants upright with minimal space
- Cons: Requires regular pruning and tying
- Best for: Indeterminate varieties when space is limited
Florida weave/string trellis:
- Pros: Efficient for multiple plants, scalable
- Cons: Requires sturdy end posts, some maintenance
- Best for: Growing many plants in rows
A-frame or V-shaped trellises:
- Pros: Very stable, good air circulation
- Cons: More complex to build, takes up more space
- Best for: Indeterminate varieties, windy locations
I’ve tried all these methods and have settled on a modified Florida weave system using 8-foot T-posts and heavy-duty twine.
This approach allows me to support multiple plants with minimal materials while maintaining good airflow through the foliage.
Specialized Techniques for Tomato Seed Starting
Beyond the basics, several specialized techniques can improve your success with tomato seeds for planting.
Winter Sowing Tomato Seeds
Winter sowing is a low-maintenance method that uses natural temperature cycles to germinate seeds outdoors.
Winter sowing process:
- Create mini-greenhouses using clear plastic containers with drainage holes
- Fill with moistened seed starting mix
- Sow seeds in January or February
- Close containers and place outdoors in a sheltered location
- Natural freeze-thaw cycles help break seed dormancy
- Seedlings emerge when conditions are right in spring
- Transplant to garden when weather permits
This method produces exceptionally hardy seedlings with minimal effort, though they typically mature a few weeks later than indoor-started plants.
Grafting Tomato Seedlings
Grafting combines the fruit quality of one variety with the disease resistance and vigor of another.
Basic grafting technique:
- Grow rootstock varieties selected for disease resistance and vigor
- Simultaneously grow scion varieties chosen for fruit quality
- When seedlings have 2-3 true leaves, cut both at 45-degree angles
- Join scion to rootstock using a grafting clip
- Place in high-humidity healing chamber for 5-7 days
- Gradually acclimate to normal conditions
While more advanced, grafting can be particularly valuable in gardens with soil-borne disease issues or for growing heirloom varieties that lack disease resistance.
Seed Priming for Faster Germination
Priming involves pre-treating seeds to initiate the germination process before planting.
Simple priming method:
- Place seeds between damp paper towels
- Keep in a warm location for 24-48 hours until you see the first signs of germination (tiny white root tips)
- Carefully plant these pre-sprouted seeds in seed starting mix
Primed seeds emerge more quickly and uniformly than untreated seeds, giving you a head start on the growing season.
Using Mycorrhizal Fungi and Beneficial Bacteria
Adding beneficial microorganisms to your seed starting mix can improve germination and seedling health.
Benefits include:
- Enhanced nutrient uptake
- Improved water efficiency
- Increased resistance to soil-borne diseases
- Stronger root development
Commercial products containing mycorrhizae and beneficial bacteria can be mixed into seed starting soil or applied when potting up seedlings.
The Best Tomato Varieties for Different Growing Conditions
With thousands of tomato varieties available, choosing the right ones for your specific growing conditions can be overwhelming.
Here are recommendations based on common gardening challenges and goals.
Best Tomatoes for Short Growing Seasons
If your growing season is less than 90 days, these early-maturing varieties will still provide a satisfying harvest:
- Stupice (52 days) – Potato-leaf heirloom with excellent cold tolerance
- Early Girl (57 days) – Reliable producer of medium-sized fruits
- Glacier (55 days) – Ultra-early variety with good flavor for its season
- Sungold (57 days) – Incredibly sweet orange cherry tomato
- Manitoba (58 days) – Developed for Canadian prairies, very cold-tolerant
Best Heat-Tolerant Tomatoes for Hot Climates
For areas with temperatures regularly above 90°F (32°C), these varieties continue to set fruit despite the heat:
- Solar Fire – Developed specifically for hot, humid conditions
- Heatmaster – Sets fruit even when nighttime temperatures remain high
- Arkansas Traveler – Heirloom with excellent heat and humidity tolerance
- Porter – Texas-bred variety that thrives in scorching conditions
- Homestead – Classic variety developed for Florida’s heat
Best Container Tomatoes
Limited to pots or raised beds? These varieties perform exceptionally well in containers:
- Patio Princess – Compact determinate plant, perfect for 5-gallon containers
- Tiny Tim – Ultra-dwarf variety suitable for 1-gallon pots
- Tumbler – Cascading growth habit ideal for hanging baskets
- Bush Early Girl – Compact version of the popular Early Girl
- Terenzo – Prolific cherry tomato bred specifically for containers
Best Disease-Resistant Tomatoes
For gardens with recurring disease problems, these resistant varieties offer peace of mind:
- Iron Lady – Triple resistance to late blight, early blight, and Septoria leaf spot
- Defiant – Excellent late blight resistance with good flavor
- Mountain Magic – Cherry tomato with multiple disease resistances
- Plum Regal – Roma-type with late blight resistance
- Better Boy – Classic variety with VFN resistance
Best Tomatoes for Flavor
If taste is your top priority, these varieties consistently rank among the most flavorful:
- Brandywine (pink, red, or black) – Complex, rich flavor with perfect sweet-acid balance
- Cherokee Purple – Smoky, sweet flavor with hints of wine
- Sun Gold – Intensely sweet orange cherry tomato
- Paul Robeson – Distinctive smoky-sweet flavor
- Green Zebra – Tangy, bright flavor with beautiful striped fruits
Organic and Natural Approaches to Tomato Seed Starting
Many gardeners prefer organic methods for starting tomato seeds.
These approaches focus on natural materials and processes that support plant health while minimizing environmental impact.
Organic Seed Starting Mixes
Commercial organic seed starting mixes are widely available, or you can create your own with these ingredients:
DIY organic seed starting mix:
- 2 parts screened compost (ensure it’s fully matured)
- 2 parts coco coir (sustainable alternative to peat moss)
- 1 part vermiculite or perlite
- 1 part worm castings
Avoid garden soil or standard potting soil, which are too heavy for optimal seed germination.
Natural Fertilizers for Seedlings
Once seedlings develop their first true leaves, they benefit from light fertilization:
Gentle organic fertilizer options:
- Compost tea (steep finished compost in water for 24-48 hours)
- Diluted fish emulsion (use at ¼ recommended strength)
- Worm casting tea
- Diluted liquid seaweed (excellent micronutrient source)
Apply these natural fertilizers at half the normal strength, once every 10-14 days.
Homemade Biodegradable Pots
Create environmentally friendly seed starting containers from materials you might otherwise discard:
Paper pot maker: This simple tool allows you to create pots from newspaper strips that can be planted directly into the garden.
Eggshell halves: Clean, empty eggshell halves make perfect biodegradable starter pots and add calcium to the soil as they decompose.
Toilet paper rolls: Cut in half and folded at the bottom, these make excellent biodegradable seed starting containers.
Citrus rinds: Halved citrus peels with drainage holes poked in the bottom provide a nutrient-rich, biodegradable container.
Natural Pest and Disease Management
Prevent common seedling problems with these organic approaches:
Cinnamon as fungicide: A light dusting of cinnamon on soil surfaces helps prevent damping off disease.
Chamomile tea spray: Cooled chamomile tea makes an effective natural fungicide for seedlings.
Diatomaceous earth: Sprinkled around seedlings, this natural powder deters crawling insects.
Hydrogen peroxide solution: A 1% solution (1 part 3% hydrogen peroxide to 2 parts water) can be used to water seedlings to increase oxygen to roots and prevent fungal issues.
Troubleshooting Guide for Tomato Seed Starting
Even experienced gardeners encounter challenges when starting tomato seeds.
Here’s how to diagnose and solve common problems.
Seeds Not Germinating
Possible causes and solutions:
- Temperature too low – Ensure soil temperature is 70-80°F (21-27°C) using a heat mat.
- Seeds too old – Tomato seeds remain viable for 3-5 years when properly stored. Use fresh seeds or increase the quantity planted for older seeds.
- Improper planting depth – Seeds should be covered with only ¼ inch of soil.
- Inconsistent moisture – Keep soil consistently moist but not waterlogged during germination.
- Poor seed quality – Purchase seeds from reputable sources.
Seedlings Falling Over (Damping Off)
Possible causes and solutions:
- Fungal pathogens – Use sterile seed starting mix and clean containers.
- Poor air circulation – Use a small fan to create gentle air movement.
- Overwatering – Allow soil surface to dry slightly between waterings.
- Crowded conditions – Thin seedlings to improve air circulation.
- Prevention measures – Apply a light dusting of cinnamon to soil surface or water with chamomile tea.
Pale, Leggy Seedlings
Possible causes and solutions:
- Insufficient light – Provide 14-16 hours of strong, direct light daily.
- Lights too far away – Position lights 2-3 inches above seedlings.
- Excessive heat – Maintain temperatures around 65-75°F (18-24°C) after germination.
- Overcrowding – Thin or transplant seedlings to give each plant adequate space.
- Treatment – When potting up, bury leggy stems deeper in the soil.
Yellow or Purple Leaves
Possible causes and solutions:
- Nutrient deficiencies – Begin light fertilization after true leaves appear.
- Cold temperatures – Ensure growing area stays above 60°F (16°C).
- Overwatering – Allow soil to dry slightly between waterings.
- Magnesium deficiency (purple leaves) – Spray with diluted Epsom salt solution (1 tsp per quart of water).
- Nitrogen deficiency (yellow leaves) – Apply diluted fish emulsion or compost tea.
Curling or Distorted Leaves
Possible causes and solutions:
- Environmental stress – Check for extreme temperature fluctuations.
- Ethylene exposure – Keep seedlings away from ripening fruit or gas heaters.
- Herbicide contamination – Ensure compost is free from herbicide residues.
- Viral infection – Remove and destroy affected plants, wash hands before handling others.
- Insect damage – Check for aphids or other pests, treat with insecticidal soap if necessary.
Mold on Soil Surface
Possible causes and solutions:
- Excessive moisture – Reduce watering frequency and improve air circulation.
- Poor ventilation – Use a small fan to create gentle air movement.
- Treatment – Scrape off mold and apply a thin layer of coarse sand or fine grit to the soil surface.
- Prevention – Water from the bottom rather than the top.
Conclusion: Growing Success with Tomato Seeds
Starting tomatoes from seed opens up a world of variety, flavor, and gardening satisfaction that simply can’t be matched by purchasing transplants.
From rare heirlooms to cutting-edge hybrids, the diversity available through seeds allows you to customize your garden to your specific tastes and growing conditions.
As we’ve explored throughout this guide, successful tomato seed starting combines science, skill, and a touch of art.
By understanding the fundamentals—from seed selection to transplanting—you’ll be well-equipped to grow healthy, productive tomato plants that will reward you with bountiful harvests.
Remember that gardening is a journey of continuous learning. Each season brings new insights and opportunities to refine your approach.
Don’t be discouraged by occasional setbacks—even experienced gardeners face challenges with seed starting.
Instead, view them as valuable learning experiences that will make you a more knowledgeable and successful gardener.
As you plan your tomato garden, I encourage you to try at least one new variety each year.
Perhaps an unusual heirloom with a fascinating history, or a modern variety bred for a specific trait that addresses a challenge in your garden.
This spirit of experimentation keeps gardening fresh and exciting year after year.
Finally, consider sharing your tomato-growing journey with others.
Whether through seed swaps, garden tours, or simply gifting extra seedlings to neighbors, the joy of growing tomatoes from seed multiplies when shared.
a world increasingly disconnected from food production, growing your own tomatoes from seed is a powerful way to reconnect with nature’s cycles and share that connection with your community.
Here’s to your tomato growing success and beyond.