
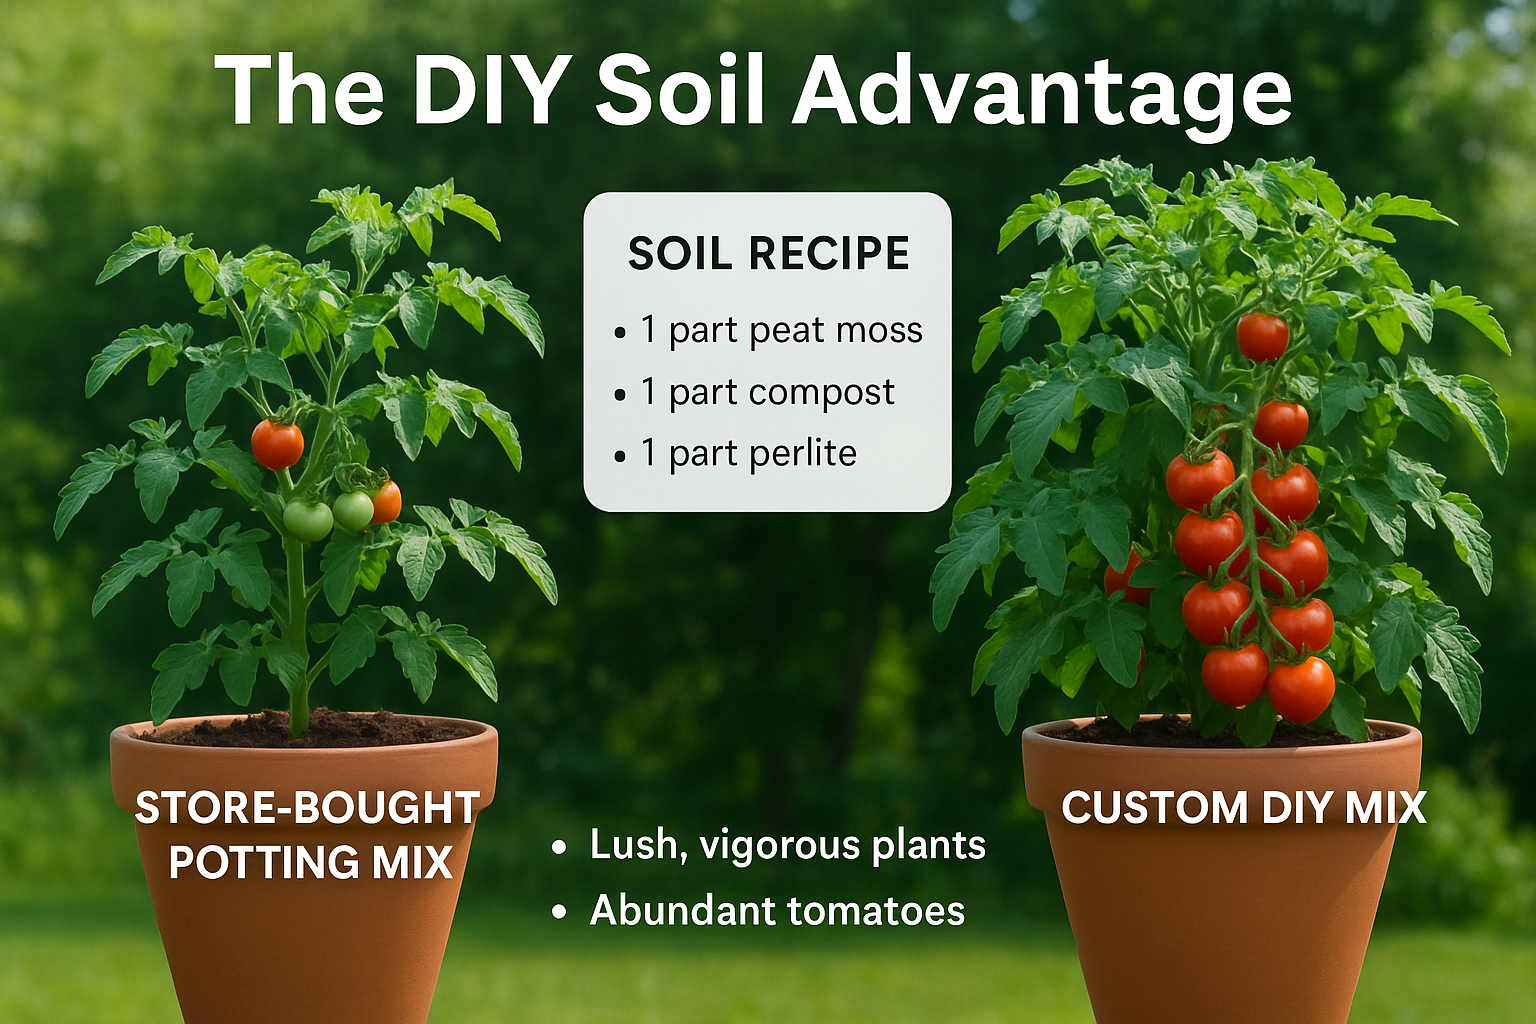
How to make potting soil for tomatoes starts with one goal: creating a mix that drains well but still holds enough moisture and nutrients to fuel strong growth.
Tomatoes don’t thrive in heavy garden soil—they need a light, airy blend.
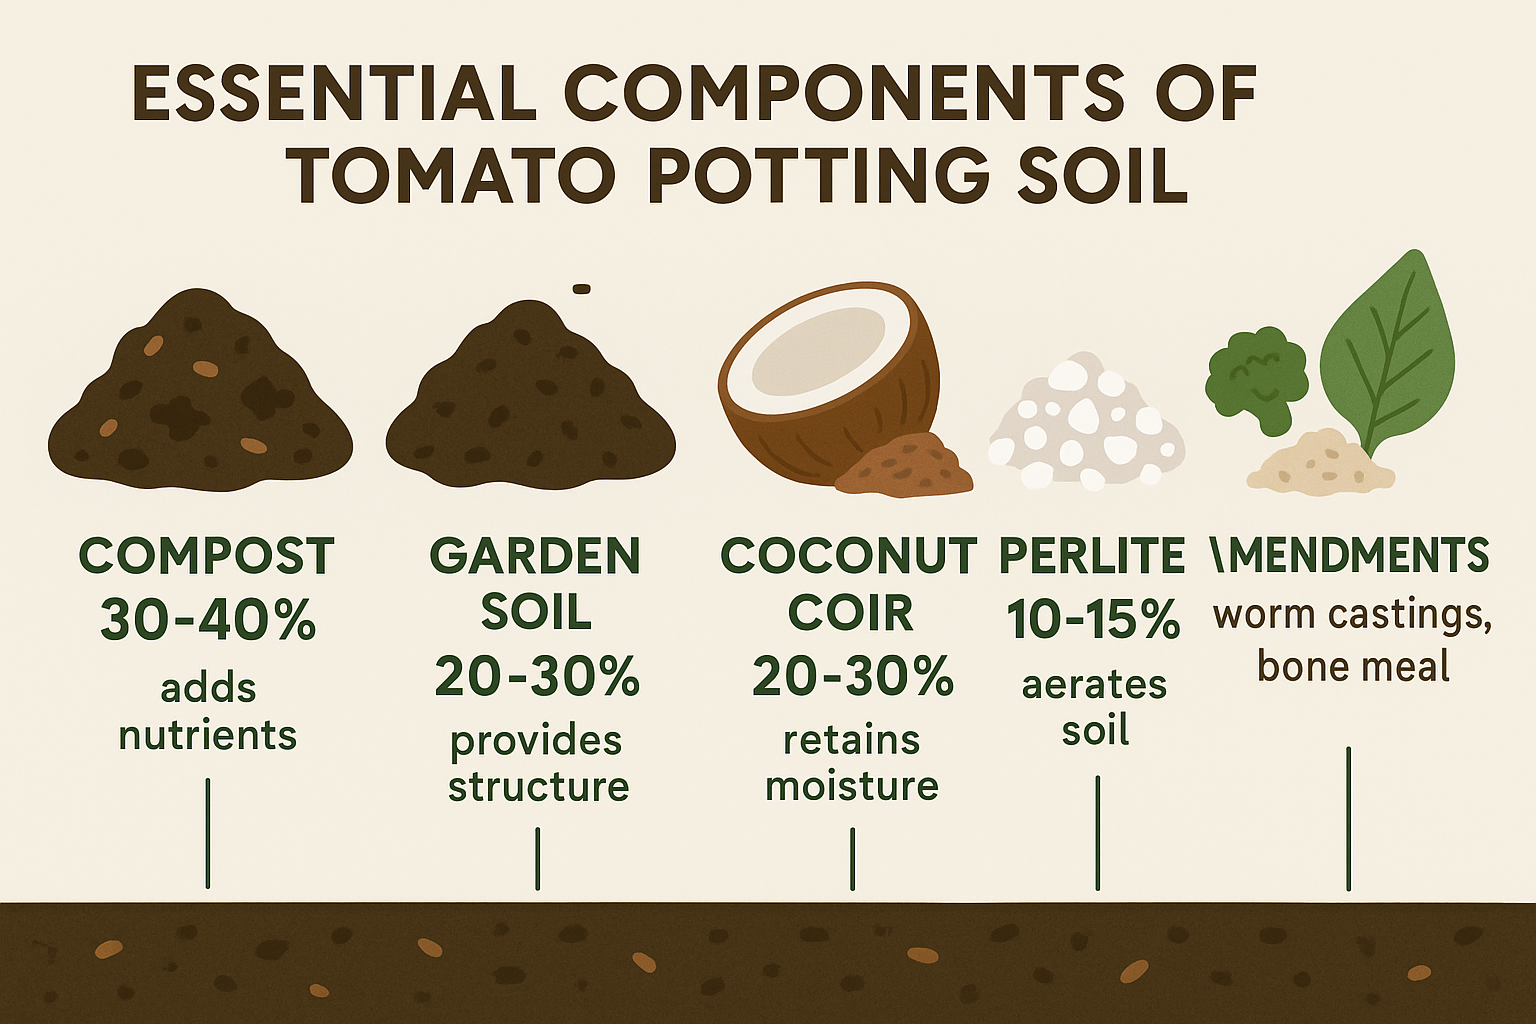
Start with 40% quality compost for nutrients, 40% coco coir or peat moss for moisture retention, and 20% perlite for drainage.
Mix thoroughly in a large container.
Add a handful of worm castings and a tablespoon of crushed eggshells for extra calcium.
The result? A balanced, breathable soil mix that supports deep roots and heavy fruiting.
Key Takeaways
- Perfect drainage is crucial for tomato potting soil to prevent root rot and disease
- Organic matter content should be 30-40% of your mix to provide slow-release nutrients
- pH balance between 6.0-6.8 creates optimal conditions for nutrient absorption
- Customizing your soil mix saves money and allows you to tailor nutrients to tomato needs
- Regular soil maintenance throughout the growing season ensures continued plant health
Why Custom Potting Soil Matters for Tomatoes
When I first started growing tomatoes, I made the rookie mistake of using whatever soil I had on hand.
The results? Stunted plants, blossom end rot, and disappointing harvests.
Through years of experimentation and research, I’ve discovered that tomatoes have very specific soil requirements that generic potting mixes simply don’t address.
The Unique Needs of Tomato Plants
Tomatoes are heavy feeders with deep root systems that require:
- Excellent drainage to prevent root diseases
- High organic matter content for sustained nutrition
- Balanced pH levels (6.0-6.8) for optimal nutrient uptake
- Good aeration for healthy root development
- Water retention without becoming waterlogged
- Calcium availability to prevent blossom end rot
Store-bought potting mixes are often too dense, lack sufficient nutrients, or contain ingredients that aren’t ideal for tomatoes.
By creating your own mix, you can precisely control these factors while saving money in the process.
Benefits of Making Your Own Tomato Potting Soil
Making your own potting soil isn’t just about better plant performance. Consider these additional benefits:
- Cost savings: Custom mixes cost significantly less than premium commercial options
- Quality control: You know exactly what’s in your soil with no mystery ingredients
- Sustainability: Utilize compost and other recycled materials from your garden
- Customization: Adjust ingredients based on your specific growing conditions
- Consistency: Maintain the same soil quality year after year
As urban gardening continues to grow in popularity in 2025, more gardeners are discovering the advantages of DIY soil mixes.
According to a recent gardening survey, 78% of tomato growers who switched to custom soil mixes reported larger harvests and healthier plants.
Essential Components of Tomato Potting Soil
Creating the perfect potting soil for tomatoes requires understanding the role each component plays.
Let’s break down the essential ingredients that will form the foundation of your mix.
Base Materials
The base materials provide structure and bulk to your potting mix:
Compost (30-40%) Compost is the heart of any good potting mix. It provides:
- Slow-release nutrients
- Beneficial microorganisms
- Improved soil structure
- Water retention capabilities
I recommend using well-aged compost that’s fully broken down.
Fresh compost can actually harm young plants as it continues to decompose.
Garden Soil or Topsoil (20-30%) Adding some mineral soil provides:
- Stability and weight
- Additional nutrients
- Water retention
- Microbial diversity
Important: If using garden soil, always sterilize it first by baking in the oven at 180°F (82°C) for 30 minutes to kill potential pathogens, weed seeds, and pests.
Peat Moss or Coconut Coir (20-30%) These materials improve:
- Water retention
- Soil structure
- Aeration
- Root development
While peat moss has traditionally been popular, coconut coir is the more sustainable choice for 2025 gardening as peat bogs are increasingly protected for carbon sequestration.
Drainage Materials
Tomatoes hate “wet feet,” making drainage crucial for success:
Perlite or Pumice (10-15%) These volcanic materials create:
- Air pockets for oxygen
- Improved drainage
- Lightweight soil structure
- Prevention of compaction
Vermiculite (5-10%) This expanded mineral:
- Retains moisture while allowing drainage
- Holds nutrients for slow release
- Improves soil structure
- Balances the effects of perlite
Coarse Sand (5-10%) Sand contributes:
- Improved drainage
- Soil stability
- Prevention of compaction
- Better root penetration
Nutrient Amendments
These specialized additions provide targeted nutrition for tomatoes:
Worm Castings (5-10%) Nature’s perfect fertilizer offers:
- Rich micronutrients
- Beneficial microorganisms
- Improved soil structure
- Plant growth hormones
Bone Meal (1-2%) This phosphorus-rich amendment provides:
- Support for flowering and fruiting
- Root development
- Calcium for preventing blossom end rot
Eggshells (1-2%) Crushed eggshells supply:
- Additional calcium
- Slow-release nutrients
- Improved drainage
Kelp Meal (1%) This seaweed-based amendment delivers:
- Trace minerals
- Natural growth hormones
- Improved plant immunity
- Better stress resistance
The beauty of making your own potting soil is that you can adjust these ratios based on your specific growing conditions and the needs of your tomato varieties.
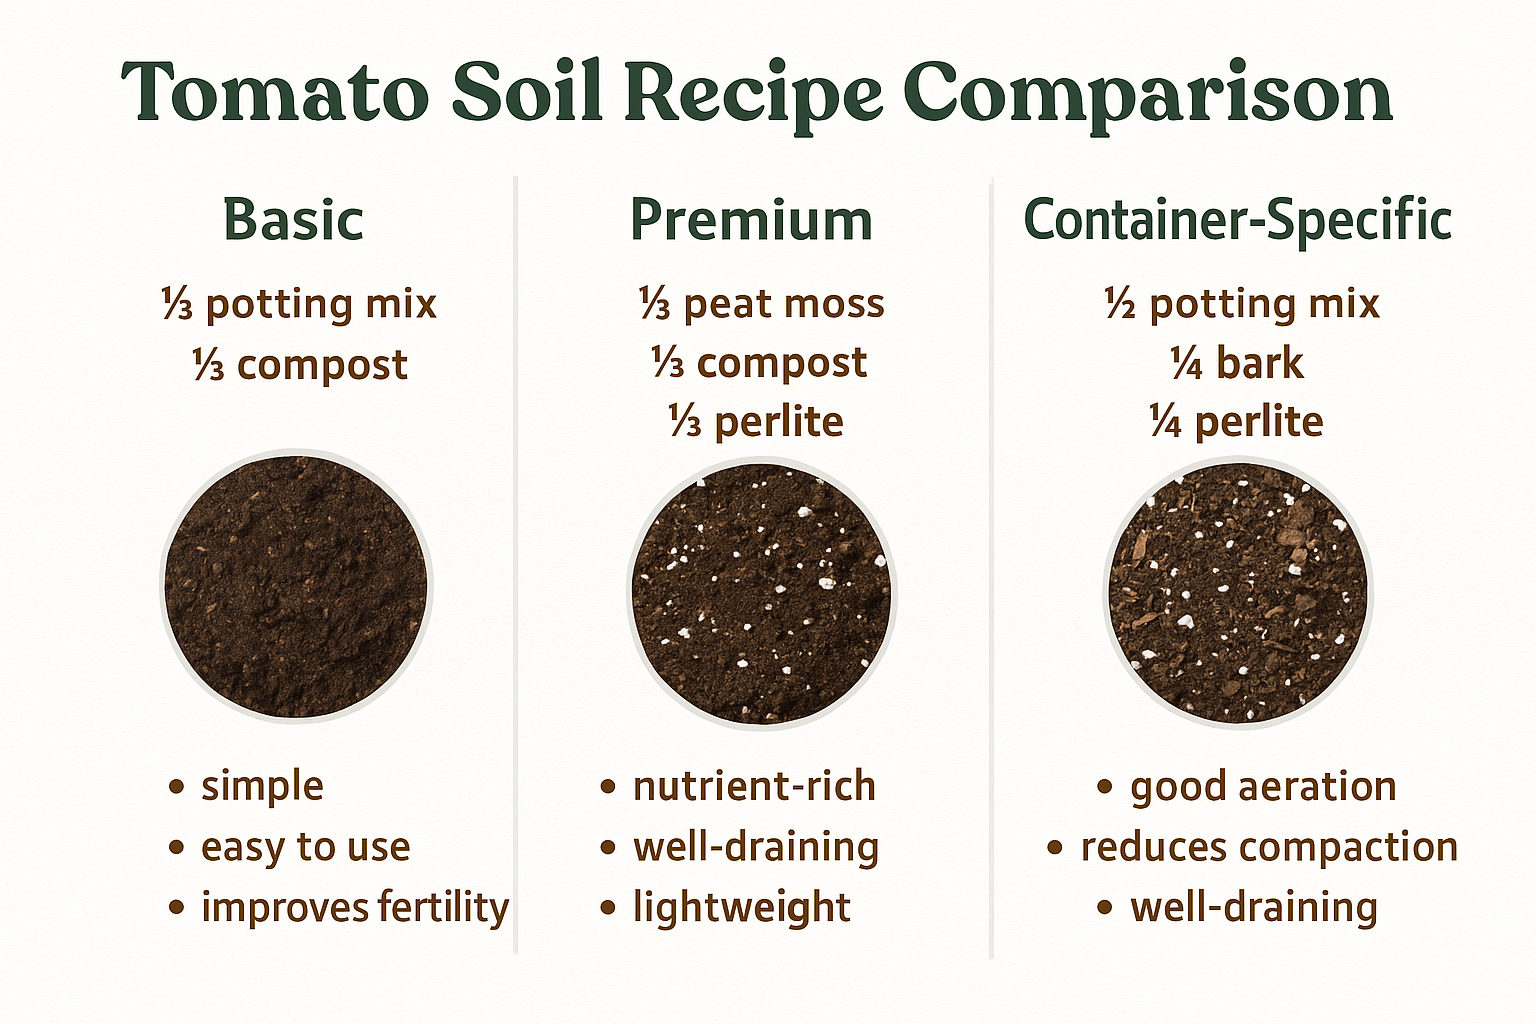
Basic Tomato Potting Soil Recipe
Now that we understand the components, let’s put together a basic recipe that works well for most tomato varieties.
This mix provides an excellent balance of drainage, nutrition, and structure.
Ingredients List
For a standard batch (approximately 20 gallons of mix):
| Ingredient | Amount | Purpose |
|---|---|---|
| Compost | 8 gallons | Primary nutrition and soil structure |
| Garden soil (sterilized) | 4 gallons | Weight and stability |
| Coconut coir | 4 gallons | Water retention and aeration |
| Perlite | 2 gallons | Drainage and aeration |
| Vermiculite | 1 gallon | Water/nutrient retention |
| Worm castings | 1 gallon | Micronutrients and biology |
| Bone meal | 2 cups | Phosphorus and calcium |
| Crushed eggshells | 1 cup | Additional calcium |
| Kelp meal | ½ cup | Trace minerals and growth hormones |
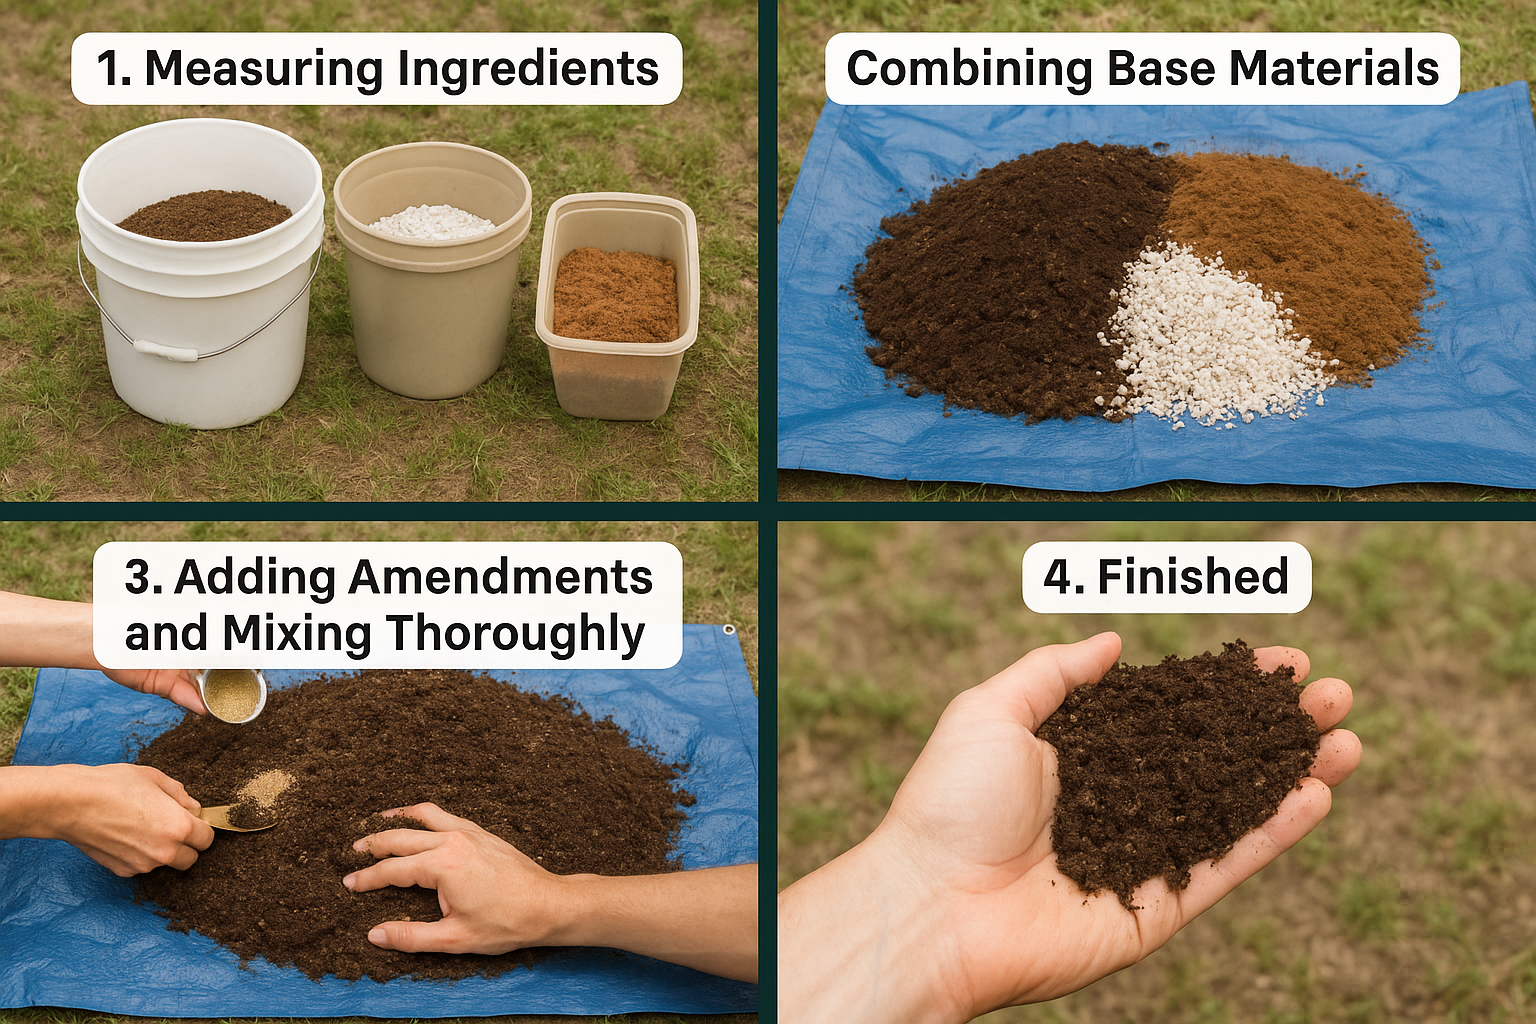
Step-by-Step Mixing Instructions
-
Prepare your workspace: Choose a flat, clean area like a tarp, wheelbarrow, or large container
-
Hydrate the coir: If using compressed coconut coir, rehydrate according to package directions (typically 1 brick expands to 5-7 gallons)
-
Combine base materials: Mix the compost, sterilized garden soil, and hydrated coir thoroughly
-
Add drainage materials: Incorporate the perlite and vermiculite, distributing evenly
-
Mix in nutrients: Add worm castings, bone meal, crushed eggshells, and kelp meal
-
Final mixing: Use a garden fork or shovel to thoroughly blend all ingredients until uniform in appearance
-
Moisture check: Squeeze a handful of the mix – it should hold together when pressed but break apart easily when poked (like a wrung-out sponge)
Testing Your Soil Mix
Before planting, it’s wise to test your new potting soil:
-
pH test: Use a soil pH test kit to ensure levels are between 6.0-6.8
-
Drainage test: Fill a pot with your mix, add water, and ensure it drains within a few minutes
-
Germination test: Plant a few quick-growing seeds (like radish) to check for any issues
If your pH is too high (alkaline), add a small amount of elemental sulfur. If too low (acidic), add a bit of garden lime. Make these adjustments gradually, as dramatic pH shifts can harm plants.
Premium Tomato Potting Soil Recipe
For those seeking exceptional results or growing heirloom varieties with specific needs, this premium recipe incorporates additional ingredients for superior performance.
Enhanced Ingredients List
For a premium batch (approximately 20 gallons):
| Ingredient | Amount | Purpose |
|---|---|---|
| Compost (multiple types) | 6 gallons | Diverse nutrition profile |
| Leaf mold | 2 gallons | Fungal diversity and structure |
| Loam soil (sterilized) | 4 gallons | Balanced texture and minerals |
| Coconut coir | 3 gallons | Sustainable water retention |
| Rice hulls | 1 gallon | Sustainable aeration alternative |
| Perlite | 1.5 gallons | Additional drainage |
| Worm castings | 1.5 gallons | Enhanced biology and nutrients |
| Composted chicken manure | 0.5 gallon | Nitrogen boost |
| Bone meal | 2 cups | Phosphorus and calcium |
| Rock dust | 1 cup | Broad mineral spectrum |
| Crushed eggshells | 1 cup | Calcium supplement |
| Kelp meal | ½ cup | Growth hormones and minerals |
| Mycorrhizal fungi inoculant | As directed | Root system enhancement |
| Biochar | 1 gallon | Carbon sequestration and structure |
Advanced Mixing Technique
-
Layer method: Rather than mixing all at once, create layers of ingredients in your wheelbarrow or tarp
-
Hydrate dry materials: Pre-moisten any very dry ingredients like coconut coir and biochar
-
Biological activation: Mix the mycorrhizal inoculant with a small amount of compost first
-
Gradual incorporation: Fold layers together gradually rather than aggressive mixing
-
Rest period: Allow the mixed soil to rest for 1-2 days before use to let biology establish
-
Moisture management: Keep the mix damp but not wet during the rest period
This premium mix provides exceptional nutrition, perfect structure, and enhanced biological activity that supports tomato plants throughout their entire growing cycle.
Container-Specific Tomato Soil Mix
Growing tomatoes in containers presents unique challenges that require adjustments to your soil mix. Container-grown tomatoes need soil that retains moisture while still providing excellent drainage.
Container Challenges
Container gardening differs from in-ground growing in several ways:
- Limited soil volume: Roots can’t expand to find nutrients and water
- Temperature fluctuations: Containers heat up and cool down more rapidly
- Water management: Containers dry out faster but can also become waterlogged
- Nutrient depletion: Frequent watering leaches nutrients more quickly
Modified Container Recipe
For a container-specific batch (approximately 15 gallons):
| Ingredient | Amount | Purpose |
|---|---|---|
| Compost | 5 gallons | Primary nutrition |
| Coconut coir | 5 gallons | Enhanced water retention |
| Perlite | 2 gallons | Drainage and aeration |
| Vermiculite | 1 gallon | Water/nutrient retention |
| Worm castings | 1 gallon | Slow-release nutrition |
| Bone meal | 1.5 cups | Phosphorus and calcium |
| Kelp meal | ½ cup | Trace minerals |
| Slow-release organic fertilizer | As directed | Extended nutrition |
| Water-retaining crystals (optional) | As directed | Drought protection |
Container-Specific Considerations
When preparing soil for container tomatoes:
-
Container size matters: Use at least 5-gallon containers for determinate varieties and 10+ gallons for indeterminate varieties
-
Drainage layer: Add a 1-inch layer of coarse material (like broken pottery or large perlite) at the bottom of containers
-
Pre-moisten thoroughly: Container mixes should be thoroughly moistened before planting
-
Mulch surface: Always mulch the soil surface to reduce evaporation
-
Mid-season refresh: Plan to top-dress containers with compost mid-season
Tip: For self-watering containers, reduce the perlite by half and increase the coconut coir to improve the wicking action.
Budget-Friendly Tomato Soil Recipe
Creating quality potting soil doesn’t have to break the bank.
This economical recipe uses readily available materials while maintaining the essential qualities tomatoes need.
Cost-Effective Ingredients
For an economical batch (approximately 20 gallons):
| Ingredient | Amount | Budget-Friendly Source |
|---|---|---|
| Homemade compost | 8 gallons | Free from kitchen/yard waste |
| Topsoil | 6 gallons | Bulk purchase or existing garden soil |
| Shredded leaves | 2 gallons | Free fall yard waste |
| Perlite or pumice | 2 gallons | Buy in bulk or substitute with coarse sand |
| Composted manure | 2 gallons | Often available free from local farms |
| Crushed eggshells | 1 cup | Save from kitchen waste |
| Wood ash (untreated) | ½ cup | From fireplace (provides potassium and calcium) |
| Epsom salt | 2 tablespoons | Inexpensive source of magnesium |
Money-Saving Tips
-
Bulk purchasing: Buy ingredients like perlite in large bags rather than small containers
-
Community resources: Check with local tree services for free wood chips that can be composted
-
Shared costs: Split large purchases with gardening friends or neighbors
-
Repurposed materials: Use pine needles or shredded fall leaves as partial peat moss substitutes
-
Municipal compost: Many cities offer free or low-cost compost to residents
DIY Amendments
Create these amendments yourself to save money:
Homemade Calcium Solution
- Collect eggshells and rinse clean
- Bake at 200°F (93°C) for 30 minutes to sterilize
- Grind to a fine powder in a coffee grinder
- Store in an airtight container
- Add 1 cup per 20 gallons of soil mix
Compost Tea Booster
- Fill a 5-gallon bucket halfway with finished compost
- Add water to fill, leaving 2 inches of space
- Add 1 tablespoon unsulfured molasses
- Stir daily for 3-5 days
- Strain liquid and use to moisten your soil mix
Budget Tip: Start collecting materials in the fall when leaves, grass clippings, and other organic matter are abundant and free!
Organic vs. Conventional Ingredients
As a gardener focused on sustainability, I prefer organic ingredients for my tomato potting soil.
Let’s compare organic and conventional options to help you make informed choices.
Organic Ingredients and Their Benefits
Organic soil components offer several advantages:
- No synthetic chemicals: Avoid potential harm to beneficial soil organisms
- Sustainable sourcing: Many organic materials are renewable resources
- Improved soil biology: Support diverse microbial communities
- Long-term soil health: Build soil structure that improves over time
- Safer harvests: Reduce potential chemical residues in your tomatoes
Top Organic Choices:
- Certified organic compost
- Coconut coir (sustainable peat alternative)
- OMRI-listed perlite and vermiculite
- Rock minerals (rock phosphate, greensand)
- Plant-based meals (alfalfa, kelp, neem)
- Worm castings
Conventional Alternatives
Conventional products may be more readily available or cost-effective:
- Chemical fertilizers: Provide precise nutrient ratios but may harm soil life
- Treated peat moss: More acidic but less sustainable
- Synthetic water crystals: Effective but petroleum-based
- Conventional lime: Works quickly but may contain impurities
- Treated wood products: Convenient but may contain harmful chemicals
Making Informed Choices
When deciding between organic and conventional:
-
Read labels carefully: Look for OMRI (Organic Materials Review Institute) certification
-
Consider your priorities: Balance cost, availability, and environmental impact
-
Start with key components: If budget is limited, prioritize organic versions of compost and fertilizers
-
Transition gradually: Replace conventional components with organic alternatives over time
Hybrid Approach Table:
| Soil Component | Organic Option | Conventional Alternative | Priority Level |
|---|---|---|---|
| Compost | Certified organic | Municipal compost | High |
| Water retention | Coconut coir | Peat moss | Medium |
| Drainage | OMRI perlite | Standard perlite | Low |
| Calcium source | Crushed eggshells | Agricultural lime | Medium |
| Phosphorus | Bone meal | Superphosphate | High |
| Nitrogen | Alfalfa meal | Synthetic fertilizer | High |
I recommend prioritizing organic options for components that directly impact plant nutrition and soil biology, while being more flexible with structural components like perlite.
Step-by-Step Soil Preparation Process
Now let’s walk through the complete process of preparing your tomato potting soil from start to finish.
Gathering Materials and Tools
Before you begin, collect everything you’ll need:
Tools:
- Large tarp or mixing area
- Wheelbarrow or large containers
- Garden fork or shovel
- Measuring containers (gallon buckets, cups)
- Watering can or hose with spray nozzle
- Gloves and dust mask
- Soil sieve (optional)
Materials:
- All soil ingredients from your chosen recipe
- Water source
- pH testing kit
- Container for the finished mix
Detailed Preparation Steps
-
Plan your workspace
- Choose a flat, open area with room to move around
- Lay down a large tarp if mixing on the ground
- Work on a day with minimal wind to avoid losing fine materials
-
Prepare your ingredients
- Break up any clumps in compost or soil
- Rehydrate coconut coir if using compressed blocks
- Measure all ingredients into separate containers
-
Begin with base materials
- Start by spreading compost and soil in a large, flat layer
- Mix these thoroughly first as they form the foundation
-
Add water retention components
- Incorporate coconut coir or peat moss into the base
- Mix until the color and texture appear uniform
-
Incorporate drainage materials
- Sprinkle perlite, vermiculite, and/or sand evenly across the mix
- Fold these materials in rather than stirring aggressively
-
Add nutrient amendments
- Distribute smaller-quantity ingredients (bone meal, kelp, etc.) evenly
- These can be premixed in a bucket to ensure even distribution
-
Final mixing
- Turn the entire pile at least 3-4 times
- Break up any remaining clumps
- Aim for a consistent color and texture throughout
-
Moisture adjustment
- Sprinkle water evenly across the mix while turning
- Test by squeezing a handful – it should hold shape without dripping
- Allow moisture to distribute for 30 minutes
-
Testing and adjustments
- Check pH and make necessary adjustments
- Verify drainage by testing a small amount in a pot
-
Storage or immediate use
- Use immediately or store in covered containers
- Label with the date and recipe for future reference
Troubleshooting Common Issues
If you encounter problems during mixing:
Too Wet:
- Add additional perlite and coir
- Spread mix out to dry slightly before continuing
Too Dry:
- Add water gradually while mixing
- Allow time for materials like coir to fully absorb moisture
Clumping:
- Break up clumps by hand or with garden fork
- Consider sieving compost before mixing if consistently clumpy
Uneven Mixing:
- Use the “layer cake” method – create thin layers of each material
- Turn the pile more thoroughly and methodically
Filling Containers and Beds
Once your soil mix is prepared, proper filling techniques ensure your tomato plants get the best start possible.
Container Filling Technique
For pots, grow bags, and other containers:
-
Prepare containers
- Clean thoroughly if reusing containers
- Ensure drainage holes are clear and functional
- Add a mesh screen over drainage holes to prevent soil loss
-
Add drainage layer (optional)
- Place 1-2 inches of coarse material at the bottom
- Options include broken pottery, coarse gravel, or chunky perlite
-
Fill in layers
- Add soil mix in 3-4 inch layers
- Gently firm each layer with your hands (not compacting)
- Leave 1-2 inches of space at the top for watering
-
Pre-moisten thoroughly
- Water until it flows from drainage holes
- Allow to drain completely before planting
- Top off with additional mix if significant settling occurs
-
Create planting holes
- Make holes slightly larger than your tomato root balls
- For deeper planting, remove lower leaves and bury stem
Raised Bed Filling Method
For raised beds and garden plots:
-
Prepare the bed
- Clear any existing vegetation
- Loosen the soil at the base of the bed
- Line with hardware cloth if burrowing pests are an issue
-
Layer filling approach
- Start with a 2-inch layer of coarse organic matter (twigs, chunky compost)
- Add your tomato soil mix in 4-6 inch layers
- Lightly tamp each layer (walking on a board works well)
-
Mounding for drainage
- Create a slight crown in the center of the bed
- This promotes drainage away from plant stems
-
Edge reinforcement
- Add extra soil around edges where drying occurs faster
- Consider edging material to prevent soil loss
-
Pre-irrigation
- Water thoroughly several days before planting
- Allow soil to settle and assess drainage patterns
- Add more soil to low spots that collect water
Space Planning for Tomatoes
Proper spacing ensures good airflow and root development:
Container Spacing Guidelines:
| Container Size | Tomato Type | Plants Per Container |
|---|---|---|
| 5 gallon | Determinate/Dwarf | 1 plant |
| 10 gallon | Indeterminate | 1 plant |
| 15+ gallon | Any type | 2 plants maximum |
| 20+ gallon trough | Any type | 1 plant per 12″ of length |
Raised Bed Spacing:
| Tomato Type | Minimum Spacing | Optimal Spacing |
|---|---|---|
| Determinate bush | 18-24 inches | 24-30 inches |
| Indeterminate vining | 24-30 inches | 36 inches |
| Dwarf varieties | 12-18 inches | 18-24 inches |
Tip: When using the Square Foot Gardening method, allow at least 4 square feet per indeterminate tomato plant for best results.
Ongoing Soil Maintenance
Creating great tomato soil is just the beginning. Maintaining soil health throughout the growing season ensures continued plant performance.
Watering Practices
Proper watering maintains soil structure and nutrient availability:
- Consistent moisture: Aim for even moisture rather than wet/dry cycles
- Deep watering: Water deeply less frequently rather than shallow daily watering
- Morning watering: Water early in the day to reduce fungal issues
- Drip irrigation: Consider drip systems to deliver water directly to soil
- Moisture monitoring: Use your finger or a moisture meter to check 2 inches deep
Fertilizing Schedule
Even the best soil mix needs supplemental nutrition for hungry tomatoes:
Early Season (Planting to First Flowers):
- Fish emulsion (diluted per instructions) every 2 weeks
- Focus on nitrogen for leaf and stem development
Mid Season (Flowering to First Fruits):
- Switch to balanced organic fertilizer (like 5-5-5)
- Apply every 3-4 weeks at half-strength
Late Season (Heavy Fruiting):
- Use higher phosphorus and potassium formula (like 3-6-9)
- Consider calcium supplementation if blossom end rot appears
Mulching for Soil Health
Mulch protects and enhances your soil:
-
Wait until soil warms: Apply mulch after soil temperatures reach 65°F (18°C)
-
Maintain clearance: Keep mulch 2-3 inches away from plant stems
-
Proper depth: Apply 2-3 inches of organic mulch
-
Best materials: Straw, shredded leaves, or wood chips (not cedar)
-
Refresh as needed: Add additional mulch midseason as it decomposes
Seasonal Soil Amendments
Keep your soil performing with these timely additions:
Early Summer:
- Top-dress with compost tea every 2-3 weeks
- Add 1/2 inch of worm castings around plants
Mid-Summer:
- Side-dress with compost when first fruits appear
- Consider supplemental calcium if needed (crushed eggshells or liquid calcium)
Late Summer:
- Apply seaweed extract as a foliar spray and soil drench
- Reduce nitrogen inputs to encourage ripening
End of Season:
- Add shredded leaves or cover crops to rebuild soil for next year
- Test soil pH and adjust as needed for next season
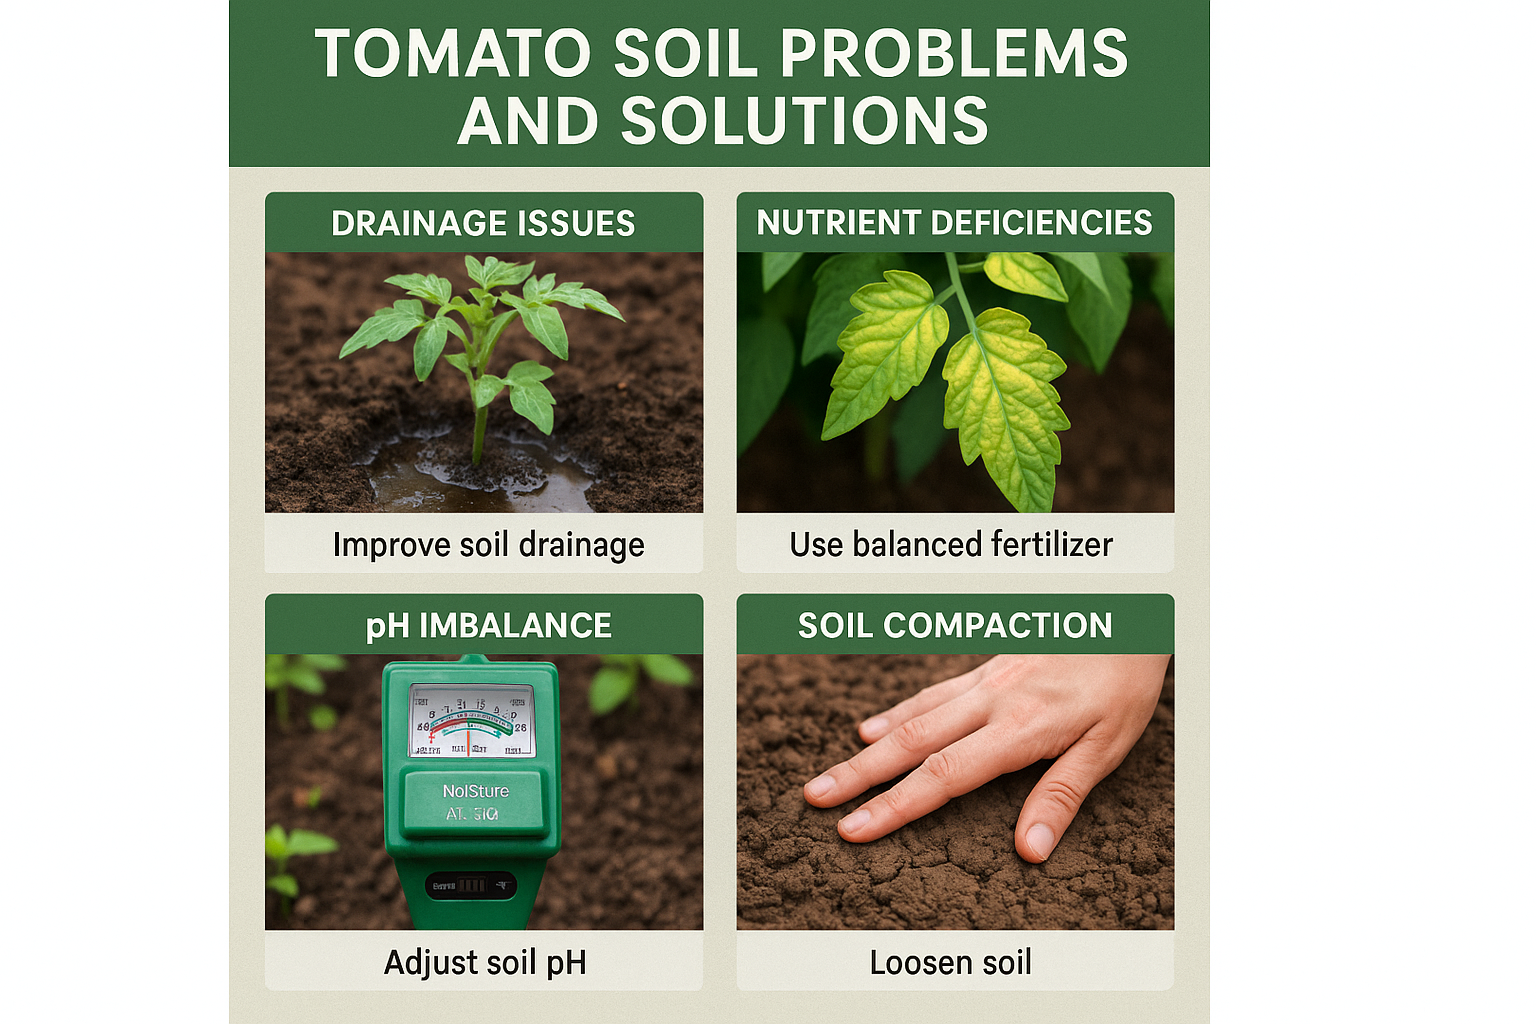
Troubleshooting Soil Issues
Even with careful preparation, soil problems can develop.
Here’s how to identify and address common issues.
Identifying Common Problems
Look for these warning signs of soil issues:
Drainage Problems:
- Water pools on soil surface
- Soil remains soggy for days after watering
- Yellow leaves and stunted growth
- Root rot symptoms (wilting despite wet soil)
Nutrient Deficiencies:
- Yellowing leaves (nitrogen)
- Purple leaf undersides (phosphorus)
- Brown leaf edges (potassium)
- Blossom end rot (calcium)
- Interveinal yellowing (magnesium)
pH Imbalance:
- Overall yellowing despite fertilization
- Nutrient deficiency symptoms despite adequate feeding
- Stunted growth with dark green foliage
Soil Compaction:
- Hard, crusty soil surface
- Water runs off rather than soaking in
- Shallow root development
- Slow overall growth
Quick Fixes for Common Issues
Address these problems promptly to save your tomato crop:
For Poor Drainage:
- Mix in additional perlite or coarse sand
- Create channels for water runoff
- Temporarily reduce watering frequency
- Consider raising plants or relocating containers
For Nutrient Deficiencies:
- Nitrogen: Apply diluted fish emulsion
- Phosphorus: Water with bone meal tea (1 cup per gallon)
- Potassium: Add wood ash tea (1/2 cup ash steeped in 5 gallons water)
- Calcium: Crush eggshells in vinegar, dilute and apply
- Magnesium: Apply Epsom salt solution (1 tablespoon per gallon)
For pH Problems:
- Too acidic: Add garden lime (1 tablespoon per square foot)
- Too alkaline: Add elemental sulfur (as directed on package)
- For containers: Flush with pH-adjusted water
For Compaction:
- Gently loosen soil surface with fork
- Apply worm castings to encourage biological activity
- Reduce overhead watering in favor of drip irrigation
- Apply liquid humic acid to improve soil structure
Long-Term Soil Improvement
Prevent future problems with these long-term strategies:
-
Crop rotation: Avoid planting tomatoes in the same soil for consecutive years
-
Cover cropping: Plant soil-building crops during off-seasons
-
Soil testing: Test soil annually to track changes in pH and nutrients
-
Compost addition: Add 1-2 inches of compost annually
-
Microbial inoculation: Apply mycorrhizal fungi and beneficial bacteria products
Specialized Tomato Soil Mixes for Different Varieties
Different tomato varieties have slightly different soil preferences.
These specialized mixes can help you maximize the potential of specific tomato types.
Cherry Tomato Soil Mix
Cherry tomatoes tend to be prolific producers that benefit from:
Cherry Tomato Special Mix:
- Standard tomato mix (70%)
- Additional perlite (10% extra)
- Coconut coir (10% extra)
- Reduced compost (10% less)
- Extra potassium source (1 tablespoon greensand per gallon)
This mix provides excellent drainage and moderate nutrition, preventing the splitting common in cherry varieties while supporting their extended production.
Heirloom Tomato Soil Mix
Heirloom varieties often have specific needs:
Heirloom Enhancement Mix:
- Standard tomato mix (80%)
- Extra calcium (double the eggshells or add oyster shell)
- Mycorrhizal fungi (as directed on package)
- Biochar (5% of total volume)
- Azomite or rock dust (1/4 cup per gallon)
This mix provides the diverse mineral profile and biological activity that helps heirloom varieties develop their complex flavors.
Determinate vs. Indeterminate Varieties
Adjust your soil mix based on growth habit:
Determinate (Bush) Varieties:
- Standard mix with additional initial fertilizer
- Focus on front-loading nutrients as they produce all at once
- Add slow-release organic fertilizer at planting time
Indeterminate (Vining) Varieties:
- Standard mix with emphasis on long-term nutrition
- More compost and less quick-release nutrients
- Addition of time-release mineral sources like rock phosphate
Climate-Specific Adjustments
Modify your soil mix based on your local climate:
Hot, Dry Climates:
- Increase water-retentive materials (coir, vermiculite) by 10%
- Add water-retaining crystals or gels
- Increase mulch depth to 3-4 inches
- Consider 5% clay addition for water retention
Cool, Wet Climates:
- Increase drainage materials (perlite, coarse sand) by 10%
- Reduce water-retentive components
- Add extra calcium to prevent blossom end rot
- Consider 5% biochar addition to improve drainage
Short-Season Climates:
- Add dark materials like compost and worm castings on soil surface
- Incorporate 5% vermicompost for faster nutrient availability
- Consider 2% bat guano addition for quick early growth
Sustainable and Eco-Friendly Practices
As gardeners, we have a responsibility to use sustainable soil practices.
Here are some eco-friendly approaches to tomato soil preparation.
Reducing Environmental Impact
Make environmentally conscious choices:
-
Choose peat alternatives: Coconut coir is renewable and sustainable
-
Source locally: Reduce transportation carbon footprint by using local materials
-
Compost at home: Create closed-loop systems in your own garden
-
Use organic methods: Avoid synthetic chemicals that can harm beneficial organisms
-
Conserve water: Design soil mixes and irrigation systems for maximum efficiency
Recycling and Reusing Materials
Incorporate these recycled materials into your soil mix:
- Coffee grounds: Add up to 10% for nitrogen and improved structure
- Crushed eggshells: Excellent calcium source
- Composted kitchen waste: Rich in diverse nutrients
- Shredded paper/cardboard: Adds carbon and improves structure (use only non-glossy)
- Fallen leaves: Collect, shred, and compost for excellent organic matter
Building Soil Health Long-Term
Focus on creating living soil that improves over time:
-
Encourage biodiversity: Create habitats for beneficial insects and organisms
-
Practice no-till methods: Disturb soil structure as little as possible
-
Use cover crops: Plant soil-building crops during off-seasons
-
Implement crop rotation: Vary what you plant to prevent disease and balance nutrients
-
Compost in place: Allow some plants to decompose directly in the soil
Carbon Sequestration in Garden Soil
Your garden can help fight climate change:
- Incorporate biochar: Stable carbon that remains in soil for centuries
- Maximize organic matter: Garden soil can store significant carbon
- Avoid bare soil: Keep soil covered with plants or mulch year-round
- Minimize tilling: Tilling releases stored carbon dioxide
- Choose perennials: Where possible, include perennial plants in your garden
By adopting these sustainable practices, your tomato garden becomes part of the solution to environmental challenges while producing delicious, healthy food.
Cost Analysis: DIY vs. Commercial Potting Soil
Making your own potting soil isn’t just about quality—it can also save you money.
Let’s break down the costs.
Price Comparison
Here’s how DIY and commercial options compare for a 20-gallon batch:
| Material | DIY Cost | Commercial Equivalent |
|---|---|---|
| Basic DIY Mix | $15-25 | $45-60 |
| Premium DIY Mix | $30-40 | $70-90 |
| Container-Specific Mix | $20-30 | $50-70 |
| Organic Premium Mix | $35-45 | $80-100 |
Costs are approximate and will vary by location and source
Long-Term Savings Strategies
Maximize your savings with these approaches:
-
Bulk purchasing: Buy ingredients like perlite in large bags
-
Community sharing: Split large purchases with gardening friends
-
Off-season buying: Purchase amendments in fall/winter when prices drop
-
Homemade components: Make your own compost and collect free materials
-
Reuse and recycle: Save and reuse potting soil from year to year
Value Beyond Cost
Consider these additional benefits of DIY soil:
- Customization value: Tailor mixes to specific plants and conditions
- Quality control: Ensure only high-quality ingredients are used
- Skill development: Build gardening knowledge and self-sufficiency
- Waste reduction: Utilize materials that might otherwise be discarded
- Consistent supply: Never run out during gardening season
For most gardeners, the combination of cost savings and superior quality makes DIY potting soil well worth the effort.
Expert Tips and Tricks
After years of making my own tomato potting soil, I’ve discovered some professional-level techniques that can take your results to the next level.
Professional Insights
These advanced techniques can significantly improve your soil:
-
Pre-ferment organic materials: Soak alfalfa meal, kelp meal, and other organic amendments in water with a tablespoon of molasses for 24-48 hours before adding to your mix
-
Layer method: Create alternating thin layers of ingredients rather than mixing all at once for better incorporation
-
Thermal activation: Cover your mixed soil with black plastic in the sun for 1-2 days to activate beneficial microorganisms
-
Worm integration: Add 10-20 red wigglers to container soil to create a living system
-
Char-water soaking: Pre-soak biochar in compost tea before adding to capture and hold nutrients
Time-Saving Techniques
Streamline your soil preparation process:
-
Batch preparation: Make large batches and store in covered containers
-
Pre-measured kits: Create “soil recipe kits” with pre-measured amendments
-
Tumbler mixing: Use a compost tumbler for easy, thorough mixing
-
Mechanized options: For large volumes, consider a cement mixer or drill attachment
-
Template system: Create a template board with marked measurements for quick ingredient portioning
Storage Solutions
Properly store soil and ingredients:
-
Covered containers: Use plastic totes with lids for soil storage
-
Moisture management: Store slightly damp but not wet
-
Labeling system: Mark containers with contents and date
-
Ingredient organization: Store amendments in sealed buckets
-
Seasonal preparation: Mix large batches during off-season when you have more time
Advanced Soil Testing
Go beyond basic tests for optimal results:
-
Complete nutrient analysis: Consider a professional lab test annually
-
Bioassay testing: Grow test plants to evaluate soil performance
-
Microscopic assessment: Use a microscope to check for beneficial microorganisms
-
Infiltration testing: Measure how quickly water moves through your mix
-
Bulk density check: Weigh a standard volume to ensure proper aeration
Conclusion
Creating your own potting soil for tomatoes is truly a game-changer for serious gardeners.
Throughout this guide, we’ve explored how custom soil mixes provide the perfect balance of drainage, nutrition, and structure that tomato plants need to thrive.
By taking control of this fundamental aspect of gardening, you’re setting yourself up for an abundant harvest of flavorful, healthy tomatoes.
The benefits extend far beyond just better plants.
Making your own soil saves money, reduces waste, and allows you to create sustainable, environmentally friendly growing systems.
It puts you in touch with the fundamental cycles of nature while developing valuable self-sufficiency skills.
As you implement these recipes and techniques in your garden, remember that soil is a living ecosystem.
Each batch you mix will be slightly different, and you’ll learn to adjust based on your specific conditions and the feedback your plants provide.
This is the art and science of gardening at its most rewarding.
I encourage you to start with the basic recipe, then experiment with modifications as you gain confidence.
Take notes on what works best in your garden, and don’t be afraid to make adjustments.
Your perfect tomato soil mix will evolve over time as you develop your skills and understanding.
Happy growing, and may your tomato harvests be bountiful!
Next Steps
Ready to put your new knowledge into practice?
Here’s how to proceed:
- Assess your needs: Determine how much soil you’ll need based on your containers or garden space
- Gather materials: Source the ingredients for your chosen recipe
- Schedule mixing: Set aside time for soil preparation 1-2 weeks before planting
- Start small: Begin with a basic recipe before trying more complex mixes
- Document results: Keep notes on what works best for future reference
By following these steps and the detailed guidance in this article, you’ll be well on your way to growing your best tomatoes ever.