When to start tomato seeds indoors is about choosing the right time to plant your tomato seeds inside your home so they grow strong before moving outside.
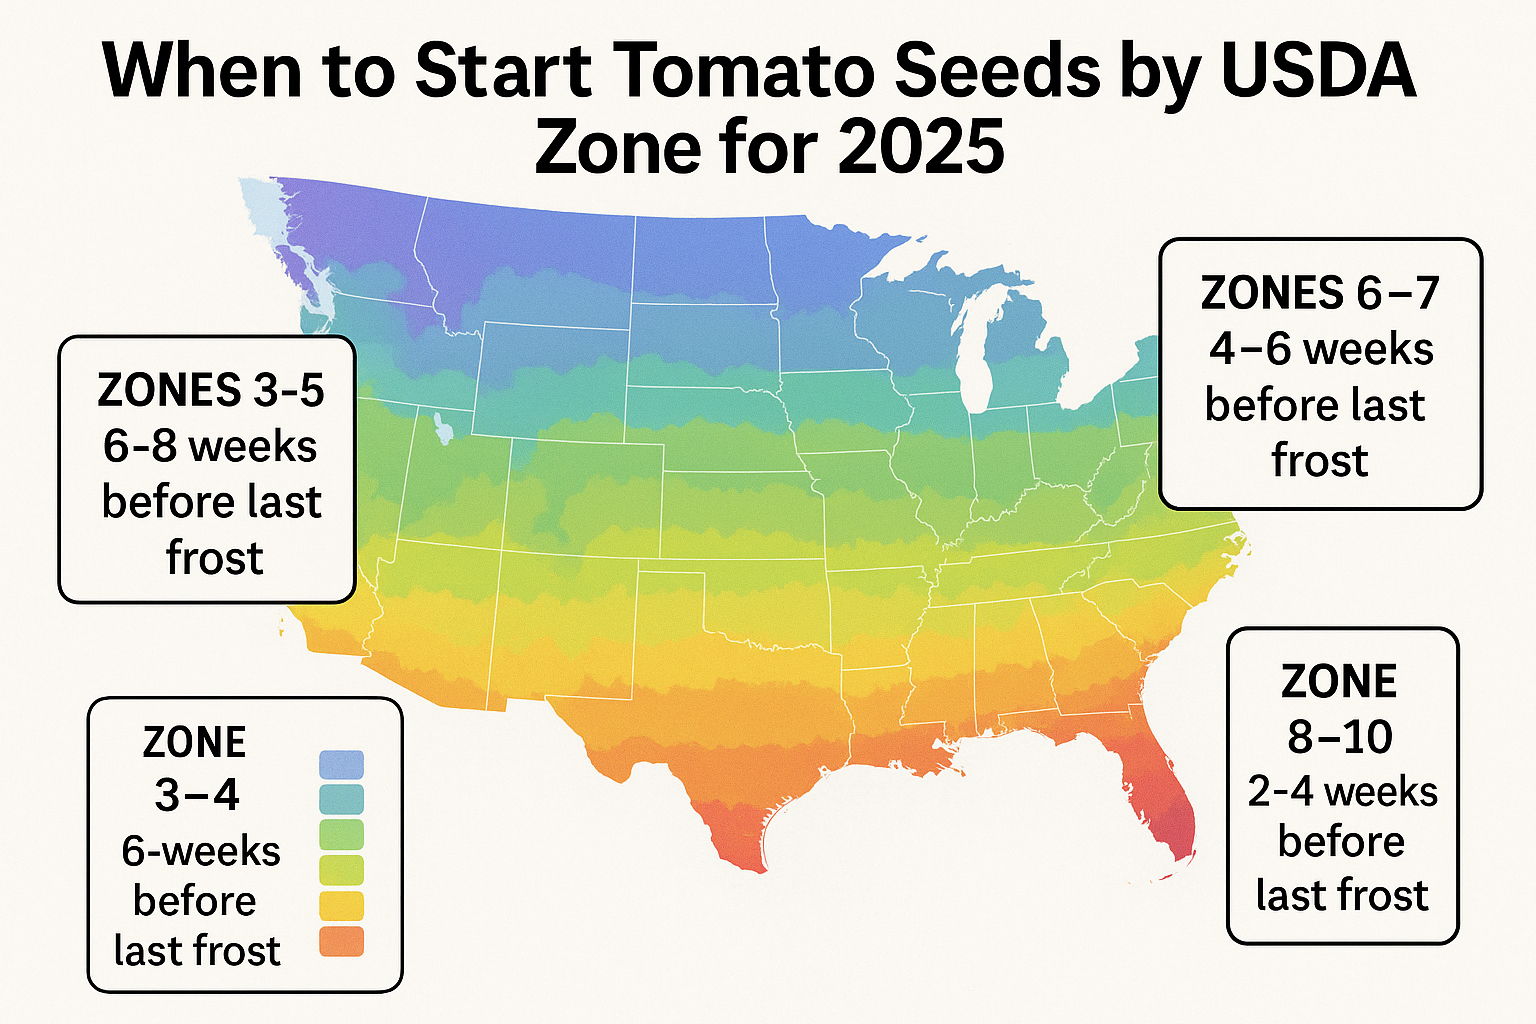
The best time to start is usually 6 to 8 weeks before the last frost date in your area.
This gives the plants enough time to grow healthy stems and leaves.
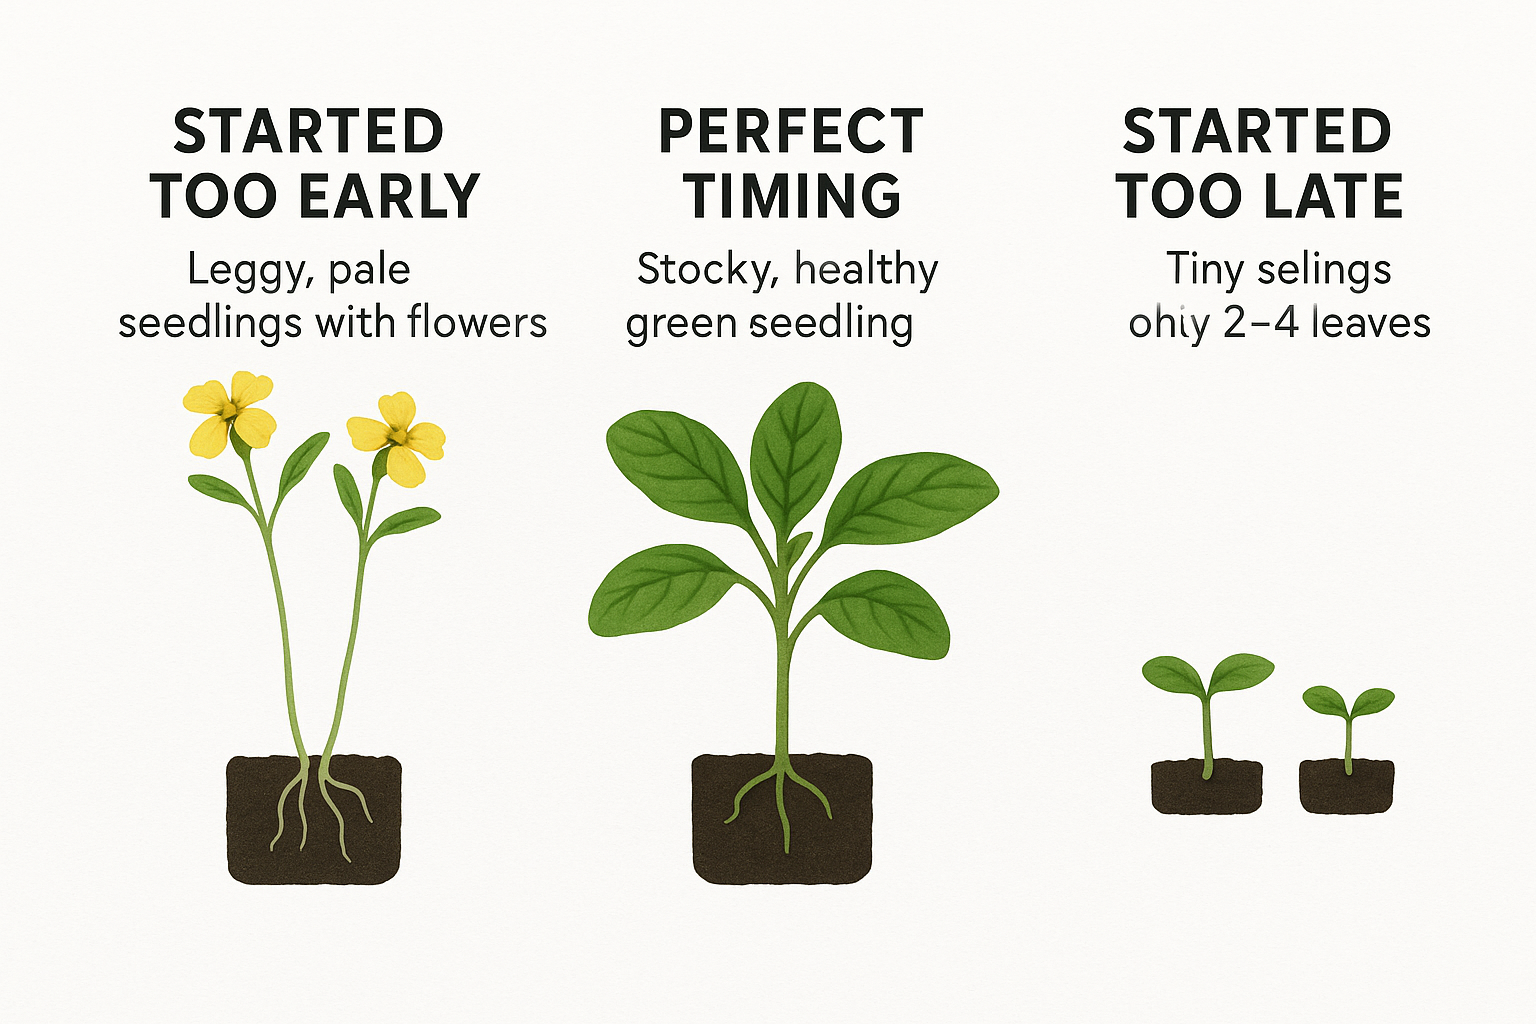
If you plant too early, the seedlings may become too tall and weak.
If you plant too late, they won’t be ready for the garden.
Tomato seeds indoors at the right time helps you enjoy bigger, better tomatoes when the growing season begins.
As I gazed out at the snow-covered landscape outside my window in February, it seemed almost impossible to imagine the lush, productive tomato garden that would flourish there just a few months later.
Getting the timing right for starting tomato seeds indoors is perhaps one of the most critical factors that separates abundant harvests from disappointing yields.
Starting tomato seeds indoors isn’t just a gardening ritual—it’s a strategic advantage that extends your growing season and maximizes your harvest potential.
But timing is everything.
The sweet spot for when to start tomato seeds indoors varies based on your specific climate, the varieties you’re growing, and your garden’s unique conditions.
From calculating your perfect start date based on your last frost date to understanding how different tomato varieties affect timing, you’ll gain the confidence to nurture those tiny seeds into productive plants that will reward you with a bountiful harvest.
Highlights
- Start tomato seeds indoors 6-8 weeks before your area’s last spring frost date for most varieties, adjusting for specific types (cherry tomatoes need less time, beefsteaks need more).
- Your geographic location significantly impacts timing – gardeners in USDA zones 3-5 typically start seeds in March, zones 6-7 in late February to early March, and zones 8-10 in January to February.
- Different tomato varieties have different maturation periods – determinate varieties mature faster (55-75 days) while indeterminate varieties take longer (70-90+ days), affecting when you should start seeds.
- The “days to maturity” listed on seed packets should be counted from transplant time, not seed starting – add 4-6 weeks to calculate total time from seed to harvest.
- Properly hardening off seedlings before transplanting outdoors is crucial – this 7-14 day process increases transplant success and overall plant health.
Understanding the Tomato Growing Timeline
Before diving into specific dates, it’s essential to understand the complete timeline of tomato development from seed to harvest.
This knowledge forms the foundation for making informed decisions about when to start your seeds indoors.
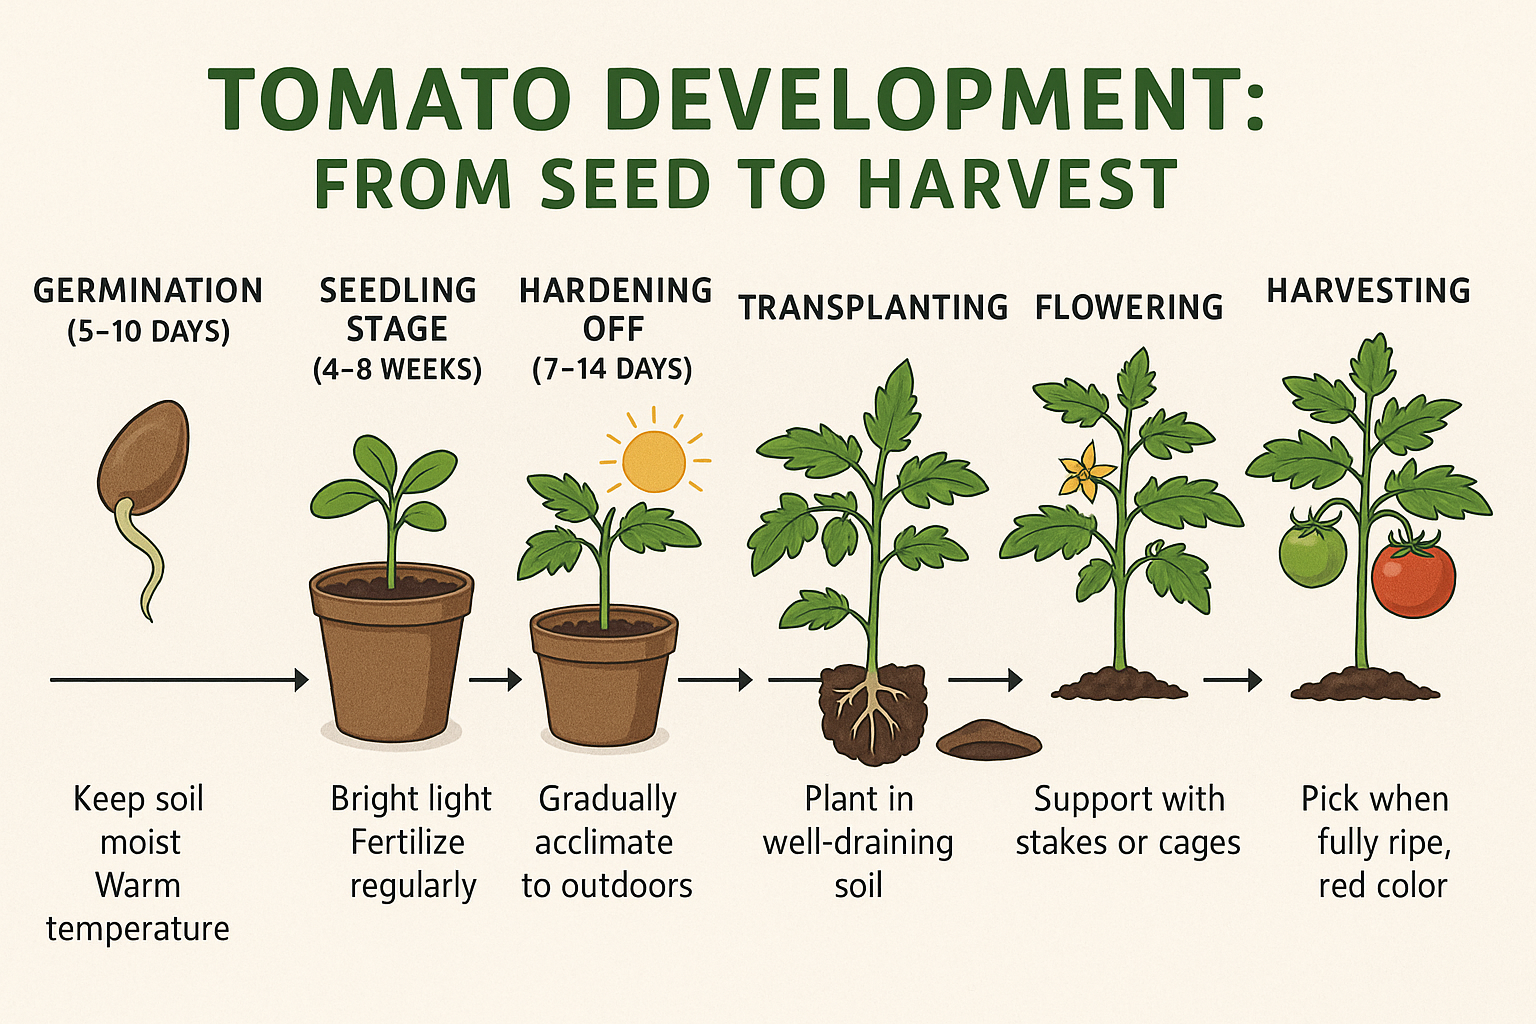
From Seed to Harvest: The Complete Tomato Timeline
The journey from a tiny tomato seed to your first ripe fruit follows a relatively predictable pattern:
- Germination: 5-10 days (temperature dependent)
- Seedling stage: 4-8 weeks (indoors under lights)
- Hardening off: 7-14 days (transitioning seedlings to outdoor conditions)
- Transplanting to garden: When soil temperatures reach 60°F (15.5°C) and all danger of frost has passed
- Flowering: 3-5 weeks after transplanting
- Fruit development: 6-8 weeks after flowering
- Harvesting: Begins when fruits reach mature size and color for the variety
This entire process typically takes 60-100 days from transplant to first harvest, depending on the variety.
When you add the 4-8 weeks of indoor growing time, you’re looking at 90-130+ days from seed to first harvest.
Why Starting Seeds Indoors Matters
Starting tomato seeds indoors offers several significant advantages:
- Extended growing season: By starting seeds 6-8 weeks before outdoor planting is possible, you effectively add two months to your growing season.
- Earlier harvests: Those extra weeks of growth translate to earlier harvests—often by a month or more.
- Stronger plants: Properly grown seedlings develop stronger root systems and are better prepared to thrive when transplanted.
- Variety selection: You gain access to hundreds of heirloom and specialty varieties not available as transplants at garden centers.
- Disease prevention: Starting with clean soil and controlled conditions helps prevent early disease issues.
- Cost savings: A packet of seeds costs about the same as one or two transplants but provides dozens of plants.
I’ve personally found that starting seeds indoors gives me not just better results, but a deeper connection to the growing process.
There’s something profoundly satisfying about nurturing those first tender seedlings while winter still holds the garden in its grip.
The Frost Date Factor: Your Primary Timing Guide
The single most important factor in determining when to start tomato seeds indoors is your area’s last spring frost date.
This date represents when your region typically experiences its final frost of the spring season, after which it’s generally safe to plant tender crops like tomatoes outdoors.
How to Find Your Last Frost Date
Several reliable resources can help you determine your area’s last frost date:
- USDA Cooperative Extension Service: Your local extension office can provide precise frost date information specific to your county.
- National Weather Service: Offers historical frost date data for major cities and regions.
- Online frost date calculators: Websites like The Old Farmer’s Almanac or Dave’s Garden allow you to enter your zip code for customized frost date information.
- Gardening apps: Many modern gardening apps can automatically determine your frost dates based on your location.
For most accurate results, I recommend checking multiple sources and perhaps speaking with experienced local gardeners.
Microclimate variations can make your specific location’s last frost date differ from regional averages by a week or more.
The 6-8 Week Rule: Calculating Your Start Date
Once you know your last frost date, calculating your seed starting date is straightforward:
- Identify your area’s average last frost date
- Count backward 6-8 weeks from that date
- That’s your target window for starting most tomato seeds indoors
For example, if your last frost date is May 15th:
- 6 weeks before = April 3rd
- 8 weeks before = March 20th
- Your ideal seed-starting window is March 20th – April 3rd
This 6-8 week timeframe ensures your seedlings will be at the optimal stage for transplanting when weather conditions become favorable.
Seedlings should ideally have 6-8 true leaves and be 6-10 inches tall at transplant time, but not yet flowering.
Regional Timing Guidelines for 2025
While your specific frost date should guide your decisions, here are general timing guidelines by USDA hardiness zones for the 2025 growing season:
| USDA Zone | Last Frost Date Range | When to Start Seeds Indoors | When to Transplant Outdoors |
|---|---|---|---|
| 3-4 | Late May – Early June | Late March – Early April | Early to mid-June |
| 5-6 | Late April – Mid May | Early to mid-March | Mid to late May |
| 7-8 | Early to late April | Mid-February to early March | Late April to early May |
| 9-10 | February – March | January – February | March – April |
Remember that these are general guidelines.
Local weather patterns for 2025 may necessitate adjustments.
I always recommend monitoring 10-day forecasts as you approach your planned transplant date and being prepared to delay if unseasonably cold weather threatens.
Tomato Variety Considerations: Not All Tomatoes Are Equal
The specific varieties of tomatoes you choose to grow significantly impact when you should start your seeds indoors.
Different types have different maturation periods and growth habits that affect their optimal starting times.
Determinate vs. Indeterminate: Growth Habits Matter
Tomatoes fall into two main growth categories, each with different timing considerations:
Determinate Tomatoes
- Grow to a predetermined height (usually 3-4 feet)
- Set all their fruit within a concentrated 4-6 week period
- Typically mature faster (55-75 days from transplant)
- Can be started 6 weeks before last frost
- Examples: Roma, Celebrity, Bush Early Girl
Indeterminate Tomatoes
- Continue growing and producing fruit until killed by frost
- Can reach heights of 6-10+ feet
- Typically have longer maturation periods (70-90+ days)
- Should be started 8 weeks before last frost
- Examples: Brandywine, Cherokee Purple, Sun Gold, most cherry tomatoes
I’ve found that starting determinate varieties a bit later than indeterminates works well.
This prevents them from becoming too large before transplanting and helps synchronize their production period with optimal growing conditions.
Days to Maturity: Understanding Seed Packet Information
Seed packets typically list “days to maturity” or “days to harvest,” but there’s an important detail many gardeners miss: this number usually refers to the time from transplant to harvest, not from seed to harvest.
To calculate the total time from seed to harvest:
- Note the days to maturity on the seed packet
- Add 4-6 weeks (28-42 days) for the indoor growing period
- This gives you the total days from seed to first harvest
For example, if a tomato variety lists “75 days to maturity,” you can expect approximately 103-117 days (75 + 28-42) from seeding to first harvest.
Here’s a breakdown of common tomato types and their typical maturation periods:
| Tomato Type | Days to Maturity (from transplant) | When to Start Indoors (before last frost) |
|---|---|---|
| Early Season | 50-65 days | 6 weeks |
| Mid-Season | 65-80 days | 7 weeks |
| Late Season | 80+ days | 8 weeks |
| Cherry/Grape | 55-75 days | 6-7 weeks |
| Roma/Paste | 70-85 days | 7 weeks |
| Beefsteak | 75-90+ days | 8 weeks |
| Heirloom (varies) | 70-90+ days | 7-8 weeks |
Special Timing Considerations for Popular Varieties
Some popular tomato varieties have specific timing considerations worth noting:
Early Producers (Start 6 weeks before last frost)
- Early Girl (50-60 days)
- Sun Gold (57 days)
- Fourth of July (49 days)
- Stupice (52 days)
Mid-Season Producers (Start 7 weeks before last frost)
- Celebrity (70 days)
- Roma (75 days)
- Better Boy (75 days)
- San Marzano (80 days)
Late-Season Producers (Start 8 weeks before last frost)
- Brandywine (80-100 days)
- Cherokee Purple (80-90 days)
- Mortgage Lifter (85 days)
- Beefsteak (85-96 days)
I’ve learned through experience that it’s better to err on the side of starting seeds a bit later rather than too early.
Slightly younger, more compact transplants often establish more quickly and overtake older, larger transplants that may suffer more transplant shock.
Climate Zone Specifics: Tailoring Timing to Your Region
Your geographic location significantly impacts when you should start tomato seeds indoors.
Let’s explore specific recommendations for different climate zones across North America.
Cold Climate Considerations (Zones 3-5)
In colder northern regions, the growing season is compressed, making timing especially critical:
- Last frost dates: Typically range from mid-May to early June
- Optimal indoor start time: Mid-March to early April
- Key challenges: Short growing season, cool spring soil temperatures
- Strategies for success:
- Focus on early-maturing varieties (under 70 days)
- Use season extension techniques like wall-o-water protectors
- Prepare to protect late-season plants from early fall frosts
- Consider starting seeds 8 weeks before last frost to give plants more time
Living in Zone 4 for several years taught me the value of careful variety selection. In these regions, prioritize early producers like ‘Stupice’, ‘Manitoba’, and ‘Glacier’ that can set fruit in cooler temperatures and mature quickly.
Moderate Climate Strategies (Zones 6-7)
These transitional zones offer a good balance of growing season length with distinct seasonal changes:
- Last frost dates: Typically range from mid-April to early May
- Optimal indoor start time: Late February to early March
- Key advantages: Good growing season length with relatively mild summers
- Strategies for success:
- Stagger plantings for continuous harvest
- Balance early, mid, and late-season varieties
- Be prepared for occasional late frost events
- Consider starting heat-loving varieties 8 weeks before last frost and cooler-tolerant varieties 6 weeks before
In my Zone 6b garden, I’ve found success with starting indeterminate heirlooms in late February and determinate varieties in mid-March, which positions both for optimal production during the prime growing months.
Warm Climate Adaptations (Zones 8-10)
Southern and coastal regions present different challenges for tomato growers:
- Last frost dates: February to April, or no frost at all in zones 9b-10
- Optimal indoor start time: January to February
- Key challenges: Heat and humidity can limit production in midsummer
- Strategies for success:
- Consider split-season planting: spring and fall crops
- Select heat-tolerant varieties for summer production
- In zones 9-10, direct seeding may be possible for fall crops
- Focus on disease resistance for humid areas
Gardeners in these regions often find that their biggest challenge isn’t the length of the growing season but rather the intense summer heat that can cause tomatoes to stop setting fruit.
In these areas, timing indoor seed starting to allow for strong spring production before summer heat arrives is crucial.
Special Considerations for Mountain and Coastal Regions
These areas often have microclimates that differ significantly from their USDA zone designation:
Mountain Regions:
- Higher elevations have shorter growing seasons
- Temperature fluctuations can be extreme
- Consider starting seeds 8-10 weeks before last frost
- Focus on cold-tolerant, early-maturing varieties
- Be prepared to protect plants from late spring and early fall frosts
Coastal Regions:
- Moderate temperatures but often less summer heat
- Fog can reduce sun exposure and slow ripening
- May need to start seeds earlier to compensate for slower summer growth
- Select varieties that perform well in cooler conditions
- Consider using black plastic mulch to increase soil temperature
Beyond Frost Dates: Other Timing Factors to Consider
While frost dates provide the foundation for timing decisions, several other factors should influence exactly when you start your tomato seeds indoors.
Soil Temperature Considerations
Tomatoes are warm-season crops that require soil temperatures of at least 60°F (15.5°C) for proper root development after transplanting:
- Minimum soil temperature: 60°F (15.5°C)
- Optimal soil temperature: 70-80°F (21-27°C)
- How to measure: Use a soil thermometer inserted 2-4 inches deep
- Warming strategies: Black plastic mulch, raised beds, fabric row covers
In many regions, soil temperatures lag behind air temperatures by several weeks in spring.
I’ve found that transplanting into soil that’s too cold stunts growth significantly, even if air temperatures are warm.
It’s worth waiting until soil has properly warmed, even if it means keeping your seedlings indoors a bit longer than planned.
Light Conditions and Day Length
Natural daylight hours increase as spring progresses, which affects both indoor seedling growth and outdoor planting considerations:
- Indoor implications: Seedlings started very early (January/February) will need more supplemental lighting
- Outdoor implications: Day length affects flowering and fruiting
- Early spring challenge: Even after frost danger passes, limited daylight hours can slow growth
- Solution: Ensure seedlings receive 14-16 hours of light daily when starting very early
I’ve noticed that seedlings started in January require much more careful attention to supplemental lighting than those started in March, when natural daylight is increasing rapidly.
Your Personal Schedule and Availability
Practical considerations about your own schedule should factor into timing decisions:
- Vacation plans: Avoid having newly transplanted seedlings when you’ll be away
- Work commitments: Consider when you’ll have time for hardening off and transplanting
- Weekend availability: Time seed starting so critical transplanting falls on a weekend
- Gardening bandwidth: Stagger seed starting if growing multiple varieties to manage workload
One year, I started all my seeds at the “perfect” time according to frost dates, only to realize I had a week-long work trip scheduled right when they needed to be transplanted.
Since then, I always check my calendar before deciding exactly when to start seeds.
Greenhouse or Cold Frame Availability
Access to season extension tools can significantly alter your seed starting timeline:
- With a greenhouse: Can start seeds 1-2 weeks earlier than recommended
- With cold frames: Can transplant seedlings 2-3 weeks before last frost date
- With cloches/row covers: Can transplant 1-2 weeks before last frost date
- Timing adjustment: If using these tools, adjust your indoor seed starting date accordingly
My unheated greenhouse allows me to transplant seedlings about two weeks earlier than my neighbors who plant directly into open gardens.
This means I can either start seeds earlier for an earlier harvest or start at the normal time and transplant less mature seedlings that establish better.
The Indoor Seed Starting Process
Now that we’ve covered when to start your tomato seeds, let’s review the essential elements of the indoor seed starting process to ensure your timing efforts pay off with healthy, productive seedlings.
Essential Supplies for Successful Seed Starting
Gathering the right supplies before you begin is crucial:
- Containers: Cell trays, peat pots, or recycled containers with drainage holes
- Growing medium: Sterile seed starting mix (not garden soil)
- Light source: Sunny south-facing window or grow lights (preferred)
- Heat source: Seed heating mat or warm location (70-80°F ideal)
- Watering tools: Spray bottle, watering can with fine rose, or bottom watering tray
- Labels: Waterproof markers and plant labels
- Covers: Plastic dome lids or plastic wrap to maintain humidity during germination
- Timer: For controlling grow light duration
- Fan: Small oscillating fan for air circulation to prevent damping off
I find that investing in quality supplies—especially good lighting and a proper seed starting mix—pays dividends in seedling health and vigor.
Step-by-Step Seed Starting Timeline
Follow this timeline for optimal results:
1-2 Weeks Before Seed Starting Day:
- Purchase seeds if you haven’t already
- Gather and sanitize containers
- Purchase seed starting mix
- Test and set up lighting system
- Create a seed starting schedule/calendar
Seed Starting Day:
- Moisten seed starting mix
- Fill containers
- Plant seeds at proper depth (¼ inch for tomatoes)
- Label containers
- Cover to maintain humidity
- Place on heat mat if available
After Planting:
- Maintain temperature at 70-80°F (21-27°C)
- Check daily for germination
- Remove covers as soon as seeds germinate
- Position lights 2-3 inches above seedlings
- Run lights 14-16 hours per day
Week 1-2 After Germination:
- Maintain consistent moisture
- Begin light fertilization when true leaves appear
- Ensure good air circulation
- Thin to strongest seedling if multiple sprouted per cell
Week 3-4:
- Transplant to larger containers if needed
- Increase fertilizer strength slightly
- Begin brushing tops of plants daily to strengthen stems
- Lower temperature slightly to 65-70°F (18-21°C)
Week 5-6:
- Begin hardening off process
- Reduce watering slightly
- Continue fertilizing weekly
- Check for signs of readiness for transplanting
Week 7-8:
- Complete hardening off
- Prepare garden soil
- Transplant when conditions are right
Common Timing Mistakes to Avoid
In my years of starting tomato seeds, I’ve made (and seen others make) these common timing errors:
Starting too early:
- Results in leggy, weak seedlings
- Plants may become rootbound
- May begin flowering indoors, stunting later growth
- Requires more care and possibly repotting
Starting too late:
- Reduces overall harvest potential
- May not allow enough time for full production before fall frost
- Rushed hardening off process can stress plants
Inconsistent care schedule:
- Irregular watering leads to stress and poor development
- Inconsistent light exposure causes weak, stretched plants
- Forgetting to harden off properly leads to transplant shock
Transplanting based solely on calendar date:
- Ignoring actual weather conditions can be disastrous
- Soil temperature is as important as air temperature
- Plant readiness should influence timing as much as date
I’ve learned that the most successful approach is to use frost dates as a starting point, but then adjust based on actual conditions, plant development, and weather forecasts.
Flexibility within a 1-2 week window usually yields better results than rigid adherence to a specific date.
Preparing Seedlings for Outdoor Transition
The final stage of indoor seed starting—preparing your seedlings for life outdoors—is critical for transplant success and requires careful timing of its own.
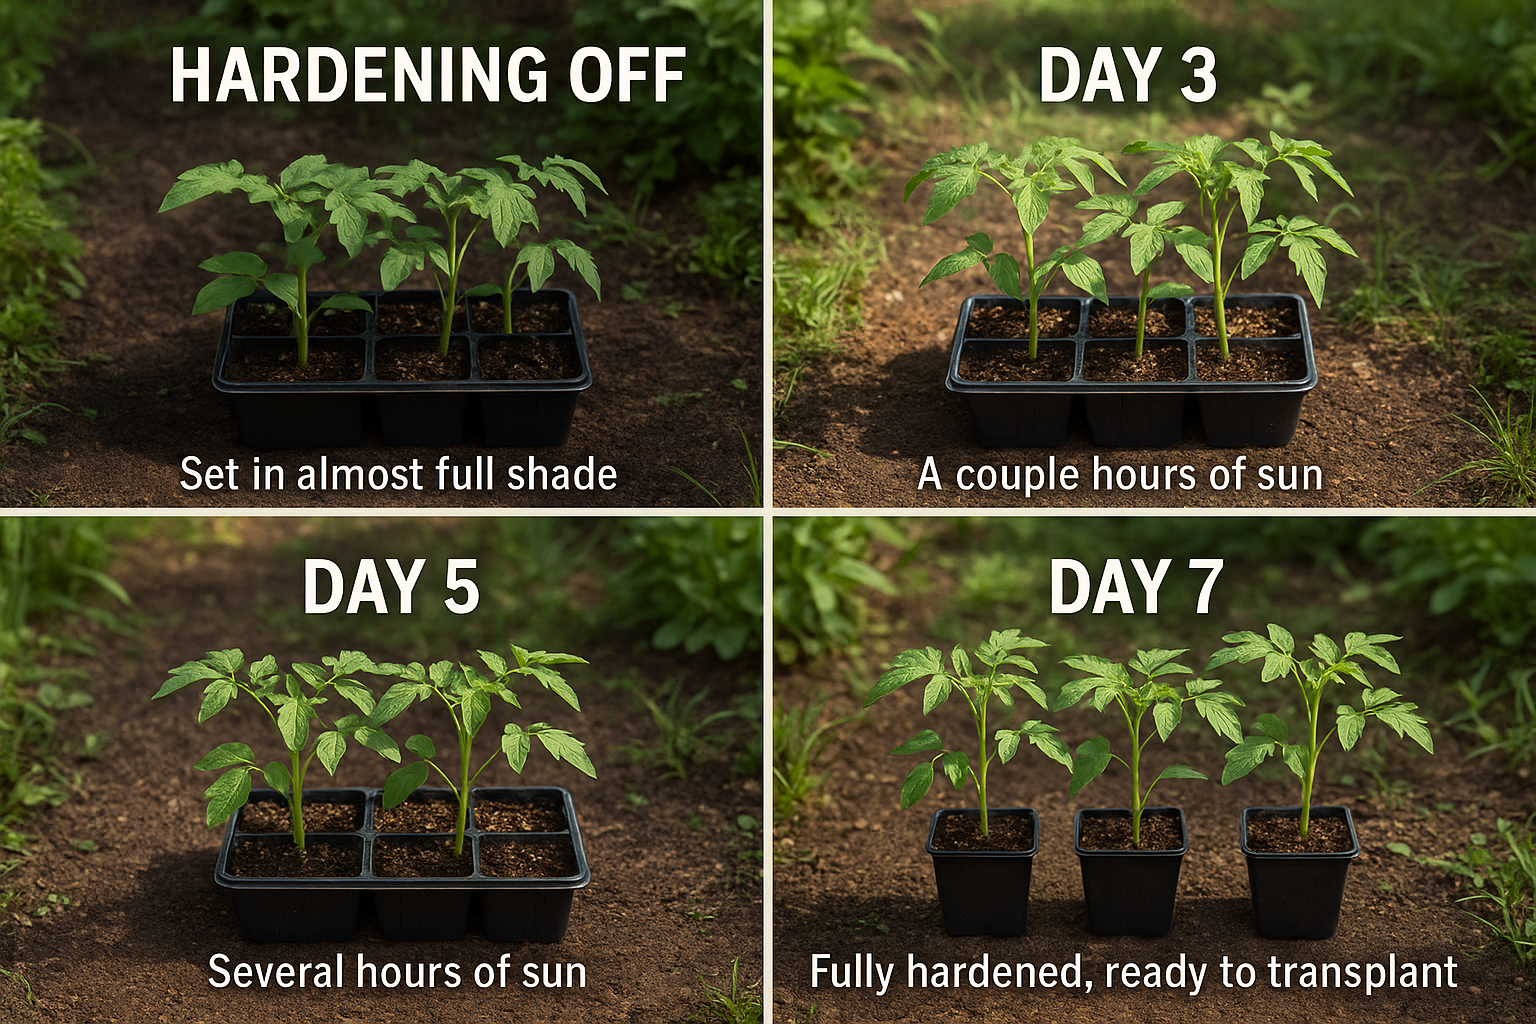
The Critical Hardening Off Process
Hardening off is the process of gradually acclimating indoor-grown seedlings to outdoor conditions:
Why it’s essential:
- Indoor seedlings have never experienced wind, direct sun, or temperature fluctuations
- Direct transplanting causes severe shock that can set plants back weeks or even kill them
- Properly hardened plants establish more quickly and produce earlier
Timing the hardening off process:
- Begin 7-14 days before planned transplant date
- Start when seedlings have at least 4-6 true leaves
- Schedule during a period of mild weather if possible
- Allow extra time if weather is particularly harsh
Day-by-day hardening off schedule:
- Day 1-2: Place seedlings outdoors in a sheltered, shaded location for 1-2 hours
- Day 3-4: Increase outdoor time to 3-4 hours with some filtered sunlight
- Day 5-6: Extend time to 4-6 hours with morning sun exposure
- Day 7-8: Allow 6-8 hours outdoors with increased sun exposure
- Day 9-10: Leave plants out all day, bring in at night
- Day 11-12: Leave plants out day and night unless frost threatens
- Day 13-14: Plants are ready for transplanting
I’ve found that a gradual approach pays enormous dividends in plant health.
One year, pressed for time, I shortened the hardening off process to just three days.
Those plants took nearly three weeks to recover from transplant shock, while properly hardened plants in the same garden were growing vigorously within days.
Recognizing Transplant Readiness
Beyond calendar dates, visual cues indicate when your seedlings are ready for transplanting:
Physical indicators of readiness:
- 6-8 true leaves have developed
- Stem thickness is about that of a pencil
- Plant height is 6-10 inches (not including root system)
- Root system is well-developed but not severely rootbound
- Color is deep green without yellowing
- No flowers have formed yet (remove any that appear)
Signs seedlings are NOT ready:
- Thin, leggy stems
- Pale or yellowing leaves
- Few true leaves
- Stunted growth
- Visible stress or disease
Signs seedlings have been indoors too long:
- Rootbound (roots circling container)
- Flowering while still in containers
- Yellowing lower leaves
- Extremely tall or leggy growth
- Nutrient deficiency symptoms despite fertilization
I’ve learned to pay more attention to these physical indicators than to the calendar.
Some years, conditions promote faster seedling development; other years, growth is slower.
Adjusting your transplant timing based on actual seedling development often leads to better results.
Weather Monitoring for Transplant Timing
The final decision on when to transplant should always consider current and upcoming weather conditions:
Ideal transplanting conditions:
- Daytime temperatures: 65-75°F (18-24°C)
- Nighttime temperatures: Above 50°F (10°C)
- Soil temperature: At least 60°F (15.5°C)
- Weather forecast: Cloudy or partially cloudy days
- Precipitation: Light rain or drizzle is beneficial
- Wind: Calm to light breeze
Conditions to avoid:
- Frost or near-frost temperatures
- Extreme heat (above 85°F/29°C)
- Strong winds
- Heavy rain or storms
- Extended cold periods
- Drought conditions
Tools for monitoring:
- 10-day weather forecasts
- Soil thermometer
- Historical weather data for your area
- Weather apps with alerts
I always check the extended forecast before transplanting.
Even if we have past the average last frost date, an unseasonable cold snap can damage or kill newly transplanted seedlings.
I prefer to wait a few extra days for ideal conditions rather than risk weeks of growth.
Special Timing Scenarios and Solutions
Some gardening situations require adjustments to the standard seed-starting timeline.
Let’s explore solutions for common special scenarios.
Late Start Recovery: What If You’re Behind Schedule?
If you’ve missed your ideal starting window, don’t panic—you have options:
If you’re 1-2 weeks late:
- Proceed with starting seeds as normal
- Provide slightly warmer conditions to speed germination
- Use a weak fertilizer solution once true leaves appear
- Transplant as soon as seedlings are ready and conditions allow
If you’re 3-4 weeks late:
- Consider purchasing seedlings from a garden center
- Look for smaller, younger seedlings rather than blooming plants
- Choose faster-maturing varieties if starting seeds
- Use larger starter pots to minimize need for potting up
- Provide optimal growing conditions to accelerate growth
If you’re more than a month late:
- Purchase established seedlings for main crop
- Start seeds of fall-producing varieties
- Consider cherry tomatoes, which mature faster
- Plan for season extension in fall with row covers or other protection
- Look for “days to maturity” of 60 or fewer on seed packets
I once started seeds nearly a month late due to a family emergency.
By choosing early-producing varieties and providing optimal care, I still managed a decent harvest, though it began later than usual and was somewhat reduced in volume.
Extended Season Strategies
For gardeners looking to maximize their tomato season, these strategies can help:
Succession planting approach:
- Start main crop seeds at the standard 6-8 weeks before last frost
- Start a second batch 2-3 weeks later
- Start a third batch 4-6 weeks later for fall production
- This provides continuous harvest and insurance against early crop failures
Season extension techniques:
- Use wall-o-water protectors to transplant 2-3 weeks earlier
- Apply black plastic mulch to warm soil before transplanting
- Install low tunnels or cold frames for early spring and late fall protection
- Plant some tomatoes in containers that can be moved indoors if frost threatens
Fall harvest planning:
- Start seeds 12-14 weeks before first fall frost for a late-season crop
- Choose faster-maturing varieties (under 70 days)
- Be prepared to protect plants from early fall frosts
- Focus on determinate varieties that will produce a concentrated harvest
By combining these approaches, I’ve been able to extend my tomato harvest season by nearly two months beyond what my neighbors typically achieve.
Container and Small Space Timing Adjustments
Growing in containers or small spaces affects timing considerations:
Container advantages:
- Soil warms faster in spring
- Can be moved to protected locations if weather threatens
- Can be started outdoors earlier with protection
- May allow for slightly later seed starting (5-7 weeks before last frost)
Container challenges:
- More vulnerable to temperature extremes
- Requires more frequent watering
- Limited root space can affect long-term production
- May need to choose compact varieties
Timing adjustments for container growing:
- Start seeds 5-7 weeks before last frost (slightly later than garden plants)
- Choose determinate or dwarf indeterminate varieties
- Consider starting some plants later for succession harvests
- Plan for possible replacement plantings in midsummer
When I grew tomatoes on my apartment balcony, I found that starting seeds about 6 weeks before last frost worked perfectly.
The containers warmed quickly in spring sun, and being able to move them to sheltered locations during cold snaps gave me flexibility that garden growers didn’t have.
Record-Keeping for Future Success

One of the most valuable tools for perfecting your seed-starting timing is maintaining good records of your experiences from year to year.
Tracking Your Results for Continuous Improvement
Develop a system to track key information:
Essential data to record:
- Varieties planted
- Seed starting dates
- Germination dates and rates
- Transplant dates
- First harvest dates
- Total yield
- Weather patterns and anomalies
- Problems encountered
- Successful techniques
Simple record-keeping methods:
- Dedicated garden journal
- Spreadsheet
- Garden planning app
- Calendar with notes
- Photo documentation with dates
How to use your records:
- Compare performance between varieties
- Identify optimal starting dates based on results
- Refine your techniques year over year
- Adjust timing based on variety performance
- Document microclimate effects in your specific garden
I keep a simple spreadsheet that tracks all my tomato varieties each year.
By comparing notes across multiple growing seasons, I’ve been able to fine-tune my starting dates for specific varieties and identify which ones consistently perform best in my garden.
Learning from Experience
Your garden has unique conditions that may require adjustments to standard recommendations:
Microclimate factors that affect timing:
- Proximity to large bodies of water (lakes, oceans)
- Urban heat island effects
- Elevation changes
- Wind patterns
- Shade from buildings or trees
- Soil type and drainage
- Exposure and orientation
How to identify your microclimate patterns:
- Compare your garden’s first and last frost dates to official records
- Note temperature differences between your garden and local weather reports
- Observe snow melt patterns in spring
- Monitor soil temperature in different garden areas
- Note how plant development in your garden compares to neighbors’
Over the years, I’ve discovered that my backyard has a microclimate about 5-7 days earlier than the official last frost date for my area.
This has allowed me to adjust my seed starting and transplanting dates accordingly, gaining nearly a week of growing season.
Troubleshooting Common Timing-Related Problems
Even with careful planning, timing issues can arise.
Here’s how to identify and address common problems related to seed starting timing.
Signs Your Timing Was Off (And How to Adjust)
Started too early symptoms:
- Extremely tall, leggy seedlings
- Yellowing lower leaves
- Rootbound plants
- Flowering while still indoors
- Stunted growth despite adequate care
Started too late symptoms:
- Small, immature plants at normal transplant time
- Insufficient hardening off
- Delayed production
- Harvest pushed into less favorable weather
- Reduced overall yields
Corrective actions for early starts:
- Repot into larger containers if needed
- Provide stronger light to prevent stretching
- Reduce temperature slightly to slow growth
- Pinch off any flowers that form
- Consider cutting back and rooting leggy plants
- Adjust your timing for next season
Corrective actions for late starts:
- Provide optimal growing conditions to accelerate development
- Use season extension techniques in fall
- Choose faster-maturing varieties
- Consider purchasing some seedlings while growing others
- Note the timing issue and adjust next year’s schedule
When I realized I’d started my seedlings too early one year, I took drastic action with the leggiest plants—cutting them back to about 4 inches tall and replanting them deeper.
This worked surprisingly well, as tomatoes can root along their stems, and the plants recovered to produce a good crop.
Adapting to Unexpected Weather Patterns
Climate change and weather variability make strict adherence to calendar dates increasingly challenging:
Unusually cold spring:
- Delay transplanting until soil and air temperatures are appropriate
- Extended hardening off period
- Use season extension tools like wall-o-water or row covers
- Be prepared to protect plants from late frosts
Unusually warm spring:
- Accelerate hardening off process
- Transplant when soil temperature is adequate, even if before last frost date
- Have protection ready in case of temperature reversals
- Consider starting heat-tolerant varieties for summer production
Erratic temperature swings:
- Focus on soil temperature as your guide rather than air temperature
- Use deeper planting techniques to protect roots
- Apply mulch immediately after transplanting
- Have row covers or other protection ready
In 2023, many regions experienced an unusually cold, wet spring followed by an abrupt shift to summer heat.
Gardeners who maintained flexibility in their transplanting schedule and focused on soil temperature rather than calendar dates generally had better results.
Conclusion:
When to start tomato seeds indoors does not have one perfect answer for everyone.
It depends on where you live, the type of tomatoes you are growing, and your weather.
For most people, starting seeds 6–8 weeks before the last spring frost works best.
The goal is to have strong, healthy plants ready when it is warm enough to move them outside.
Remember, timing is important, but it is not the only thing that matters.
Good seeds, enough light, and regular care also help your plants grow well.
Even if you are not perfect, tomato plants are strong and can still grow great fruit with proper care.
Next Steps for Your Tomato Growing Journey
- Determine your last frost date using local extension resources
- Select your tomato varieties based on your growing season length and preferences
- Create a seed-starting calendar working backward from your last frost date
- Gather supplies well before your planned starting date
- Monitor weather patterns as spring approaches and be prepared to adjust as needed
- Keep records of your experiences to refine your approach for future years
Happy growing!