

How to save seeds from tomatoes is simpler than most gardeners think—and it can save you money season after season.
Start by choosing a fully ripe, healthy tomato.
Scoop out the seeds with the gel into a jar, let them ferment for 2–3 days, then rinse and dry them completely. Once dried, store them in a cool, dry place.
That’s it—you’ve preserved next year’s harvest from this year’s best fruit.
I realized just how powerful this was one summer while harvesting the last of my Brandywine tomatoes.
Instead of feeling that end-of-season letdown, I saw opportunity.
Those final fruits weren’t just dinner—they were next year’s plants in the making.
With a little patience and no extra cost, I saved seeds that later produced one of my best harvests ever.
Saving tomato seeds connects you to generations of gardeners who did the same long before seed packets lined store shelves.
It’s practical, sustainable, and deeply satisfying—closing the loop from seed to harvest and back again.
Key Takeaways
- Select fully ripe, disease-free tomatoes from open-pollinated or heirloom varieties for the best seed-saving results
- Fermentation is crucial for removing the gel sac around tomato seeds and preventing diseases
- Proper drying and storage in cool, dark, dry conditions can extend seed viability to 4-10 years
- Label seeds meticulously with variety name, collection date, and any special characteristics
- Seed saving promotes biodiversity, saves money, and connects you to traditional gardening practices
Why Save Tomato Seeds?
The Economic Benefits
Let’s talk numbers. A typical packet of quality tomato seeds costs between $3-5 and contains roughly 20-30 seeds.
If you grow just five tomato varieties each year, you’re spending $15-25 annually on seeds.
Now consider that a single well-grown tomato can contain 50-300 seeds, depending on the variety.
By saving seeds from just one fruit of each variety, you’re potentially harvesting hundreds of dollars worth of seeds over time.
I started seed saving when my gardening budget was tight during the economic downturn of 2020.
That first year, I saved seeds from three varieties and calculated that I’d harvested about $45 worth of seeds from fruits I was going to eat anyway.
Five years later, I haven’t purchased tomato seeds since, saving me approximately $225—enough to buy that drip irrigation system I’d been eyeing!
Environmental Sustainability
Commercial seed production has a significant environmental footprint.
Seeds are typically grown in large monoculture operations, requiring substantial inputs of water, fertilizers, and pest control products.
They’re then processed, packaged, and shipped—often across continents.
By saving your own seeds, you’re:
- Reducing packaging waste
- Eliminating shipping emissions
- Supporting biodiversity
- Creating plants adapted to your local growing conditions
- Decreasing dependence on commercial seed suppliers
Preserving Biodiversity and Heritage
Perhaps the most compelling reason to save tomato seeds is to preserve genetic diversity.
According to the Food and Agriculture Organization, we’ve lost over 75% of plant genetic diversity in the last century as farmers worldwide switched to genetically uniform varieties.
When you save seeds from heirloom tomatoes, you’re participating in a living history project.
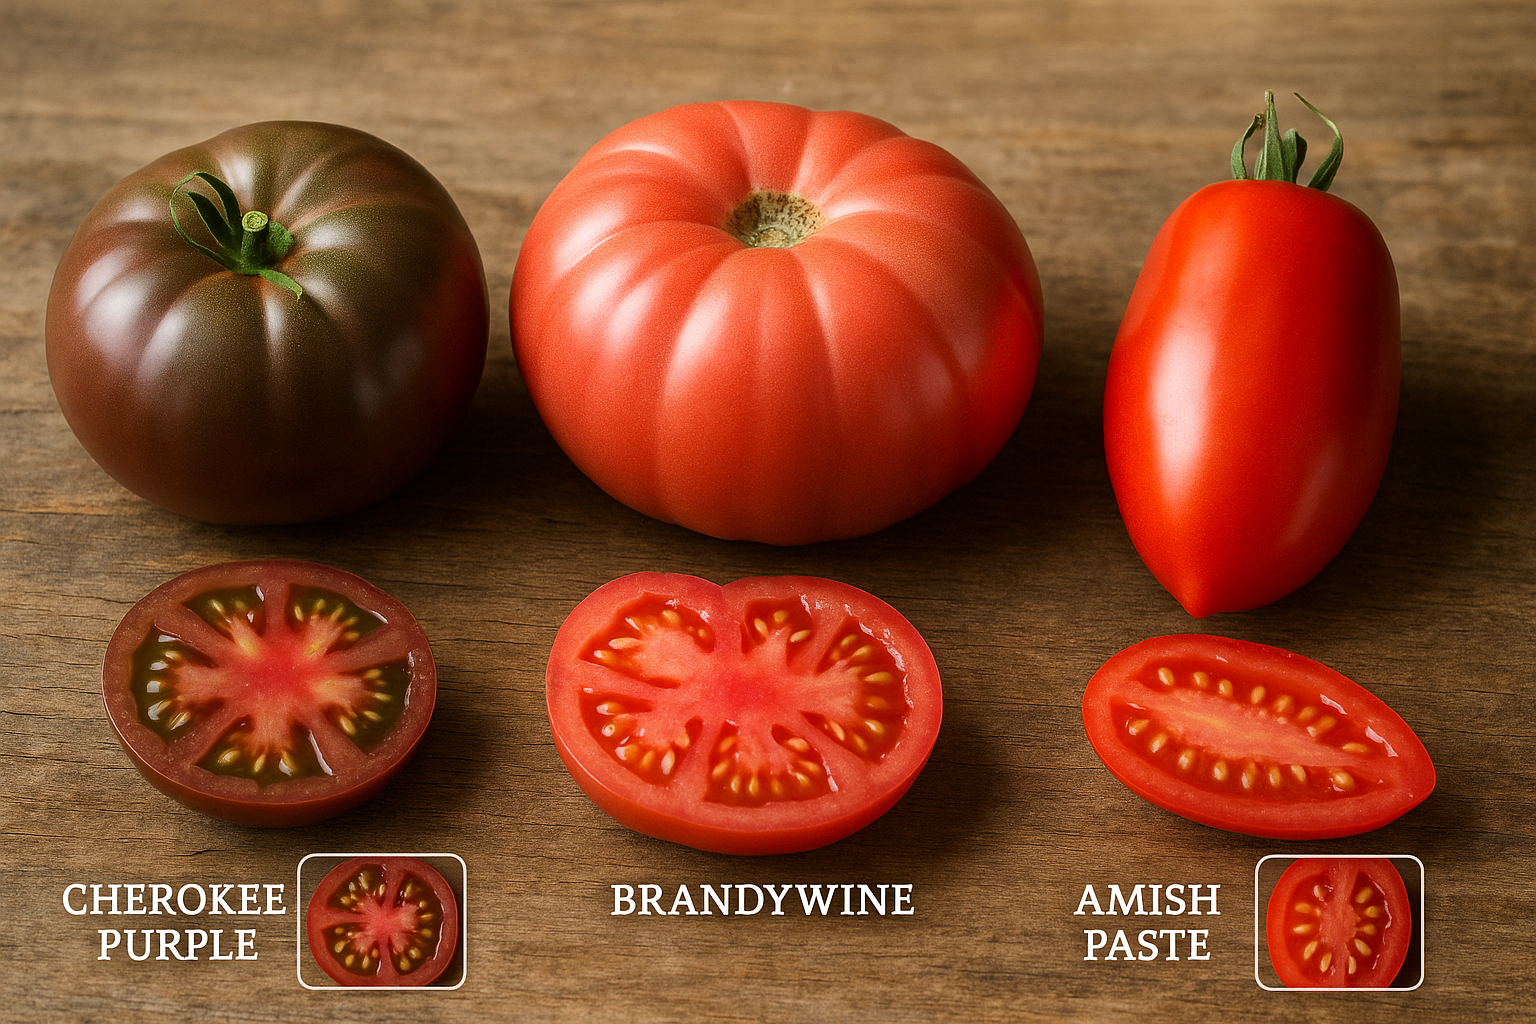
That Cherokee Purple you’re growing might trace its lineage back to Native American gardens from over a century ago.
The Brandywine might have been passed down through Amish communities since the 1880s.
Each time you save seeds, you’re ensuring these genetic treasures continue for future generations.
I still grow ‘Grandpa’s Italian’ tomatoes, passed to me by an elderly neighbor whose grandfather brought the seeds from Sicily in 1910.
Every time I taste one, I’m experiencing the same flavors enjoyed by generations before me—a living connection to the past.
Understanding Tomato Seed Biology
Tomato Reproduction Basics
Tomatoes (Solanum lycopersicum) are primarily self-pollinating plants, which makes them excellent candidates for seed saving.
Each tomato flower contains both male and female reproductive parts—stamens (male) that produce pollen and a pistil (female) that receives it.
When a tomato flower opens, the pollen from the stamens typically falls directly onto the stigma of the same flower, fertilizing it without needing external pollinators.
This self-pollination mechanism means that most tomato varieties will produce fruits that “breed true”—the offspring will display characteristics very similar to the parent plant.
However, cross-pollination can occur when insects carry pollen between different tomato varieties growing nearby.
While less common than in crops like squash or corn, this cross-pollination can result in seeds that produce plants with unexpected characteristics.
Open-Pollinated vs. Hybrid Tomatoes
When saving seeds, understanding the difference between open-pollinated and hybrid varieties is crucial:
Open-Pollinated (OP) Varieties:
- Seeds produce plants identical or very similar to the parent
- Include heirloom varieties (open-pollinated varieties with a history of being passed down)
- Perfect for seed saving
- Examples: Brandywine, Cherokee Purple, San Marzano, Black Krim
Hybrid (F1) Varieties:
- Created by deliberately crossing two different parent varieties
- Seeds will not produce plants identical to the parent
- Offspring may show unpredictable characteristics
- Often labeled with “F1” on seed packets
- Examples: Big Boy, Early Girl, Better Boy, Celebrity
Seed Saving Tip: Always save seeds from open-pollinated or heirloom varieties if you want predictable results. Seeds from hybrids will grow, but the resulting plants may not resemble the parent plant in appearance, flavor, or productivity.
The Gel Sac Mystery Solved
If you’ve ever cut open a tomato, you’ve noticed the gelatinous substance surrounding each seed.
This isn’t just packing material—it serves important biological functions:
- Germination inhibitor: The gel contains chemicals that prevent seeds from germinating while still inside the fruit
- Protective coating: Shields the seed from certain pathogens
- Dispersal mechanism: In nature, helps seeds spread when animals consume the fruit
For successful seed saving, we need to remove this gel sac.
In nature, this happens when the fruit drops, rots, and the gel ferments away.
In our seed-saving process, we’ll mimic this natural fermentation process to clean our seeds properly.
Selecting the Right Tomatoes for Seed Saving
Choosing the Best Varieties
Not all tomato varieties are created equal when it comes to seed saving.
Here’s what to consider:
Best for Beginners:
- Cherry tomatoes (Super Sweet 100, Black Cherry)
- Roma/paste tomatoes (San Marzano, Amish Paste)
- Medium-sized slicers (Rutgers, Stupice)
Intermediate Level:
- Large beefsteak types (Brandywine, Cherokee Purple)
- Unusual colors/patterns (Green Zebra, Pineapple)
Advanced:
- Very rare heirlooms
- Varieties with specific disease resistance
I began my seed-saving journey with Amish Paste tomatoes because they’re prolific producers with thick flesh and relatively few seeds—making the process manageable for a beginner.
As I gained confidence, I expanded to more challenging varieties like the giant Mortgage Lifter beefsteaks.
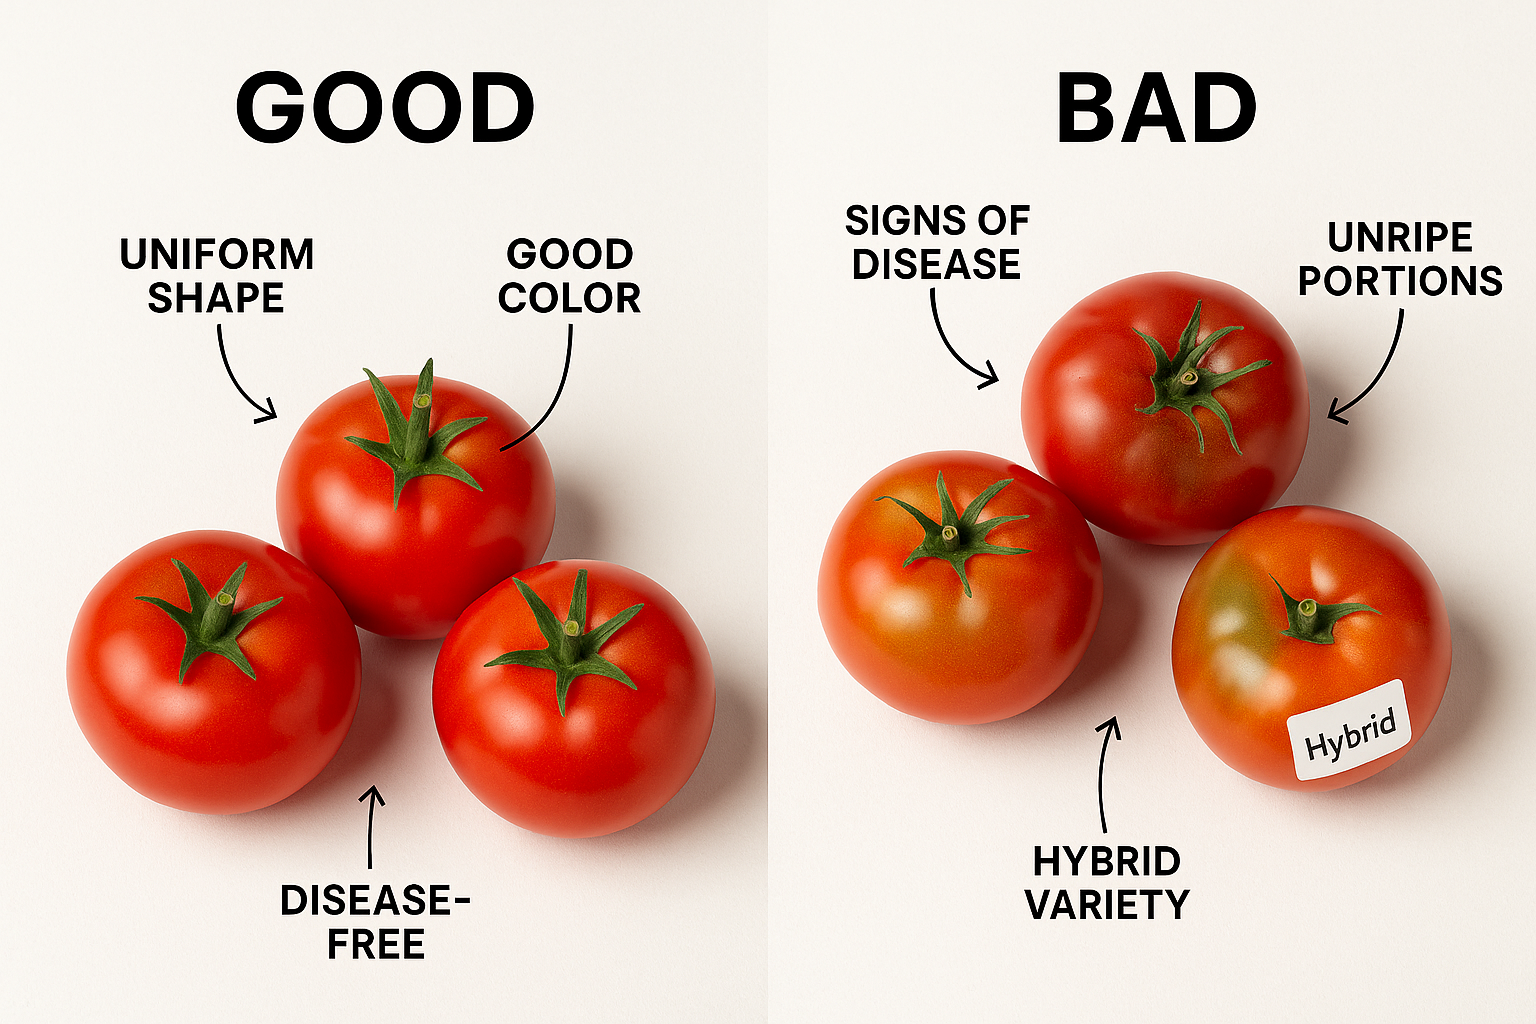
Identifying Prime Candidates
The tomatoes you select for seed saving should be:
✅ Fully ripe (even slightly overripe is fine)
✅ Disease-free with no signs of blight, rot, or insect damage
✅ True to type – displaying all the characteristics typical of that variety
✅ From healthy, productive plants with desirable traits
✅ From the middle of the growing season (not the first or last fruits)
I always tag my best-performing plants early in the season with brightly colored garden twine.
This helps me remember which specific plants showed exceptional vigor, disease resistance, or flavor—ensuring I’m selecting seeds from the most robust genetic stock in my garden.
Avoiding Cross-Pollination
While tomatoes are largely self-pollinating, cross-pollination can occur, especially in gardens with many varieties grown close together.
To minimize this risk:
- Plant varieties at least 10-20 feet apart if possible
- Consider physical barriers like row covers during flowering for prized varieties
- Plant tall crops between different tomato varieties to reduce insect travel between them
- Focus on one variety per area of your garden
For absolute certainty with rare or special varieties, you can employ a technique called “bagging.”
Before flowers open, place small mesh or paper bags over individual flower clusters and gently shake them daily to encourage self-pollination.
Remove bags once fruits begin to form.
Essential Equipment for Tomato Seed Saving
Basic Tools You’ll Need
Saving tomato seeds doesn’t require expensive equipment. Here’s what you’ll need to get started:
Must-Have Items:
- Clean glass jars or small containers (8 oz mason jars work perfectly)
- Spoon for scooping seeds
- Sharp knife
- Labels or masking tape and permanent marker
- Fine mesh strainer or sieve
- Paper plates, coffee filters, or paper towels for drying
- Small paper envelopes or airtight containers for storage
Nice-to-Have Items:
- Cheesecloth
- Small plastic or wooden labels for the fermentation jars
- Dedicated seed-saving notebook
- Small digital scale (for serious seed savers)
- Silica gel packets for storage
Last year, I expanded my seed-saving operation to include 12 varieties.
To keep everything organized, I invested in a specialized seed-saving journal where I record not just varieties, but also germination rates, plant performance, and tasting notes.
This has become an invaluable resource for planning future gardens.
Setting Up Your Workspace
Creating a dedicated seed-saving workspace will make the process more enjoyable and efficient:
- Choose a location that won’t be disturbed for 3-5 days (the fermentation period)
- Consider ventilation – fermenting seeds have a distinctive (and not entirely pleasant) odor
- Work on a washable surface – seed gel can stain some materials
- Have good lighting to easily see the seeds
- Keep pets and children away from the fermentation area
I’ve designated a corner of my garage workbench as my “seed-saving station.”
It’s away from direct sunlight, has good airflow, and can be easily cleaned.
I cover it with an old plastic tablecloth during seed-saving season to protect the surface.
Organizational Systems
When you’re saving seeds from multiple varieties, organization becomes crucial:
Simple Labeling System:
- Use waterproof labels on fermentation jars
- Include variety name and date started
- Consider color-coding for different types (cherry, paste, beefsteak, etc.)
Record-Keeping:
- Document parent plant characteristics
- Note weather conditions during growing season
- Record any unusual observations about the fruits
Storage Organization:
- Group seeds by variety type
- Store alphabetically or by planting date
- Consider using photo storage boxes with dividers
Tip: Take photos of each tomato variety before processing the seeds. Include a ruler in the photo for size reference and a label with the variety name. This visual record is invaluable when planning next year’s garden.
Step-by-Step Seed Saving Process
Harvesting Tomatoes for Seeds
The seed-saving process begins with selecting and harvesting the right tomatoes:
- Choose tomatoes at peak ripeness or slightly overripe
- Harvest in dry conditions when possible
- Handle gently to avoid damaging the fruit
- Process promptly or store in a cool place until ready
When I’m specifically harvesting for seeds, I dedicate a special harvest basket just for seed-saving candidates.
This prevents mixing up my eating tomatoes with my seed-saving selections.
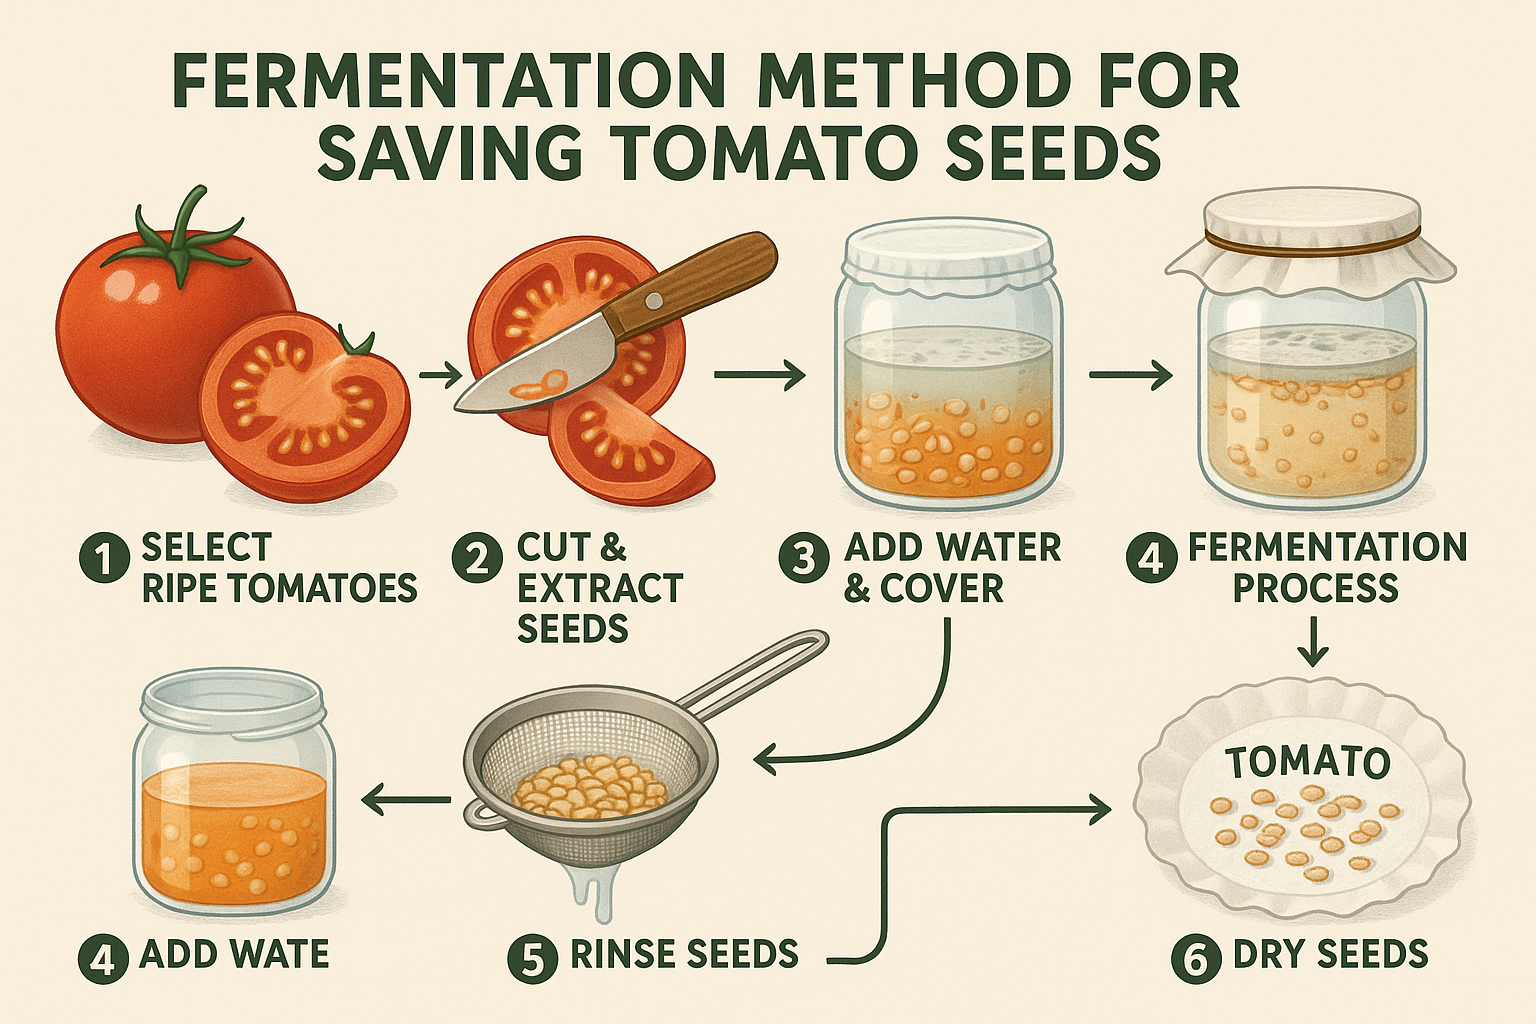
Extracting Seeds: The Fermentation Method
The fermentation method is the gold standard for tomato seed saving.
It mimics nature’s process and helps remove disease pathogens while breaking down the gel sac around each seed.
Step 1: Prepare the Tomato
- Wash the tomato and your hands thoroughly
- Cut the tomato in half along its equator (not through the stem end)
- Gently squeeze or scoop the seeds and gel into a clean glass jar
- Add approximately equal amount of water to the seeds and gel
Step 2: Fermentation Process
- Label the jar with variety name and date
- Cover with cheesecloth or paper towel secured with a rubber band (allows air in but keeps insects out)
- Place in a warm location (70-80°F/21-27°C) out of direct sunlight
- Stir once daily with a clean spoon
- Watch for development of white mold on the surface (this is normal and expected!)
- Continue fermentation for 2-5 days until:
- A white mold layer forms on top
- Seeds separate from the gel and sink to the bottom
- The mixture gives off a sour, fermented smell
Step 3: Cleaning the Seeds
- Add more water to the jar and stir vigorously
- Wait 30 seconds – good seeds will sink, while pulp and bad seeds float
- Carefully pour off the floating material, keeping the sunken seeds
- Repeat this rinsing process 3-4 times until water is clear
- Pour the clean seeds into a fine mesh strainer
- Rinse under running water while gently rubbing seeds against the strainer
The first time I tried fermentation, I was convinced I’d ruined my seeds when I saw the mold developing.
I almost threw the whole batch away!
Thankfully, I did some research and learned this was exactly what should happen.
The fermentation process ended up producing the most viable seeds I’ve ever saved.
Alternative Method: Direct Extraction
While fermentation is preferred, there is a quicker alternative method:
- Cut tomato and squeeze seeds/gel into a fine mesh strainer
- Run under cool water while gently rubbing seeds against the mesh
- Continue rinsing until most gel is removed
- Proceed to drying
This method works in a pinch but doesn’t remove all the germination inhibitors or potential pathogens.
I only use this method when I’m in a hurry or for small batches of common varieties.
Drying Seeds Properly
Proper drying is critical for seed longevity:
-
Spread cleaned seeds in a single layer on:
- Coffee filters
- Paper plates
- Paper towels
- Window screens
-
Place in a warm, dry location with good air circulation
-
Keep away from direct sunlight
-
Stir or separate seeds daily to prevent clumping
-
Allow to dry for 5-7 days until completely dry (seeds should snap, not bend)
I’ve found that coffee filters make excellent drying surfaces because the seeds don’t stick as they dry.
I write the variety name directly on the filter with a permanent marker, eliminating any chance of mix-ups.
Testing Seed Dryness
How do you know when seeds are dry enough? Try these tests:
- Snap Test: Properly dried seeds should snap cleanly when bent, not bend
- Fingernail Test: Press your fingernail into a seed—it should be too hard to leave an impression
- Container Test: Place seeds in an airtight container with a silica gel packet for 24 hours. If condensation appears, they need more drying time
Storing Your Saved Seeds
Optimal Storage Containers
The right storage containers make a significant difference in seed longevity:
Best Options:
- Paper seed envelopes (allows air exchange)
- Small glass jars with tight-fitting lids
- Vacuum-sealed bags (for long-term storage)
- Coin envelopes or glassine envelopes
Avoid:
- Plastic bags (can trap moisture)
- Containers that aren’t airtight
- Materials that can degrade or be eaten by pests
I use a combination approach: first storing seeds in small paper envelopes with variety information, then placing these envelopes in airtight glass jars with silica gel packets for moisture control.
Creating Proper Storage Conditions
Tomato seeds can remain viable for 4-10 years when stored correctly. The ideal conditions are:
- Cool temperatures: 32-41°F (0-5°C) is ideal
- Low humidity: Below 40% relative humidity
- Dark environment: Light can reduce viability
- Consistent conditions: Avoid temperature fluctuations
The refrigerator meets many of these requirements, making it an excellent storage location.
Just ensure seeds are completely dry before refrigerating to prevent condensation.
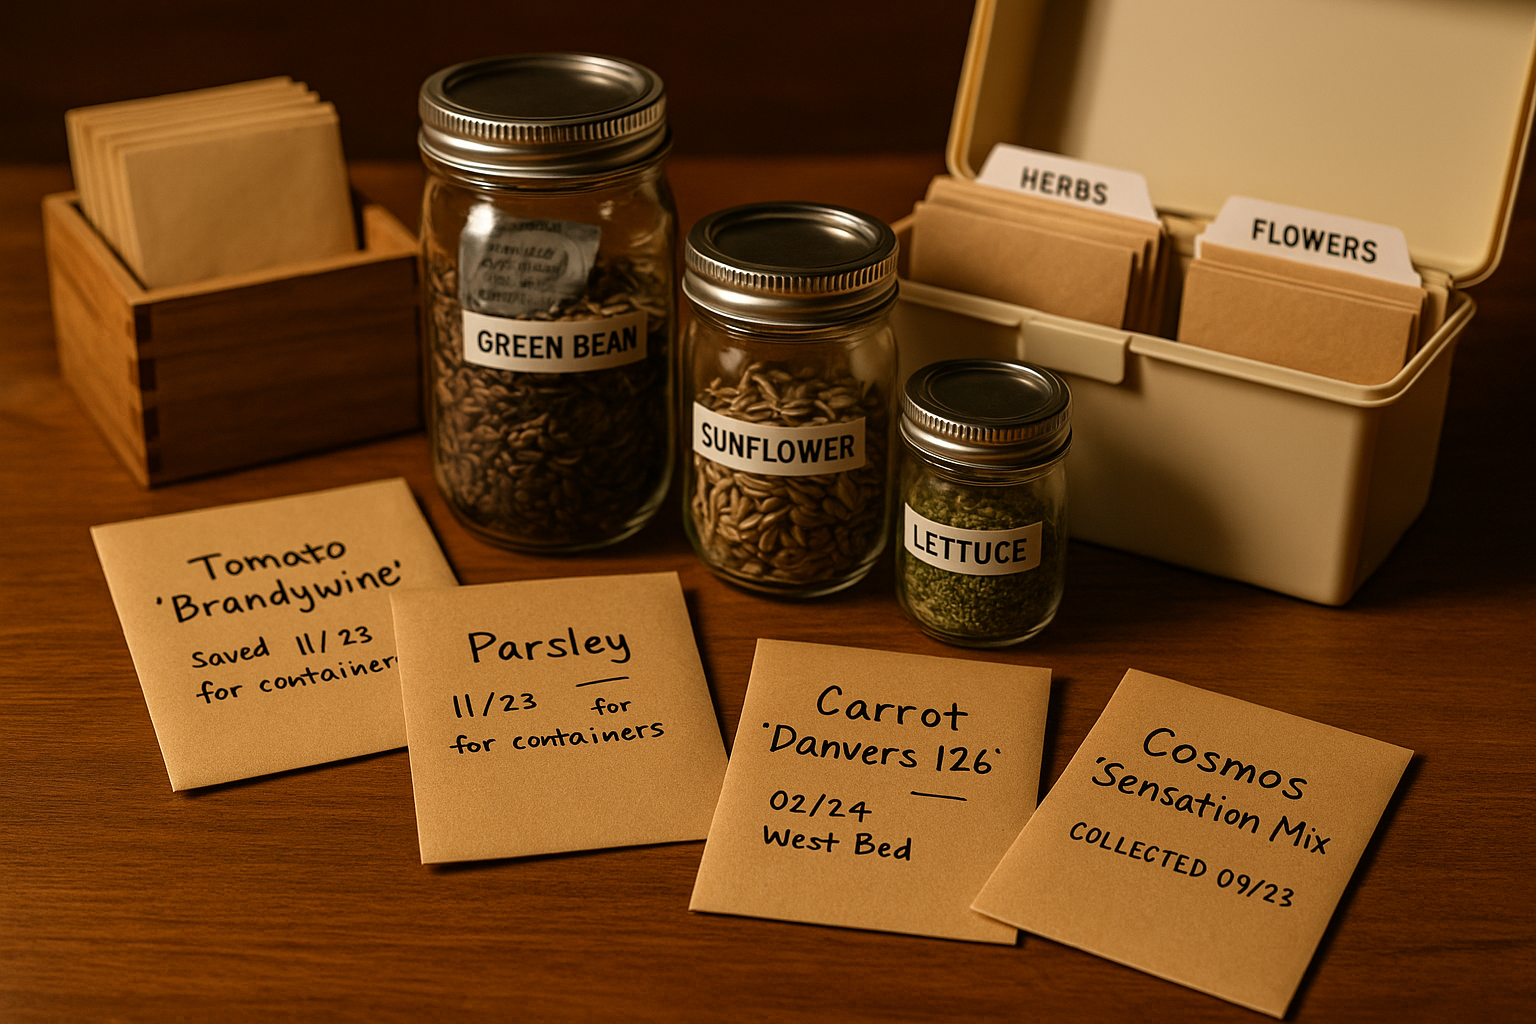
Labeling Systems That Work
Comprehensive labeling prevents future confusion:
Essential Information:
- Variety name
- Date collected
- Source (your garden, friend, seed exchange)
Helpful Additional Information:
- Days to maturity
- Plant characteristics
- Flavor notes
- Special growing requirements
- Germination test results
I’ve developed a color-coding system for my seed envelopes: yellow for cherry tomatoes, red for slicing varieties, orange for paste types, and purple for unusual or experimental varieties.
This visual system helps me quickly find what I’m looking for when planning my garden.
Organizing Your Seed Collection
As your seed collection grows, organization becomes increasingly important:
- Alphabetical system: Simple and effective for finding specific varieties
- Type-based system: Group by cherry, paste, beefsteak, etc.
- Color-based system: Organize by fruit color
- Planting date system: Arrange by when they should be started
I use photo storage boxes with divider cards to keep my seed collection organized.
Each box holds about 100 seed packets, and I can easily pull out an entire category when planning my garden.
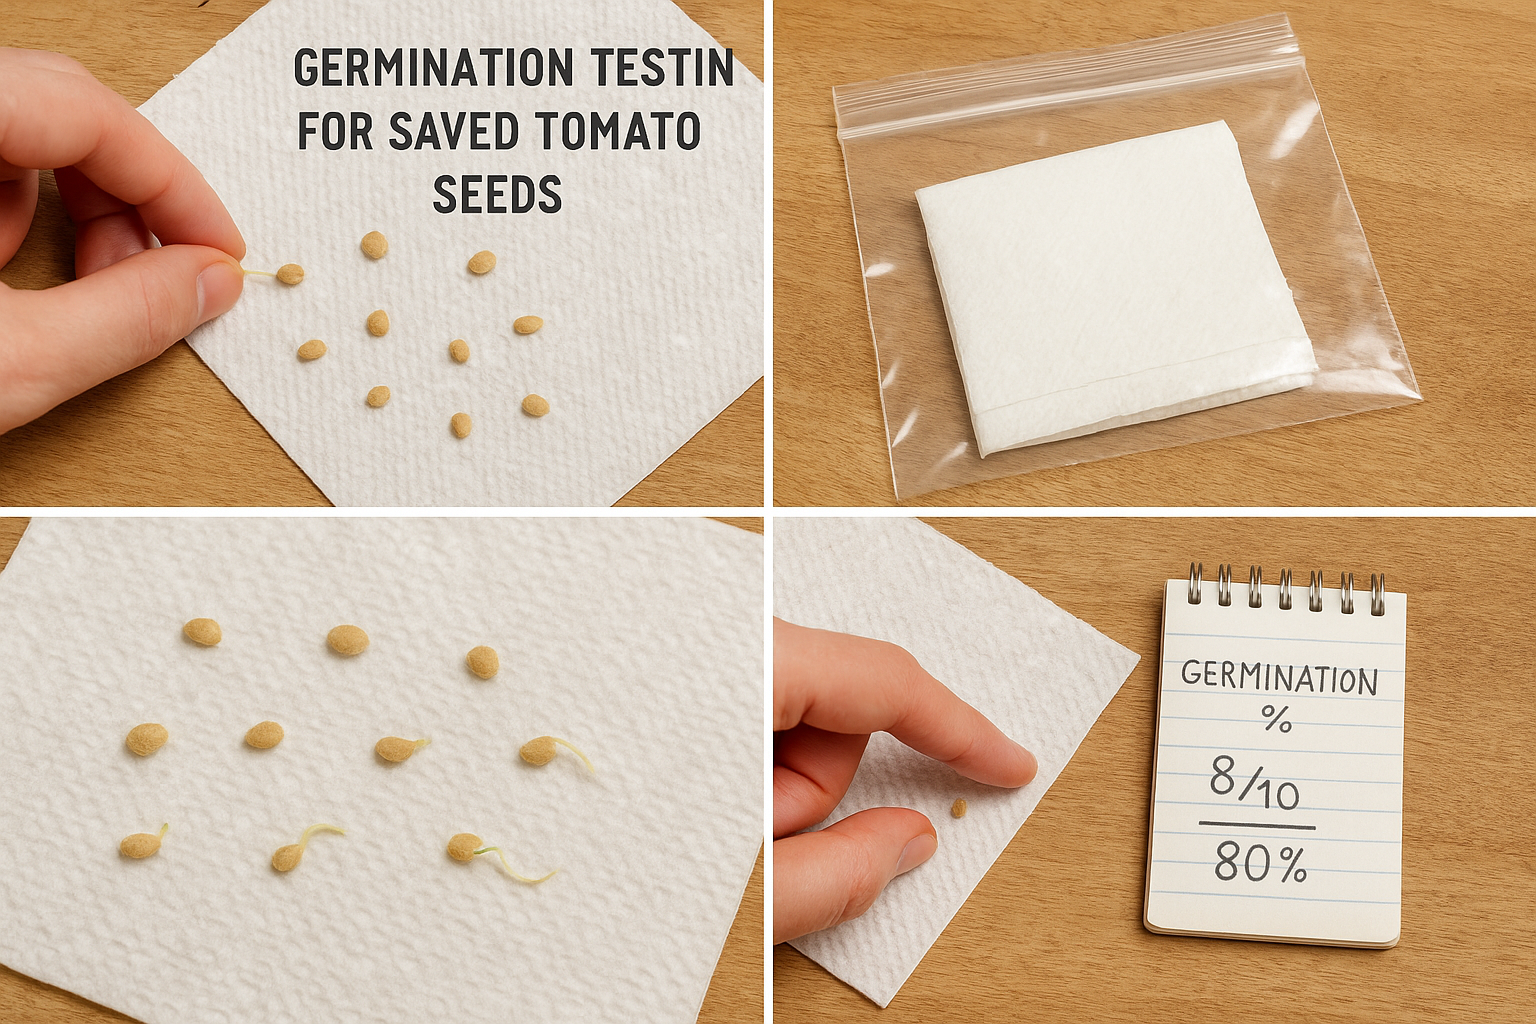
Testing Seed Viability
Simple Germination Tests
Before planting season, it’s wise to test the viability of your saved seeds, especially older ones:
Paper Towel Method:
- Moisten a paper towel until damp but not dripping
- Place 10 seeds spaced apart on half the towel
- Fold the other half over the seeds
- Place in a plastic bag or container
- Keep in a warm location (70-75°F/21-24°C)
- Check daily, keeping the paper towel moist
- Count germinated seeds after 7-10 days
- Calculate germination percentage (e.g., 8 of 10 = 80% viability)
Soil Test:
- Fill a small container with seed-starting mix
- Plant 10 seeds at recommended depth
- Keep soil moist and warm
- Count seedlings that emerge
- Calculate germination percentage
Last winter, I tested seeds from my first-ever seed saving attempt (5 years old).
I was surprised to find they still had a 65% germination rate—lower than fresh seeds but still perfectly usable by planting them a bit more densely.
Interpreting Germination Results
Here’s how to use your germination test results:
| Germination Rate | Interpretation | Action |
|---|---|---|
| 80-100% | Excellent | Use normal seeding rate |
| 60-79% | Good | Increase seeding rate by 25% |
| 40-59% | Fair | Double seeding rate |
| Below 40% | Poor | Consider replacing seeds or tripling seeding rate |
Rejuvenating Older Seeds
If your germination test shows declining viability, try these techniques to improve germination:
- Pre-soaking: Soak seeds in room temperature water for 12-24 hours before planting
- Gibberellic acid: A plant hormone that can break dormancy (available at garden centers)
- Scarification: Lightly sanding the seed coat to allow water penetration
- Stratification: Exposing seeds to cold, moist conditions before planting
Common Challenges and Solutions
Preventing Seed-Borne Diseases
Tomato seeds can carry diseases from one generation to the next.
Here’s how to minimize this risk:
- Only save seeds from healthy plants showing no disease symptoms
- Use the fermentation method – it kills many seed-borne pathogens
- Consider hot water treatment for high-value seeds:
- Soak seeds in 122°F (50°C) water for 25 minutes
- Immediately cool in cold water
- Dry thoroughly
Dealing with Cross-Pollination
If you suspect cross-pollination has occurred:
- Grow out suspicious seeds in a small test plot
- Observe plants carefully for unexpected characteristics
- Save seeds only from plants that display true-to-type traits
- Consider isolation methods for future seed saving
One year, I noticed unusual variations in my supposedly pure Brandywine tomatoes.
Some fruits were more elongated than the typical flattened shape.
I realized they had cross-pollinated with nearby San Marzano plants.
I now grow these varieties at opposite ends of my garden.
Troubleshooting Germination Problems
If your saved seeds aren’t germinating well:
Problem: Seeds rot before germinating
- Solution: Ensure seeds were completely dry before storage; check soil moisture levels
Problem: Seeds germinate but seedlings die quickly
- Solution: This may indicate seed-borne disease; try hot water treatment for future batches
Problem: Low germination rates
- Solution: Check storage conditions; seeds may have been exposed to heat, humidity, or light
Problem: Germination starts but stops midway
- Solution: Temperature fluctuations may be the cause; maintain consistent warmth
Advanced Seed Saving Techniques
Isolation Distances for Pure Seeds
For gardeners serious about maintaining pure seed strains:
| Tomato Type | Recommended Isolation Distance |
|---|---|
| Standard varieties | 10-50 feet |
| Potato leaf varieties | 20-50 feet |
| Currant tomatoes (S. pimpinellifolium) | 150+ feet |
| Wild species | 500+ feet |
These distances can be reduced by using physical barriers like row covers or by hand-pollinating and tagging flowers.
Hand Pollination Methods
For guaranteed pure seeds:
- Identify flower clusters before they open
- Cover with small mesh bags or create “cages” with fine mesh
- Once flowers open, gently shake the plant daily to distribute pollen
- Tag the protected flowers with colored twine or plant markers
- Harvest seeds only from tagged fruits
Seed Cleaning Equipment for Larger Batches
For processing larger quantities:
- Seed screens in various mesh sizes for separating seeds from pulp
- Seed winnowing tools to separate chaff from seeds
- Specialized drying racks with fine mesh
- Seed cleaning machines for serious seed savers
Record-Keeping for Seed Savers
Detailed records enhance your seed-saving success:
Basic Log Information:
- Variety name
- Source
- Date planted
- Date harvested
- Yield
- Weather conditions
Advanced Tracking:
- Disease resistance observations
- Flavor profiles
- Productivity measurements
- Adaptability to weather extremes
- Comparisons between varieties
I maintain a dedicated seed-saving journal with a section for each variety.
I include photos, growth observations, and even pressing a leaf from exceptional plants.
This documentation has become an invaluable reference that improves my gardening year after year.
The Cultural and Historical Significance of Seed Saving
Seed Saving Throughout History
Seed saving is as old as agriculture itself.
For thousands of years, farmers selected and saved the best seeds from their crops, gradually improving varieties through this selection process.
This practice:
- Created regionally adapted varieties
- Developed disease resistance
- Improved flavor and productivity
- Ensured food security through difficult times
Native American communities developed numerous tomato varieties adapted to specific growing regions long before European contact.
The Zapotec Pleated tomato from Oaxaca, Mexico, for example, has been grown and seed-saved for centuries, resulting in a variety perfectly suited to its native region.
Seed Libraries and Exchanges
Modern seed savers can participate in community seed-sharing through:
Seed Libraries:
- Community-based collections where seeds can be “borrowed” and “returned”
- Often housed in public libraries or community centers
- Focus on preserving local varieties
- Provide education on seed saving
Seed Exchanges:
- Events where gardeners trade seeds
- Online forums facilitating seed swaps
- Organizations like Seed Savers Exchange connecting seed savers nationally
Seed Banks:
- Formal institutions preserving genetic diversity
- Focus on conservation of heirloom and endangered varieties
- Some allow public access to rare seeds
I’ve been participating in my local seed library for three years.
Last season, I contributed seeds from five tomato varieties and “borrowed” seeds for three varieties I’d never grown before.
This community exchange has introduced me to tomatoes I would never have discovered otherwise, including a delicious yellow pear tomato that’s now a garden staple.
The Seed Sovereignty Movement
Seed saving has taken on new importance in recent years as concerns about:
- Corporate control of seed supplies
- Loss of genetic diversity
- Patenting of plant genetics
- Climate change resilience
These issues have fueled a growing “seed sovereignty” movement emphasizing the right of gardeners and farmers to save and exchange seeds freely.
By saving tomato seeds, you’re participating in this important cultural and environmental movement.
Planning for Next Season
Selecting Varieties for Your Climate
Use your seed-saving experience to select varieties that perform well in your specific conditions:
For Hot Climates:
- Heat-tolerant varieties like Solar Fire, Heatwave II
- Varieties with good sun-scald resistance
- Early producers that set fruit before peak heat
For Short Seasons:
- Early maturing varieties (under 70 days)
- Cold-tolerant types like Stupice, Glacier
- Determinate varieties that produce all at once
For Humid Areas:
- Disease-resistant varieties
- Smaller-fruited types that resist cracking
- Open plant habits that allow good air circulation
I garden in zone 5b with hot summers and a medium-length growing season.
Through seed saving, I’ve developed a collection of varieties that consistently perform well in these conditions, gradually eliminating those that struggle in my climate.
Rotating Crops for Seed Saving
To maintain healthy plants for seed saving:
- Practice crop rotation – don’t grow tomatoes in the same spot year after year
- Consider companion planting to reduce pest pressure
- Plan isolation distances in advance if saving seeds from multiple varieties
- Dedicate specific areas to seed saving versus production
Building a Sustainable Seed Collection
A well-planned seed collection should include:
- Core varieties – your reliable producers
- Experimental varieties – trying new types each year
- Insurance varieties – drought/disease resistant types for challenging years
- Specialty varieties – unique colors or flavors for interest
I maintain a “three-year rule” for my seed collection: any variety must prove itself over three growing seasons before earning a permanent place in my seed bank.
This ensures I’m only maintaining varieties that truly thrive in my conditions.
Sharing Your Seeds and Knowledge
Creating Seed Packets for Gifts
Homemade seed packets make meaningful, personal gifts:
- Design simple packets using paper envelopes or folded paper
- Include complete growing information:
- Variety name
- Days to maturity
- Planting depth and spacing
- Special care instructions
- Add personal touches like hand-drawn illustrations or photos
- Consider packaging sets of complementary varieties
Last Christmas, I created “Salsa Garden” seed collections with my saved tomato, pepper, and cilantro seeds.
These thoughtful, practically free gifts were a huge hit with my gardening friends and family.
Teaching Others to Save Seeds
Sharing knowledge extends the impact of your seed-saving practice:
- Offer to mentor beginning gardeners
- Host seed-saving workshops in your community
- Document your process through blogs or social media
- Volunteer with community gardens or school garden programs
Participating in Seed Preservation Projects
Connect with larger seed-saving initiatives:
- Join established organizations like Seed Savers Exchange or Native Seeds/SEARCH
- Participate in community seed banks
- Contribute to citizen science projects tracking heirloom varieties
- Focus on preserving rare or endangered varieties
Tomato Variety Spotlight for Seed Saving
Best Heirloom Varieties for Beginners
These varieties are excellent choices for new seed savers:
Amish Paste
- Medium-sized paste tomato
- Productive and disease-resistant
- Easy to process with moderate seed count
- Excellent flavor for sauces
Black Krim
- Medium-large slicer with distinctive flavor
- Reliable producer
- Distinctive dark color makes it easy to identify
- Seeds are easy to extract and process
Yellow Pear
- Prolific cherry type
- Extremely reliable producer
- Disease resistant
- Small fruits are easy to process in batches
Unique Varieties Worth Preserving
Consider these more unusual varieties for your seed-saving efforts:
Mortgage Lifter
- Historic variety with a fascinating origin story
- Huge beefsteak fruits
- Excellent flavor
- Becoming less common in commercial offerings
Green Zebra
- Distinctive green striped fruit
- Tangy, unique flavor
- Conversation starter in gardens
- Seeds contrast well with flesh, making extraction easy
Speckled Roman
- Beautiful red fruits with golden streaks
- Excellent paste tomato
- Relatively rare in commercial seed catalogs
- Worth preserving for both aesthetics and flavor
Varieties with Interesting Histories
These tomatoes come with stories worth preserving along with their seeds:
Radiator Charlie’s Mortgage Lifter
- Developed by M.C. Byles (Radiator Charlie) in the 1930s
- Created by crossing four large-fruited varieties
- Sold plants for $1 each (a significant sum during the Depression)
- Used the money to pay off his $6,000 mortgage in six years
Cherokee Purple
- Preserved by the Cherokee Nation for generations
- Introduced to the wider public in the early 1990s
- Distinctive dusky purple color
- Rich, complex flavor profile
Brandywine
- Passed down through the Amish community
- One of the oldest heirloom varieties still widely grown
- Multiple variations exist (pink, red, yellow, black)
- Often considered the standard for tomato flavor
Conclusion
Saving tomato seeds is more than just an economical gardening practice—it’s a connection to our agricultural heritage and a step toward a more sustainable future.
Through this simple process, you’re preserving genetic diversity, adapting plants to your specific growing conditions, and freeing yourself from dependence on commercial seed sources.
As you develop your seed-saving skills, you’ll likely find yourself becoming more observant and connected to your garden.
You’ll notice subtle differences between plants, develop preferences for specific traits, and perhaps even begin selecting for characteristics that work particularly well in your unique growing environment.
Remember that each seed you save carries within it thousands of years of agricultural history—the result of countless generations of careful selection by gardeners and farmers before you.
By continuing this tradition, you’re not just growing food; you’re participating in the ongoing story of human agriculture.
Start small, perhaps with just one or two favorite varieties, and expand your seed-saving repertoire as your confidence grows.
Before long, you may find yourself eagerly anticipating the end of the growing season not as a conclusion but as a beginning—the moment when you collect the promise of next year’s garden.
Next Steps for Your Seed-Saving Journey
- Select 1-3 open-pollinated tomato varieties to save seeds from this season
- Gather your basic supplies – jars, labels, and drying materials
- Join a seed-saving community online or locally to share experiences
- Start a seed-saving journal to track your results
- Consider expanding to other easy seed-saving crops like beans, peas, and lettuce
By saving your own tomato seeds, you’re not just growing tomatoes—you’re growing a more resilient, sustainable, and connected garden.
Here’s to your seed-saving success.